Desert Online General Trading LLC
Dubai, United Arab Emirates
Desert Online General Trading LLC
Dubai, United Arab Emirates


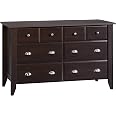
🛋️ Elevate your space with sleek storage that works as hard as you do
The Sauder Shoal Creek Dresser offers a modern, space-efficient storage solution with six smooth-glide drawers on metal runners, finished in rich Jamocha Wood with silver hardware. Its safety interlock system ensures only one drawer opens at a time, enhancing stability. Measuring 33 x 19 x 55 inches, it fits seamlessly into any room, doubles as a stylish display surface, and comes with easy assembly instructions plus a 5-year limited warranty for lasting reliability.


K**Y
Good quality for the price!
The low price was the main selling point for me because I needed a dresser and was not going to spend upwards of $500+ for a decent sized one.I was a bit hesitant to purchase this after reading the numerous reviews stating how incredibly difficult the dresser would be to assemble. I purchased it anyway because it looked sturdy and I figured I could get the job done.When the package arrived it was HEAVY. It was somewhat difficult for my boyfriend and I to carry from the garage into the house, but after that we opened the box and just took parts at a time upstairs to the room it would be staying in.All you need is a Phillips screwdriver and a hammer. If you have a power drill and know how to use it gently then go for it - but you’ll do fine without one. The instructions are clear and the parts are all labeled. The hardware is also clearly labeled in separate bag compartments.Will it take a few hours of your time? Yes. Do you need the ability to read and follow instructions? Yes. Will it be a torturous task, leaving you reconsidering your life decisions? No! Just bring a screwdriver, your brain, a dash of patience and a helper if you have one and you’ll be just fine. If you have to go it alone, you can still do it, I believe in you!The drawers may need some adjusting to get them all lined up right, but it’s easily done by turning the nifty adjustment screws (my boyfriend made it looked easy enough anyways- albeit he’s quite handy).At the end of it all, I now have a beautiful, sturdy, decently sized dresser that didn’t break the bank. The drawers glide smoothly and are spacious enough to hold the hoards of sweaters that I own. We also have our 47” tv on top with room to spare! Overall, very satisfied with this purchase.
N**L
Nice & sturdy. Easy, detailed instructions
Package arrived in perfect condition. No damaged boards or missing pieces. Regarding assembly, if you know how to read simple instructions, you can do this. There are a lot of steps though, so no skipping steps! There are even QR codes linked to video tutorials if visual/written instructions aren't your thing, although I dont know how good the videos are as I didn't use them. Many say they had a professional assemble it, and it failed them. I am NO professional. This was my 1st REALLY involved piece of furniture I've put together, and I did it alone within 2hrs while watching a movie. A lot of people are saying the drawers aren't aligned correctly. I found that there are "sides" (R/L) they are meant for. If it wasn't aligned, I tried the other side, and it lined up perfectly. Also, one must be meticulous with making sure the rails for the drawers are straight. It's on you to make sure the drawers close well. Luckily they're easily adjusted. Also, many are saying it's not sturdy. If you follow the instructions to a T, I don't see why it wouldn't be. I have well over 60lbs on top of it currently, and it's still very stable. Anyway, I hope my review helps someone! I am very happy with my dresser!
T**R
Be prepared for a lengthy build.
When this was delivered, both my husband and I were alarmed at the sheer weight of the box. I had read the reviews that said it was heavy but nothing prepared me for it.I enjoy challenges. I like putting furniture together and my husband loves that he doesn't have to do much other than help here or there. I put together our daughters crib and some toys but this project intimidated me. I took everything out of the box and organized it on the floor. There were no damaged pieces. Make sure you have plenty of room for working. I read the directions and made sure I had everything before I started. The directions are clear with great pictures and reference points (lamented side, side with hidden cams) so that mistakes are pretty hard to do if you are focused on the task. I appreciated that only 2 tools were needed. This took me roughly 4 hours by myself...but I took my time and only had to fix one mistake. My arm is pretty sore from all the screwdriver work but I'm very pleased with this dresser. We purchased it in white to match our daughters crib...it really is a beautiful, sturdy dresser. I took off one star just for the length of time it took to build and for the sharp corners at the top. I have no other complaints or issues and even the build time is now just a fading memory. The drawers slide beautifully. The drawer pulls are nice- modern and sleek. Big drawers that hold alot. I'm sure my daughter will use this dresser for a long time.Update October 1st 2015....We just moved & while the movers we hired were very good about carrying the dresser from the bottom, this dresser bowed badly in the center & the top pulled right off after adjusting it's position in the room. It's heavy throughout the drawers & sides but the top & back are cheap & flimsy. I'm not a happy customer. Way too much money for something that breaks after moving it once. I now have to buy a new dresser....this time I'll go with solid wood & much better quality.
Trustpilot
3 days ago
3 weeks ago
2 weeks ago
1 month ago