🚀 Upgrade Your Mac, Elevate Your Game!
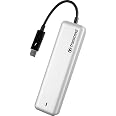
The Transcend 240GB JetDrive 855 SSD is a high-performance storage solution designed for MacBook Air and Pro models from 2013 to 2017. With lightning-fast read speeds of up to 1600 MB/s and write speeds of 1400 MB/s, this SSD enhances your device's performance while providing a sleek Thunderbolt enclosure and installation tools for easy setup. Compatible with macOS High Sierra and later, it’s the perfect upgrade for tech-savvy professionals looking to boost their productivity.
| RAM | 1 TB |
| Hard Drive | 240 GB External |
| Brand | Transcend |
| Series | JetDrive 855 |
| Item model number | TS240GJDM855 |
| Hardware Platform | Mac |
| Operating System | macOS 10.13 or later |
| Item Weight | 0.352 ounces |
| Product Dimensions | 4.72 x 1.24 x 0.71 inches |
| Item Dimensions LxWxH | 4.72 x 1.24 x 0.71 inches |
| Color | silver |
| Flash Memory Size | 240 GB |
| Hard Drive Interface | Thunderbolt |
| Manufacturer | Transcend Information |
| ASIN | B07DCFM37D |
| Country of Origin | Taiwan |
| Is Discontinued By Manufacturer | No |
| Date First Available | June 4, 2018 |
L**S
Easy to install and get working
This was easy to install and get working. - I have read a lot of these reviews on here, and I will be honest; You need to be somewhat technical to install this. - When replacing an SSD they don't just magically start working, they ship blank with no data.Both P5 and T5 screw drivers worked fine. I used the P5 to open my MBAir (First time since it left the Apple Factory four years a go!). Used the T5 to remove the screw on the SSD. Ever so slightly lift the SSD half an inch if that or else you will break the connector. Install new transcend drive. Screw new drive in. Screw base back on, done. Put old SSD inside transcend enclosure, use T5 to screw the drive and seal the enclosure. As far as the external is concentred, you can plug this in to another working Mac and view / copy any data you wish.Now you're new Transcend internal SSD. I have a MacBook Air Early 2014. Everyone saying, backup, clone, create bootable USB... The Mac has built in Web Recovery. CMD alt R. Power the Mac on holding these until you see the globe, let go. Once loaded. Go to utilities> disk utility. You will see the new Transcend drive. By default you will only see the volumes. Click on View>Show All Devices. Select the internal Transcend SSD (The device above the volume named "Transcend".) You will know if you have selected the volume instead of the root level of the SSD because you won't have the options I mention next. Select erase.Name: Whatever you like.Format: Up to you but MacOS Extended (Journaled) Mojave will change the volume to APFS anyway so no need to worry about that.Scheme: GUID (You have to set it to this or else anything like Mojave won't install).Click erase.Done.Now you can close disk utility and go back to the main menu of Web Recovery and select Reinstall MacOS. Just follow all on screen prompts and you will have a brand new machine set up within 30 minutes and your external that you can plug in and use.Cloning, restoring etc. Once you have done the above without "reinstall MacOS" there shouldn't run in to any problems.Having a new SSD you should preferably do clean installs and restore what is required. - You need to install 10.13 or newer.I will reply back here after time on performance, use, how long it lasts etc.
H**S
Easy to install physically but hard to get working
After much consideration, Looking at numerous websites and assessing the suitability of the various SSD options, I plumped for the Jetdrive 850. It arrived very promptly, and was very easy to physically install. However, as many of the other reviews have indicated, the problems start when you try and get the Mac to recognise the new SSD drive. the instructions that come with the drive are extremely basic, and really are no help at all. Even on the transcend website there is not much to help you load the new drive. The first thing that has to be done is that you must be running OS high Sierra for the Mac to recognise the new Drive. the Jetdrive 850 has to be formatted for the Mac. Once you have physically installed the drive, you have to restart the computer holding down the 'option' key. This will allow you to reboot from a Time Machine backup. In order to reformat the new SSD drive go into disk utilities and click on the 'view' menu and select 'show all devices'. Then select the Transcend Jetdrive. Select 'erase' and you get options of how you want it formatted. You can then select 'Mac OS extended (journaled)'. and select 'GUID' in the other option box. Then you erase the disc and it will reformat to suit the Time Machine backup or reinstalling from OS from the Internet. I did not need to use anything other than Time Machine, such as SuperDuper, or clone the system. It is just the hassle of getting the new disk formatted that is the problem.This worked for me on a 2015 MacBook Air and it seems to be working fine, giving me my MacBook Air a new lease of life. However if I had had to rely on the Transcend technical support I would still be waiting now. I contacted them on three occasions and no one ever got back to me. One tip that I did discover is that there is a telephone number for UK technical support at Transcend on (01442) 202880, so you could try that as a last resort if you're really having trouble.I would probably advise buying the Jetdrive 855 which comes with an enclosure, which allows the new disk to be formatted before removing the existing drive, and of course allows for the old drive to be used as an additional external drive once the new one is in place.
Trustpilot
3 weeks ago
1 day ago