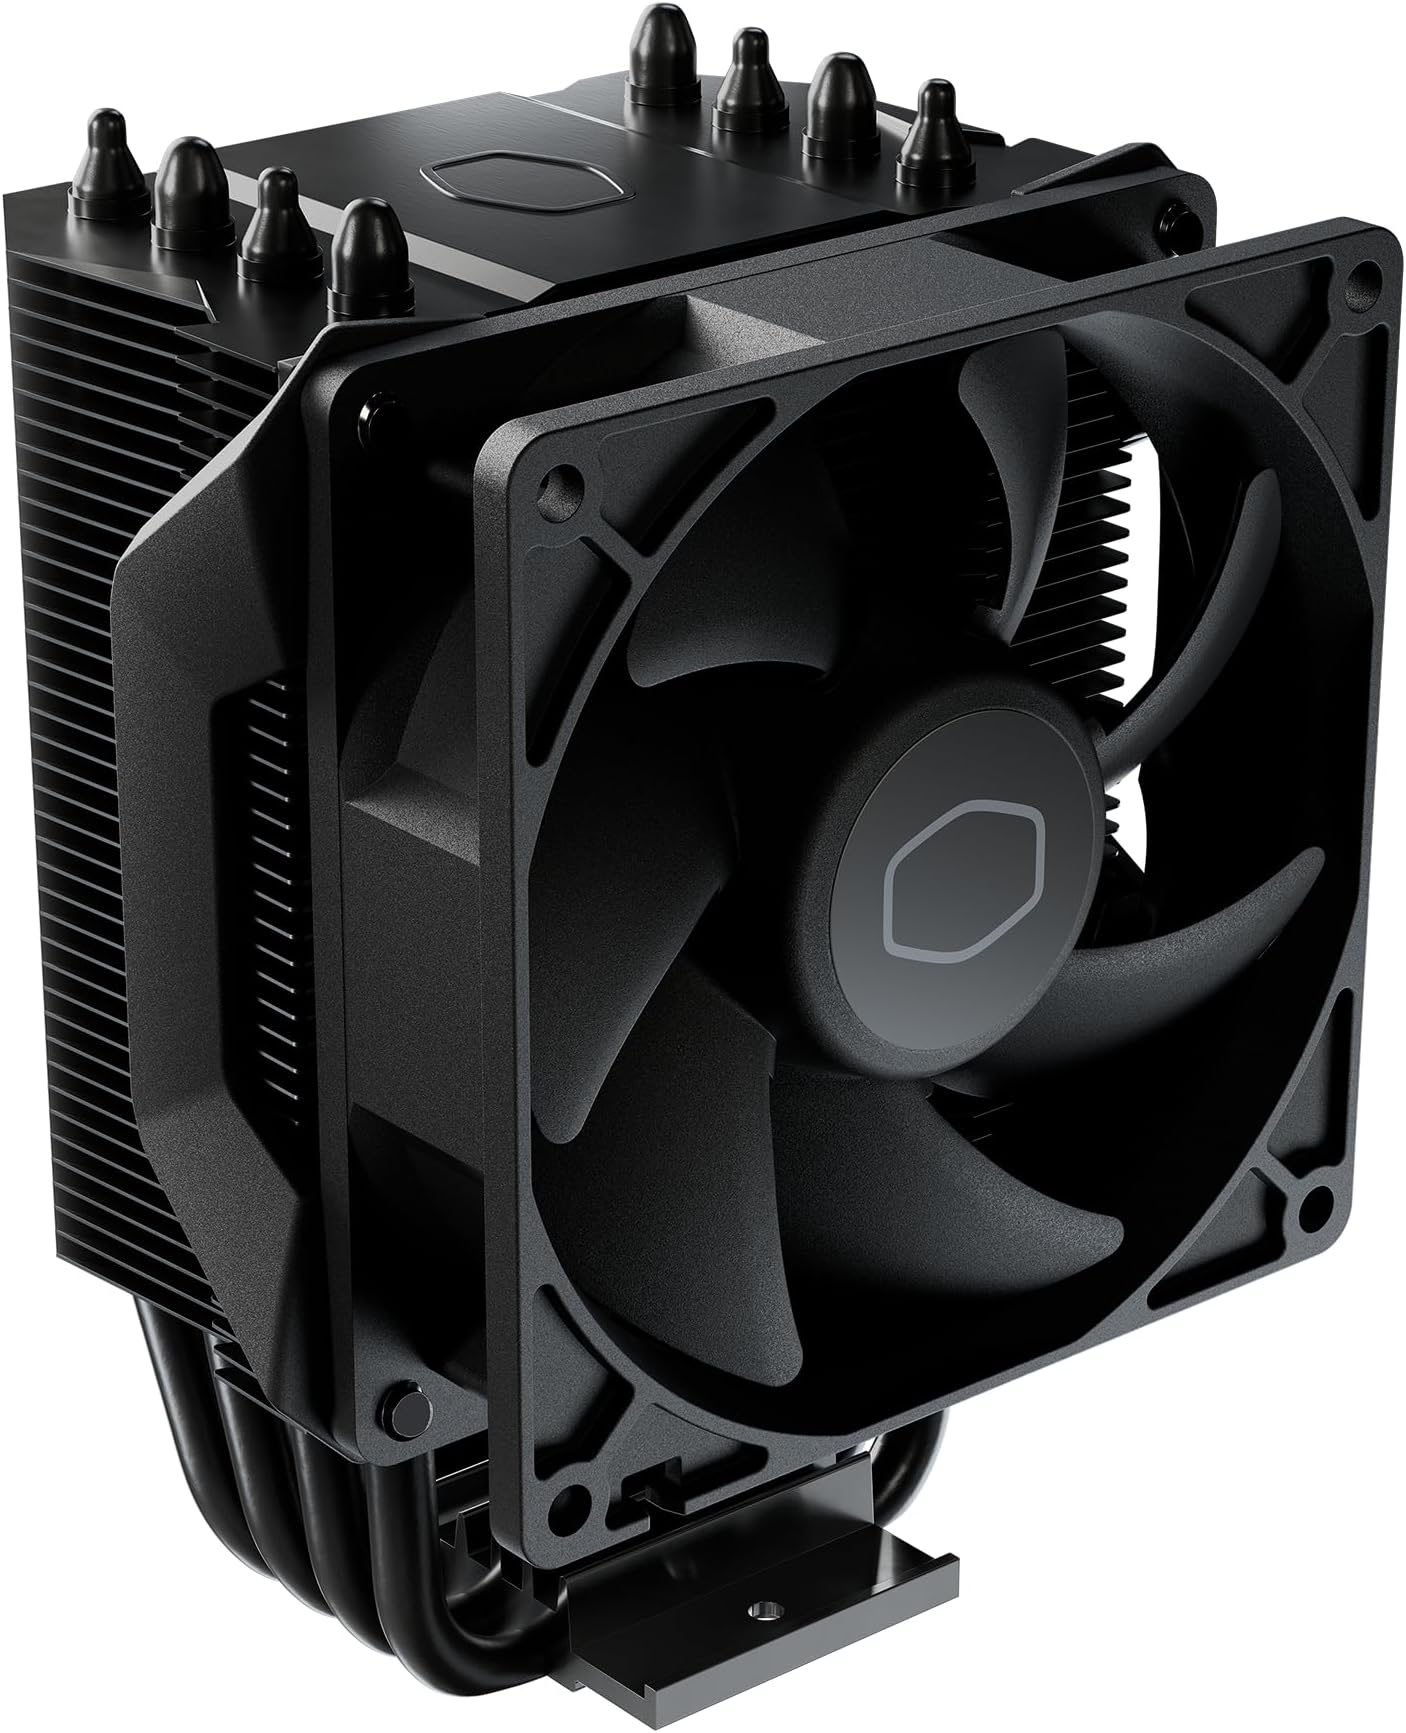


❄️ Stay cool, stay ahead — the Hyper 411 Nano means business.
The Cooler Master Hyper 411 Nano is a compact, high-performance CPU air cooler featuring four copper heat pipes and a SickleFlow 92 PWM fan with adjustable speeds from 650 to 2,500 RPM. Designed for easy installation on AMD Ryzen AM5/AM4 and Intel LGA 1851/1700 sockets, its sleek black design and 136mm height ensure compatibility with most chassis while delivering efficient, whisper-quiet cooling for mid-range processors.
M**E
Gets the job done
Cooler Master Hyper 411 Nano:Needed something that would fit into a smaller case and cool an AMD Ryzen 7 5700X better than the Wraith Stealth I was using.Decided to give this cooler a try and after a very easy, straightforward installation I started is up. The heat sink worked better than I expected as it kept the CPU at 38C or under while at idle with the fan at 1200 RPM. Under load it rose to 58C and stayed there with the fan at about 2000 RPM.Decided to test it out with the PBO set on and at maximum load it went to 79C with the fan maxed out at 2500 RPM. At the setting I used the CPU was drawing in excess of 110 Watts and this is out of the range of my intended use. I specifically looked for a CPU that used less power and thus created less heat. But just for testing purposes the Hyper 411 Nano was able to keep the CPU within safe thermal limits.As it is, the heat sink worked better than AMD wraith by about 10C and is significantly quieter.Recommended for small form factor setups with lower power consumption.
T**E
212 EVO--Great, 101--Don't bother.
The stock fan with my 4770 didn't look like the greatest piece of work, so I decided to "upgrade" to an aftermarket unit. I started with the 101, and I can tell you, forget it. It performed so poorly my processor had to auto-underclock to keep within thermal limits. Unless you are running a low voltage model CPU, the 101 isn't going to cut it at all.On the plus side, it's light and relatively easy to install as you don't need to access the back of the motherboard. You can attach a second fan on the other side of the radiator using the included 80mm bracket, and I did when I installed it. Since I didn't test it without the second fan, I don't know how much difference it made.I suspect the biggest reason for this model's inadequacy is that the copper heat pipes only cover a fraction of the contact surface. The rest is aluminum, and doesn't appear to be particularly well-bonded to the copper. There are small, but potentially thermally-significant recesses in the surface where the heat pipes run along the aluminum base. I made sure to get some arctic silver in there to prevent an air gap. I don't know how successful I was.Anyway, the 101 is scrap. Maybe if I built a small form factor PC with a low voltage processor, but that's not likely...Big pass on this heat sink.Moving on to the 212 EVO--great. Temps were far below stock heat sink and it's much quieter than the stock was when it spooled up to hairdryer mode. This one has more heat pipes, and their copper makes up the whole base. The base is still not a solid block--the pipes have small recesses (similar to the 101) where they run alongside each other, but it performs well enough that I don't care. Just make sure to get some thermal compound in there. It will conduct heat much better than air in any case.Like the 101, you can add a second fan, using the included bracket, for a push-pull setup. This time the fan is 120mm, and again, I added it at install time. One caveat: the included fan seems to be molded to its bracket, so if the included fan breaks, you probably won't be replacing it without some jury-rigging.Now, on to the installation. This one was not as easy as the 101. You have to get behind the motherboard. My motherboard tray, unfortunately, didn't have a cutout under the CPU slot, so I had to take it out of the case completely. If I had installed the fan when I built the PC this wouldn't have been an issue, but since I didn't it was a hassle and presented another opportunity to ruin something with my shoddy mechanical work. In addition, the instructions are pictorial only and not the clearest ones I have seen, so make sure you understand before you start attaching stuff or you'll be un-attaching stuff later because things will be out of kilter. Of course this happened to me, and I about stripped out a screw. I'm lucky it went back together at all.Another thing to note is this thing is heavy. That's why it needed secured through the back of the motherboard. Add to this it's very tall so you have leverage putting further stress on the PCB. Time will tell if this will be a problem.Did I mention it's tall? The Coolermaster site has the exact specifications, so check them if you have a doubt about it fitting in your case. With the second fan attached, it's also pretty wide, and would block, or be practically flush with, the first memory slot. Since I was only using two sticks I could use the second channel slot further back, but it could be a problem if you wanted to use the first slot or your motherboard's memory slots start closer to the CPU socket.As far as the fan goes, it's described as a long-life sleeve bearing, which seems to be a oxymoron. Again time will tell. I set up both fans to run at constant full speed. They are still quiet, so no complaints there. The included fan is a four-pin, but the fourth pin doesn't matter to me since I'm running it at full speed. The tachy wire doesn't make a difference either, as my CPU fan always registers zero rpm. I don't know who's fault this is, fan, wire, or motherboard, but my old fan's RPM showed up, so I'm guessing something's wrong elsewhere.Last, but not least, price. This heatsink is very reasonably priced, or it was when I purchased it. Even if it doesn't work out for you, it's not a bank-breaker, so you won't feel too bad if you have to eat the loss. That's why I wasn't really mad about the 101--that one was cheap too. I just shouldn't have tried to get away with that one in the first place. It's specified dissipation didn't leave much breathing room for my CPU. Apparently the dissipation rating was revised (presumably downward) at some point, since I noticed different numbers on the website than on the box.In the end, I certainly recommend the 212 EVO. I'm not overclocking, but it more than handles stock speeds. My full-load temps went from about 67 on stock to around 50 on the EVO, which is well within my comfort zone. 67 is pushing it. I think Intel's specification lists 72 as the upper limit. Or maybe it's 70. I'm too tired to check. But 50 is great as far as I'm concerned.I would buy the 212 EVO again and rate it as excellent.
A**E
Great cooler.
Keeps things cool, very easy to replace fans on cooler with different fans. No vibration, keeps it cool, never got above 65 •cGood performance. Looks great, very good quality. Should last a long time.
A**R
Air Flow!! Awesome CPU Cooler!! LOVE IT’S Design!! ZERO RGB!!
Ever Since I saw this CPU Cooler!! I had to have it!! For a want vs a need!! I saved $100 too the side for when it first came available! I was on a AIO Water Cooler for 5 years time to replace it from Water Cooling since air is more reliable in the long run! This CPU Cooler is my favorite air cooler!! Wanted it ever since I saw it!! It does its Job excellent! I got 128 GB’s of DDR4 RAM, the clearance wasn’t an issue but you can take the fan off so it doesn’t interfere with the RAM! I got low profile RAM, I have Socket 1700 Intel 12th Gen i7 12th 700KF CPU and a 3060Ti ya ya people hate the 3060Ti I know, I love this Air Cooler so much for my Future builds I will Buy this Air Cooler all the time! Yes you might need to go into your Bios and then change the fan speeds to about 1900 RPM on some Systems, better to use Bios vs downloading something! It has Zero RGB!! Since I stare at my monitor than I do vs my PC!!
Trustpilot
2 months ago
2 weeks ago