


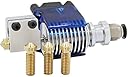
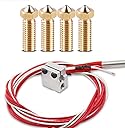

Kee Pang All-Metal J-Head V6 Hotend Kit with 5 Pcs Extruder Print Head and Nozzle Throat + Volcano Heating Block+ 4 Pcs Volcano Extruder Nozzles for 3D Printers
Product ID: 67799433
Review: V1 Volcano & V6 banger lil kit(12V, use original probes if needed 24V) - I mainly got this for the all metal heat break and the volcano end. Good news for me, all 3 included breaks were all metal. Upon closer inspection, one of them had a much better visual finish. Ran some steelwool and cotton twine with polishing compund through it b4 initial install. The other two have minor scuff marks on inside, might buff out, haven't needed them yet. Been printing with it for over a month and so far zero issues(hence why I haven't needed the other 2). No clogging for me, just make sure to tighten everything while HOT. And apply heatsink compound only between nozzle/block and heat break/heatsink. None between break and block. Basically you want heat escaping the block towards the nozzle not the heat break but the heat that does go up should escape the break through the heatsink as quick as possible. Hope that helps. I didn't use ANY other other hardware from the kit on my ender 3. Just heatsink, throat and block(worth the money). Ender probes just fit(at least in the volcano block they do, didn't use the shorty) and fans get adapted to whatever mount used. My setup went into a direct drive orientation(BMG/Volcano/pancake stepper from desertcart) and so so glad I did. Swapping fillament is a breeze now, print quality improved, stringing is all but gone, using much much lower hotend temp. (From MAX 260/270 on PETG to 230). I fitted a sock from B-GOOD(the V1 is needed for this kit) and it fits nice and snug. I priced out individual parts since i only needed so little from this kit, but even so this was a hard to beat value and everything just fit, I didn't have to worry about ordering incompatible parts. Review: Very good value. - I didn't buy this kit for the heat break they are pretty bad and this is why im giving it a 4 star. If you are buying this for the all metal heat break then this is not for you but paired with a good heat break this works really well with alil tinkering. I figured out the reason everyone is having so much problems with jams and clogs its simple really. These heat breaks are actually 3 different parts the top thread a pipe in the middle and threads on the bottom pressed together. Mine actually has about a 1/16" gap so if your using these print slow and retract very little then buy a good quality heat break. Also the thermistor attached to the hotend was over tightened and causing a short i just used a larger piece of heatshrink spread the wires shrinked it then just a hole for the bolt hope this helps. The attached pics are with all there parts with bad heat breaks extrusions were kinda all of the place sometime to little sometimes to much printed at 50mm/s with a slower print better settings you should be ok. keep printing
| Customer Reviews | 4.1 out of 5 stars 194 Reviews |
F**M
V1 Volcano & V6 banger lil kit(12V, use original probes if needed 24V)
I mainly got this for the all metal heat break and the volcano end. Good news for me, all 3 included breaks were all metal. Upon closer inspection, one of them had a much better visual finish. Ran some steelwool and cotton twine with polishing compund through it b4 initial install. The other two have minor scuff marks on inside, might buff out, haven't needed them yet. Been printing with it for over a month and so far zero issues(hence why I haven't needed the other 2). No clogging for me, just make sure to tighten everything while HOT. And apply heatsink compound only between nozzle/block and heat break/heatsink. None between break and block. Basically you want heat escaping the block towards the nozzle not the heat break but the heat that does go up should escape the break through the heatsink as quick as possible. Hope that helps. I didn't use ANY other other hardware from the kit on my ender 3. Just heatsink, throat and block(worth the money). Ender probes just fit(at least in the volcano block they do, didn't use the shorty) and fans get adapted to whatever mount used. My setup went into a direct drive orientation(BMG/Volcano/pancake stepper from Amazon) and so so glad I did. Swapping fillament is a breeze now, print quality improved, stringing is all but gone, using much much lower hotend temp. (From MAX 260/270 on PETG to 230). I fitted a sock from B-GOOD(the V1 is needed for this kit) and it fits nice and snug. I priced out individual parts since i only needed so little from this kit, but even so this was a hard to beat value and everything just fit, I didn't have to worry about ordering incompatible parts.
N**.
Very good value.
I didn't buy this kit for the heat break they are pretty bad and this is why im giving it a 4 star. If you are buying this for the all metal heat break then this is not for you but paired with a good heat break this works really well with alil tinkering. I figured out the reason everyone is having so much problems with jams and clogs its simple really. These heat breaks are actually 3 different parts the top thread a pipe in the middle and threads on the bottom pressed together. Mine actually has about a 1/16" gap so if your using these print slow and retract very little then buy a good quality heat break. Also the thermistor attached to the hotend was over tightened and causing a short i just used a larger piece of heatshrink spread the wires shrinked it then just a hole for the bolt hope this helps. The attached pics are with all there parts with bad heat breaks extrusions were kinda all of the place sometime to little sometimes to much printed at 50mm/s with a slower print better settings you should be ok. keep printing
P**E
Good Value
>You purchased this item on August 14, 2018 Many months in, it prints like a charm. I print in PETG with no issues aside from user error. -10 month update: Haven't found an excuse to use the Volcano yet, still on my first nozzle. I've put 5kg of filament through this so far (mostly PETG, some PLA). Still going good! Pros: It's an inexpensive E3D V6 clone. Same dimensions. Comes with standard AND Volcano-type heat blocks Comes with a few extra nozzles of varying sizes for both blocks Cons: There's ONE all-metal heatbreak I thought each one was all-metal. TL;DR: It's cheap and prints well, and has the volcano block, which is cool, but I haven't used it. If you don't have a specific reason, get a clone without the volcano block. (updated for more info and new thoughts) April 2020: still using this set.
J**H
Great for pushing out .4mm layers with PETG for large builds with .8mm nozzle.
I ordered 3 of these to replace the heavy extruders without proper fan ducting on a Tevo Black Widow and 2 Tronxy X5S-400 printers. Each kit came with one all metal heat break and 2 spare PTFE heat breaks. Just throw out the PTFE heat breaks. I see no use for them and they are only good for PLA with no advantage over the all metal heat breaks. Both heat blocks use proper clamping to get full contact around the heating element instead of the original equipment crappy set screw. I also ordered a pack of highly rated Witbot all metal heartbreaks just in case the kit came without all metal heat breaks. The Witbots were nothing special so just order them from KeePang who has a better price. Always check everything for burrs with a light touch and round jewelers file. Otherwise expect to spend $$$$$$$ for a name brand. The included thermistor was about 113K Ohm and the heating element was 3.8 Ohms. I did not bother using the new elements with the upgrade. I suggest finding a tiny washer to help hold the thermister in place. I will eventually replace the thermistors with hard to find integrated screw in thermistors from Banggod or New Frog. Unless KeePang gets them soon. The PTFE tubing is wound way too small and needs to be put in boiling water to soften up and then straightened out and run under cold water to straighten it out a bit. The included pneumatic fittings are high quality. On my X5S-400, I am currently using the clone volcano heat block with a .8mm nozzle, squirting out .4mm layers of PETG with .8mm shells at 245 degrees C. The X4S is now a rocket ship for properly designed large builds. Prior to the upgrade with the heat break fan also blowing on the heater block the hot end could barely reach 130C. Attached photo is printing PETG on an unheated 17C glass bed with purple glue stick. I cannot mention enough, any filament path part from any vendor or kit needs to be checked for burrs so also invest in some inexpensive jewelers files. This kit is the best $16 you can spend to improve your prints.
M**Y
All good except for the heatbreaks
TLDR: clogged on first print and came with 3 all metal throats instead of one and two ptfe throats depicted in the pictures. Got a replacement but still didn’t get any ptfe heatbreaks. Well when I got the hotend I was impressed. It looked nice and had lots and lots of parts. Immediately I was a bit disappointed as the two replacement throats were both all metal hot ends. That would be great if they worked but unfortunately clone all metals don't have that great of a reputation so I was banking on the fact of having a reliable ptfe throat just in case but that's a nope even though the picture shows the two ptfe throats. Then second red flag was a piece of metal shaving stuck in the heat sink from the machining process. Oh well if it works no harm however, after taking it all apart inspecting and then following the official E3d guide on assembly then first print it clogs. Spend a good hour fixing the blockage. Second attempt not 10 min in and another blockage. Hopefully it is just one bad throat and the others will work better but for now things aren't looking great and this is probably going to turn into a returned item. i'll update this if i get it working. Update: company sent a replacement unfortunately same problem all of the heatbreaks are the full metal kind and have the unpolished interior surface making jamming a problem. Been trying to polish them myself so far no luck.
J**.
100% complete and total junk ** DO NOT BUY **
I could not unscrew the heat beak at all it was entirely seized up and very tight . I reached out to them for help to see if there was something wrong and they told me to use tools, which of course marred and messed up the thin and very poor quality heat break. The unit would not print very long before it began to clog and the filament ran over from the coupler onto the heater block and then all over the hot end. This thing is not worth the materials it is made of. I wish I could get my time back as well as my money because I would have had more than enough to purchase a genuine E3D V6 and have some sanity left over.
A**6
HUGE UPGRADE OVER STOCK HOT END
Given the price i was skeptical, but i couldnt not do it for that price.... got it all hooked up and running in about 30 min since i already had my mounts printed... Im getting smoother prints and the same extrusion properties with an 10-15% lower temperature... this may be the position of the thermistor or just manufacturing differences in the thermistor but i see this as a plus since before with the stock hot end, i had to print PETG at 255-260 to get good flow and adhesion where now im printing at 245 with excellent results... i see this as a benefit since now i have a little more wiggle room and can finally print this nylon filament as well without even altering the 260 max temp setting. Very impressed. came with 2 blocks and a crap ton of nozzles and extras... no idea how at the price point but im not complaining... Feeding is smooth and have had no jams or anything of the like. i am using the stock fans from the cr10 since thats one less thing to solder and printed a 40mm fan mount for it instead of the stock 30mm,.... not sure how much difference it makes. No issues here either. ive also been able to up my printing speed from reliable at 30-40mm/sec with PETG and now its same or better quality at 40-55mm/sec Requires a certain will to tinker and get it all set up but its rocking it once you get it set up. Highly recommmended. Get yourself one.
R**E
Thermister is trash
This is the second time I've purchased this item and it seems quality control has disappeared. neither of the thermisters sent with the hot end worked at all, and the heater would just ramp out of control until you killed the power. The first time i ordered everything worked, but that was a year or so ago. IF your thermister already works, then the heatblock and tips is a welcome upgrade for an ender 3, especially the "volcano". Using a 1.2mm tip takes a print down to about 2 hours that would normally be 10 on a 0.4. If you are ordering this, just order some extra thermisters from a reputable company, because the 2 that come with it may not work at all.
J**I
Todo parece funcionar bien sin cosas raras
Venia aparentemente todo, con bloque V6 y Volcano, y al menos en la configuración V6 con una boquilla CHT clon funciona perfectamente en una Ender 3 Max con adaptador para un V6. Contento y muy barato, especialmente para imprimir filamentos como ASA que requieren de una temperatura lo suficientemente alta como para quemar el tubo de PTFE. Actualización: Después de unos meses de uso, he de decir que montar una garganta bimetal es casi imprescindible a la hora de imprimir según qué PLA, sobre todo si imprimimos piezas con muchas retracciones. La garganta de acero que viene, sin embargo, funciona bien para PLA de alta temperatura, ASA y PETG, así como para PLA normal si nuestra pieza no tiene muchas retracciones seguidas.
M**I
Ben fattio
Il kit è ben fatto e si ha la possibilità di montare sia V6 che Volcano. Ci sono anche Nozzle di buona qualità. L'unica cosa sarebbe bello una versione da 24V
R**U
Fonctionne
Pour une chinoiserie c'est corecte hormis le ventilateur cheap ca envoie très bien par contre nutiliser pas les Termistances fournie les deux on cramer résultat erreur temp e1 .. Pas de sousis avec le reste qui est bien copié
D**I
se atasca
mala calidad, se atasca, tube que devolverlo
N**R
Bonne qualité
Bonne qualité mais il manquait le tube ptfe ! A++++
Trustpilot
3 weeks ago
2 weeks ago