🏡 Elevate Your Outdoor Space with Patiowell's Ultimate Storage Solution!
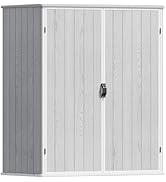
The Patiowell 5x3 FT Outdoor Storage Shed is a robust and versatile storage solution designed for your backyard or garden. Made from durable galvanized steel, it features a lockable door for security, a sloping roof to prevent water accumulation, and is both UV and water-resistant. With easy installation instructions, this shed is perfect for keeping your outdoor tools organized and protected.
Door Width | 34.2 Inches |
Door Height | 35.5 Inches |
Item Dimensions D x W x H | 34.2"D x 63.4"W x 71"H |
Item Weight | 78.28 Pounds |
Style | Contemporary |
Door Style | Swinging Door |
Color | Brown |
Top Material Type | Alloy Steel,Metal |
Frame Material | Alloy Steel |
Material Type | Metal |
Is Assembly Required | Yes |
Ultraviolet Light Protection | UV resistant |
Weight Capacity Maximum | 4.4E+2 Pounds |
Water Resistance Level | Water Resistant |
D**E
I built this 10X8 alone by myself. It's doable
I watched 10-15 videos of people taking several days with help. I did it in less than a day, plus a couple hours after work pre-building the roof beams, wall tops, and building, squaring, and screwing the base down to the platform I built.You need to be organized. Build the big complicated pieces first have them ready to go on. Use a tool belt like carpenters use and keep the bag of screws and plastic washers in it. Read the instructions a bunch of times and pay attention to the locations and which way things face compared to the base. The only thing I had real issue with was the top most part of the roof, and if I had a better ladder I'd have wedged a couple of 2x4s under the beam and put them on after getting all the panels on. Lifting one up from the center where it was attached was a pain, if you need to do it put one more panel on first. That being said despite seeming flimsy it's well designed and once it's all together it's VERY solid. I'm going to frame out a couple walls inside so I can add wood so I can hang stuff and lean things against the wall without worrying about denting it, but it's not needed for strength. I might add a little reinforcement just because we sometimes get a lot of snow and I don't feel like shoveling a roof etc.The bad: the door latch hardware is a joke. There is a gap so rain can pass through the center, I just added a strip of folded drip edging that I pounded flat and used the extra provided screws on the back of the fixed door (with latches on top and bottom). The fixed door latches are good. I also added screws along the edge of the roof, you don't even need to drill the screws they provide are very high quality and if you just want to add a screw here and there you just line it up where you want it and bump the back of your driver with your palm, the tips are sharp and will give you a bite enough to drive it through. Also they give you plenty of extra hardware.All said, I'm very happy with the shed. It's strong, looks good, the plastic on each panel really is just extra protection and I figure if it starts to peel from the sun it will be easy to take up piecemeal. Do your prep, have a good level surface for it, square your base well before you get going and pre-build everything you can, having the wall tops, roof beams, the peak of the roof with vents already installed and the braces etc. That made it a breeze. Once you get the corners up with one panel on each put your upper walls on get it all screwed in and you'll have it together in 6 hours.
J**S
Few tips and advice for future buyers
Pay extremely close attention to instruction booklet. Look where certain holes are, and on what side they are on, same with notches on certain pieces to make sure orientation of piece is correct. By paying very close attention, all holes lined up for us very well. A couple were slightly off, but that's because the base had gotten a little out of square while we were assembling.Use drill on very low setting to reduce chance of stripping screwholes. For roof screws, I went back and replaced all screws that are exposed to rain with self piercing screws #10x1" size with the rubber washers that are designed for metal roof. I used the #10 size because they were very less likely to strip out while tightening down to lightly compress rubber washer. Any size smaller diameter than #10 will most likely strip out while tightening to a watertight seal. You can get by just fine using 3/4" long screws. I only used the 1" because tractor supply was out of the #10x3/4".Make sure the metal base is perfectly square before attaching any sidewalls. If out of square, you won't realize it until you're almost finished screwing one full side of wall together. Once base is square, I recommend screwing or bolting to floor or slab or whatever type of foundation/floor you are using so that it won't come out of square while assembling.We only had very minor dents on some pieces of metal, but nothing that we couldn't push out with thumb or bend back easily with pliers on a multitool. The packages are handled multiple times during shipping, and I'm sure that's why some pieces had dents and bends. I don't blame the manufacturer for that.The 2 or 3 hours that the book says will take to put shed together might be true for people that do it for a living and know the order of parts by memory and have a rhythm down for install, but for us it took around 12 hours to take our time and make sure everything was correct so we wouldn't have to go back and redo anything later. That time includes the unboxing time and laying all of the pieces out with all same numbered parts together to make finding the parts quicker and easier.We sealed the outside of the base that makes contact with the floor with 100% silicone and used screws through base to floor every 1 foot on the outside. Also sealed corners of base with silicone and all 4 sides of each air vent on the inside of the shed. After sealing and replacing all roof screws with the #10x1" self piercing screws with rubber washer, we have had zero leaks. There was a small gap in between the 2 doors, but with some hinge adjustment and some very small bending of door frame piece, the gap is closed.The plastic that comes on each piece of metal is not worth the time to try to remove. We left the plastic on and you can't really even tell that there's a layer of plastic on the outside. Looks very good. Enjoyed putting this shed together and for the money, I think it's worth it. I did have a helper, one is definitely needed for a shed of this size (8x10).4 start rating is only because of the small diameter screws for the roof. The nylon/plastic washers for the screws that came in the bag don't seal well due to the fact that if you slightly over tighten the screws, they will strip the metal and then have no compression to seal hole. Screws that are a bigger diameter would work much better to come from the factory in the box. They do fine for the sidewalls, but need bigger diameter with rubber washer for roof.
S**.
Would order again, just what I needed.
Order came in on time. Shed was perfect size. Holes matched. Came with gloves and tools needed to put it together. You definitely need at least 2 people. Color was exact. Few hours to get up and then strap down. Straps come with the shed. I am now almost 2 years later writing this saying it is still standing strong no problems. Storms and all it didn't budge and nothing got wet. Has vents for ventilation. I added 3 inch 12x12 gym pads I was tossing out and fit perfectly over the small lip on the bottom Frame which assuming it helps extra support but if I had to order all over again and deal with the stress of finding one that will last with boys bikes motorcycles and lawn items in and out....I'd Order again. Don't get me wrong it will dent. We had a fishtank frame thar fell into it and I expected a huge dent or the door broken and just a small dent. That was a surprise and the 5 stars it needed. No warping nothing. Great choice and worth it and still functioning perfectly.
Trustpilot
1 month ago
2 months ago