Desert Online General Trading LLC
Dubai, United Arab Emirates
Desert Online General Trading LLC
Dubai, United Arab Emirates


💡 Light Up Your Prints with Style!
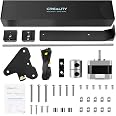
The UniTak3DEnder 3D Printer LED Light is a 24V, 7.5W dual-sided light bar designed to enhance visibility for various Ender 3 models and Voxlab Aquila printers. With a comfortable 4000K brightness, it significantly reduces shadows during printing, ensuring a better experience for 3D printing enthusiasts.


| Compatible Devices | Laptop |
| File Format | STL |
M**B
Even nicer addition to the Ender 3 S1
So this is my second UniTak3D LED Light kit for my Ender 3 S1 Printer. While this kit is primarily designed for the Ender 3 Pro/V2, it can easily be adapted to the S1 and other printers using 24-volt power supplies.This is literally a complete kit with Two LED Strips(with an inline switch), Black Wire Rubber Retention Strip, an LED Light for Hot-End, Manual, and T-nuts and bolts. The latter is for a print that is on Thingiverse that is a mount for the switch.Very easy to install on the Ender 3 S1 since it has a power supply plug on the top right rear of the printer, you just need to add a 3-pin jtag connector, so you don't even need to remove any panels to access the power supply.While the manual isn't very detailed it does list the Thingiverse Number of the item to print as well as a QR Code to a well-made youtube installation video.Pros: Easy to install, Dual Side LED's which don't cast a shadow on your prints if you are shooting videos during printing. Addition of a Hot-End LED. Much brighter than their single LED overhead version.Cons: Nothing is perfect, while the Single LED version they sell has a touch sensor on/off that also acts as a dimmer switch, this version only includes a physical on/off switch. In the end, I would much prefer the brighter LEDs of this kit over the single LED strip version.I would definitely recommend this kit to any Ender 3/Pro/V2/S1 owner. All of the items in this kit could be sourced separately, but you would end up spending more money, and would be less convenient, and would need to solder and heat shrink your connectors.
B**E
Why didn't I get this sooner?
It is quite literally a night and day difference in seeing the prints on my Ender 3! I don't have the best room lighting where it's set up, so this was a huge improvement. Note that some of the reviews complain about having issues with a "hot end light". The manufacturer has removed that part since it was causing so many issues. But, I'd say the side mounted LEDs still provide plenty of light, especially since it's not blocked by the hot end like top lights are. Note that the product pictures seem to show a very short wire between the 2 LED strips. What you get really has enough wire to make it across the top between the sides.Several installation suggestions based on my experience with an Ender 3:- Don't forget to print the switch holder before you shut down your printer to install this. Some people complained about it breaking. I used PLA+ with the recommended 15% infill and it slid/snapped in just fine.- The LED strips have what looks to be a 3M adhesive backing, but don't peel it off at all. The lights just rest inside the side V-slots below where the wheels travel.- I didn't actually have to take the top bar off my printer. I gently wiggled the LED strips into each side channel and slid them down to the bottom. It took a little time, but was probably lots less than dismantling the top bar and having to make sure it was square again.- The instructions show installing it so the switch is on the right side (side with the power supply and control panel). However, the wire between the switch and the power supply is long enough to install on the left side if that's more convenient for usage. Plus it can be installed on the side of the top bar instead of just the top like their pictures. (I have a filament dryer installed on top for dispensing)- I printed out a "snap on V-slot cover" to hide the wire up underneath the top bar between the LED strips. Makes it a lot cleaner instead of a wire dangling down across. (205mm was the perfect length). I also printed out another V-slot cover (200+180=380 total) for the wire going down the left front side instead of using the provided sleeve and having to feed the wire through it.To help you find things:Switch holder: on Thingiverse, search for "5384261" and find the "LED switch base" by HumhumWangSnap on V-slot cover (the one I used): on Thingiverse, search for "3890851" and find "V-Slot snap on cover Ender 3 - CR-10"Youtube install video (which still shows the hot end light): search for "Dual Led Strip Ender 3/Ender 3 PRO/Ender 3 V2". There's a 2nd similarly named video, but it only shows connecting up to the power supply.
C**F
Works fine.
Seems a little home-made. "Just stuff it in the channels of the aluminum extrusion, it''l be fine", seems kinda janky. But it works fine. Recommended.
A**E
Works with CR-6 SE beautifully!
UniTak3D Printer Light - $13.98 on Amazon and compatible with more than 5 different printers, including my CR-6 SE shown here.Admittedly, it takes some setting up; you're going to be feeding wires, tucking, snipping, screwing, etc. Once finished, you're left with an amazing lighting solution for an already great printer that sadly didn't have one to begin with, and with a little skill you can make it look like it was part of the printer originally.It is wired to the printer's power supply unit, and features an inline on/off switch (most similar lighting options did not).There is a bracket to hold the switch in place. The instructions include a Thingiverse link to the bracket file download so the user can print it off themselves. This not only saves the manufacturer money, but it makes the whole install more fun.I think it took about 90 minutes to install, and the bracket took about as long to print.Lighting was one of the few complaints I had about the CR-6 SE printer, and for under $14, this is a fantastic solution!
P**.
Brilliant Upgrade for your 3D Printer - A Game-Changer in Lighting!
I recently purchased these LED strips for my Elegoo Neptune 2s, and I couldn't be happier with the results! The amount of light they provide is incredible, turning my 3D printing space into a well-lit masterpiece. I inverted the installation for a cleaner look, running the light strips from the bottom of the printer upward (see photos), and it not only looks fantastic but also conveniently positions the light switch closer to the power supply.The build quality of these LEDs is top-notch – they emit a solid beam of light that enhances the entire printing experience. Whether you're a 3D printing enthusiast or just looking to brighten up your workspace, these LEDs are a must-have. I highly recommend them for their performance and versatility!
K**A
Disappointing
The media could not be loaded. Lights don't even turn on after following instructions on video it comes with. I don't even want to bother taking apart the printer to return it.
Trustpilot
1 month ago
1 week ago