
Desert Online General Trading LLC
Dubai, United Arab Emirates
Desert Online General Trading LLC
Dubai, United Arab Emirates


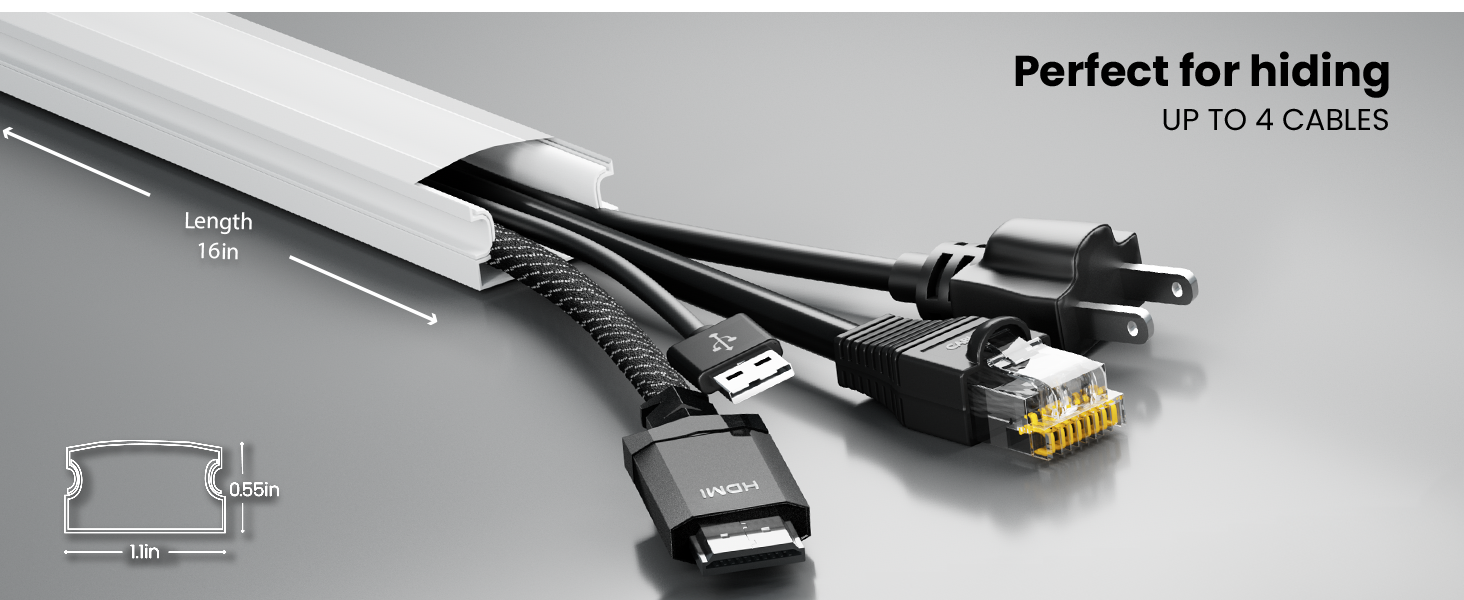
🎯 Master the art of invisible cables—because your space deserves a sleek upgrade!
The EVEO Cable Hider Wall offers a 153-inch adhesive-backed cable concealer that installs tool-free, providing a clean, safe, and customizable solution for hiding wires behind TVs or along walls. Its paintable design ensures seamless integration with any décor, while its durable construction protects children and pets from exposed cords, making it a trusted choice for professional-grade cable management.


T**Y
Great product, worked perfectly.
First impression when I received this product was the smart looking packaging it came in. Opened the box and it was just as nicely packed inside. They thought of everything with this kit even a small saw to cut the sections if needed. Although it looks like the sections could also be cut with a good pair of scissors. I opted to use the double stick adhesive tape, although the kit came with screws and wall anchors as well. The sections were very easy to install and the adhesive seems to be very good. We shall see if I ever need to remove them from the wall. I was a little tricky trying to get all my cables into the concealer but I finally was able to stuff five cables in there. The covers popped on very easily and are also easy to remove it needed. The concealer pretty much disappears against my white trim and it looks great. Much better than all of the wires before. I only needed a few sections, so I have some left over for other projects if needed. Overall I found this to be a great product and great value for the money paid. Would definitely purchase again. I didn't need to cover all my wires as I have an entertainment center that covers that section up in the photo.
A**A
Easier design.
It a great cable cover and it designed make it easer to install it.
W**Y
Good looking and easy to use cord and cable management for a good price
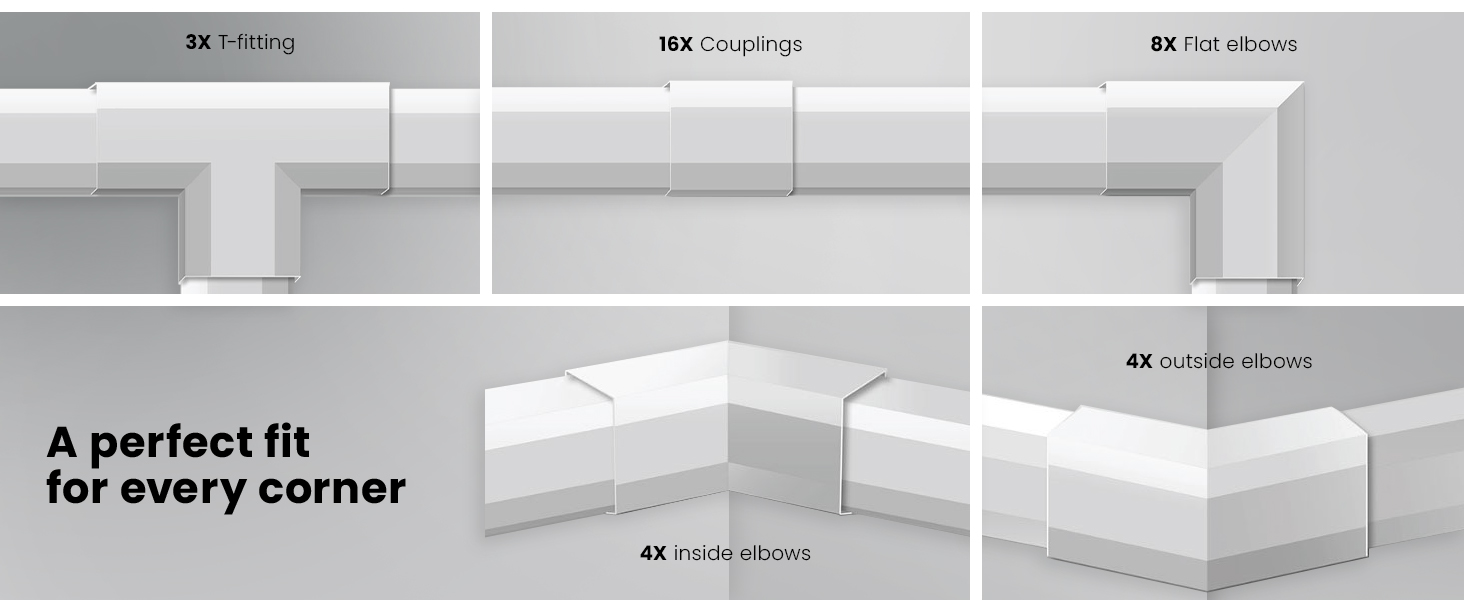
This cord cover is easy to use, easy to paint if desired. The adhesive strips hold fairly well even to lightly textured walls so I haven’t had to screw down any of the bases. The channel length can be altered with very sharp sturdy shears if done carefully to avoid cracking the plastic, or with a hacksaw. I really like that even though the top cover is easy to remove if changing or adding cords, it holds to the base securely. And the connection pieces that are included allow for almost every possible configuration of corners. This is the second set of these I’ve ordered, having used every inch of the previous pack.
C**S
Does what it is expected to do
I bought this product to neatly route two CAT6A ethernet cables and one LC fiber within a network room. It was easy to use and did what it was advertised to do. In my case the routing was over plywood, and I had some concern if the adhesive would stick well enough. The instructions say to press down the strips and ideally allow 24 hours for the adhesive to grab before routing cables. I did that, and the adhesion was terrific. The kit comes with joint pieces to go over the splice along straight runs, and right angles, and there is one for a T junction. Note that these pieces snap _over_ the cover sections that close the channel after laying in the cables.I noted that the channels were a little tight for two cat6a cables, requiring a fairly tight bend. The cables didn't want to make the turns, but it worked OK to hold them down until the covers were snapped on.The channels are thing and very flexible plastic. They worked great for my application but would not be adequate if the cables are strained. Sunlight exposure or high temperatures would call for a different solution. I deducted one star due to the relatively high price for what is being sold.
H**N
Special Installation Tips for the Strong Adhesive
This is a good product...good size, fits a bunch of cords if you need it to, and I like the way the covers snap on rather than needing to slide on from the sides.I have one big installation tip. The adhesive is SUPER STRONG and is really hard to remove the channel from the wall once you stick it. Be careful, measure and level and draw a line on the wall before you remove the cover for the adhesive. Now my little trick- TAKE AN XACTO KNIFE or razor blade and cut through the adhesive and its cover. Cut about 2 inches in from both ends, and then make a couple cuts about 2 inches apart right in the center. Those 3 two inch sections will be what you want to retain, and you want to get rid of the other adhesive. I tried just removing the liner from those little sections and sticking it up on the wall but it was a little challenging to get it to stick. It might have worked if I pushed harder to get those sections to stick. What I ended up doing is taking my thumb and rolling and peeling off the whole adhesive in those larger areas except for my 2 inch sections. It is almost like a rubbery gummy adhesive and you can just push it and roll it off the plastic with a little effort. With just the little sections of adhesive it still sticks the channel down very securely but when it comes time to take it off, it will be easier and won't rip up the whole wall.Secondly, I found that when putting 2 straight pieces against each other, it looks better to just butt them up against each other rather than using one of the connector covers. The connector covers are wider so you see a bulge at each connection that really isn't necessary. In this same vein I tried to do a 45 degree miter cut on 2 pieces of channel with my hacksaw so I could butt the corners together without the extra covers. I didn't get it perfect so there was a little gap showing and I decided to just pop on one of the 90 degree elbow covers and be done with it, but I think if you got the cuts right it would look cleaner to miter the channel cut rather than use the covers.
Trustpilot
1 month ago
2 weeks ago


![Baby Safety Outlet Cover BOX [Patent Pending] Double Lock for Much Better Toddler Proofing, Easier Operation, Simple 3 Step Install with Included Screws. Provides Extra Space Inside for Plugs,Adapters](https://images-na.ssl-images-amazon.com/images/I/81tKTKF6rrL._AC_UL116_SR116,116_.jpg)