Some deliveries may take a little longer than usual due to regional shipping conditions.

DOWNLOAD THE APP


Customer Services
Copyright © 2025 Desertcart Holdings Limited
DOWNLOAD THE APP


🍳 Elevate your air fryer game—because basic cooking is so last season!
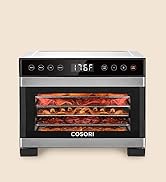
The COSORI Air Fryer Accessories Set includes 6 premium, BPA-free, nonstick pieces designed for 5.0 QT and larger air fryers. Compatible with COSORI and major brands like Ninja and Instant Pot, this dishwasher-safe kit expands your cooking possibilities from cakes and pizzas to kebabs and egg bites, making your air fryer an indispensable culinary tool.


| ASIN | B07QHSZGXC |
| Best Sellers Rank | #56,382 in Kitchen & Dining ( See Top 100 in Kitchen & Dining ) #387 in Baking Parchment |
| Brand | COSORI |
| Color | Gray&Red |
| Customer Reviews | 4.6 4.6 out of 5 stars (16,988) |
| Date First Available | November 17, 2018 |
| Department | Air Fryer Accessories |
| Global Trade Identification Number | 00817915024539 |
| Is Discontinued By Manufacturer | No |
| Item Weight | 2.4 pounds |
| Item model number | C158-6AC |
| Manufacturer | COSORI |
| Material | Metal, Nonstick Coating |
| Model Name | air fryer silicone liners |
| Oil Capacity | 5.5 Liters |
| Product Dimensions | 8.6"D x 8.6"W x 7.5"H |
| UPC | 817915024539 |
R**A
Experimenting pays off...
These items work beautifully in the Cosori 5.8qt. air fryer. Today I made a ham & bleu cheese open-faced sandwich in the pizza pan resting on the metal rack on the Broil setting for 3 minutes. Perfect! Yesterday, I made a piece of toast on the skewer rack, then a fried egg (in the pizza pan resting on the skewer rack) and a ham slice (on the skewer rack shelf) using the VeSync cell-phone software at 360 (adjusted) for 6 minutes. Perfect fried egg and ham on toast! I tried making eggs in the silicone egg cooker (using the lid, as the company told me is the intent). They needed to cook far longer than expected, and I have yet to get all of the egg off the silicone. Oh - the company also told me that the silicone mat that comes with the accessories is for something to place the hot items on coming out of the fryer. But I use it at the bottom of the basket when using the metal rack or skewer rack so as not to scratch the basket's finish. So I won't be using the egg cooker - will try some Corningware cups next time. And I just wish there were a 2-shelf rack. If anyone knows of one that will fit this machine, please post the reference.
K**A
Works well to extend the usability of an air fryer
I bought a Cosori air frier almost a year ago, and ordered these accessories at the same time. Good that I did, I've been using this instead of the oven say, 90% of the time. The accessories help provide extra usability- I just used the large pot to make a corn muffin cake about 15 minutes ago. I have yet to use the kabab sticks but those little racks are great for making hotdogs and french fries together. I have also made hamburgers on them. That shallow pan is great for making 'pancake cakes' - instead of all the mess of stove top pancakes, I butter the pan and pour in the pancake mix and air fry it. The pancake fluffs up instead of being heavy, tastes great and the whole thing takes a minute to clean. No spatter on the stove top. An air frier is such a useful cooking tool and these accessories make it doubly so.
G**Y
Good choice for operating off Alexa voice commands for blind, visually impaired
I first note that I am totally blind … no usable eyesight or light perception. My sighted wife passed away in early January of this year. She was responsible for the bulk of our meal prep, though I began trying to contribute over the last months of her life using an Alexa capable Toshiba microwave oven which I have already separately reviewed (see A blind perspective on this mainstream product). However, I knew I couldn’t and didn’t want to microwave absolutely everything. I needed an oven or oven-like device to prepare baked, crispier or toasted items in. We’d had an older model COSORI Smart Air Fryer which COSORI later recalled, then for some unknown reason, allegedly killed the smart Alexa functionality of around the time we received the replacement unit, so I never even bothered unboxing the replacement unit to confirm whether or not it either is or isn’t “smart” any longer. I had other things to be doing besides trying to sort out whether some brilliant bureaucratic executive type had “fixed” what wasn’t broken “until it was broken” by just up and deciding to kill a perfectly fine product’s “smart” capabilities, plus had my sighted wife who could continue preparing items in the standard oven. But with her passing, I had to find some solution. Now, I certainly could have tried that replacement unit …but there was the matter of COSORI themselves claiming its smart functionality was no more, so did I want to hassle with trying to set this thing up … only to discover it was, in fact, no longer “smart”, and therefore no longer operable by blind me …or did I want to just find something currently available and hope COSORI, in some infinite bureaucratic “wisdom” wouldn’t rip smarts away from at some future point? I chanced the latter. Family helped pay for this purchase as it would’ve taken me some months to manage. COSORI products all seem to have basic app control through the VeSync app, which I already had on my iPhone as a result of a couple of LEVOIT brand products, so the proper setup app was already installed. Unboxing was no issue. I specifically purchased the 10 quart version of this device, which also comes in a 7 quart model. Mine also came with the accessories of two dehydrator racks, a rie rack and crumb tray. I don’t consider the fryer basket and its crisper tray “accessories”, though I suppose they technically are, but that’s how you arrive at the “six accessories”. No, where I ran into my first issue is that once you have plugged the device in, you must press and hold down on a touch screen power button to put the device into a pairing mode so you can begin linking the device into your wireless network. On the surface, this may seem a fine way to get the device into pairing mode. However, when plugged in, unless you have lousy wireless networking, it generally takes seconds for devices to connect to the network if they have already been set up. Certainly within between 10 and 30 seconds, on-board device software should be able to tell if the device has connected or not, or whether it has already been set up on the network. If not, then when plugged in, detect one way or the other and automatically drop into pairing mode for a period of 5 or 10 minutes, after which the unit must be unplugged and plugged back in to acquire another automatic pairing mode period. Easier for most persons this way. Let them press some button to escape pairing mode if they can or want to do this, versus making absolutely everyone locate a non-tactile button on a flat touch panel in order to get into pairing mode. I understand all the liability and safety concerns companies face, but these companies also can’t just assume every disabled person is a complete, child idiot incapable of safely operating an appliance. Plenty of disabled persons can and do operate devices we probably shouldn’t, but must necessarily operate since we’re all not celebrities or uber wealthy with a team of people to do everything for us, or with ready access to sighted help every moment we might need it. It isn’t, or shouldn’t be, some company’s choice and decision what a customer can or cannot, or should or shouldn’t be doing. I would be happy, in the event of any legal case, to demonstrate for any attorney and/or judge how I’m doing whatever I’m doing. I do it safely, case closed, as far as I’m concerned. I’ve demonstrated I can do whatever safely. If there is then some liability on the company’s part, then that of course is on the company. But don’t deliberately further impair my independence because you’re being overly paranoid over legal cases of liability. If laws are simply correctly written, it should quickly enough be self-evident whether fault is the customer or the company, and if it is clearly the customer, then drop their company liability case. Very simple, very straightforward. Anyway, I spent most of a day trying to use various methods to get this thing in its pairing mode to get it set up, and was growing increasingly frustrated over whatever idiot chose this overly difficult method for accomplishing what should be a much simpler task. I went to bed upset over not being able to get this thing set up by myself all because some sighted person chose to make it so overly difficult for no good sound reason other than being downright cruel or insensitive. After all, if I could just get this thing in its pairing mode, setup would continue fine! The following morning, I was preparing to use the Aira service for the first time to get myself some sighted help finding, pressing and holding down this flat touch screen non-tactile power button when I tried Be My AI yet again … and for still unknown reason, discovered that the power button was in an entirely different location than it had been pointing me just the day before. I believe there was an audible beep as the device went into its pairing mode, but at any rate, I was finally seeing it and could proceed with setup! FINALLY! As expected, setup proceeded flawlessly once it was finally going. I say flawlessly, though one issue was my 10 quart device identifying as the 7 quart. I did double-check the box; it claimed 10 quart, so I can only assume this is a software error someone missed. I therefore wouldn’t be entirely comfortable using any of the recipe setting functionality, just assuming 7 quart cooking instructions would work for a 10 quart; perhaps they do, but why not simply identify and list my device as what it truly is versus just labeling all as 7 quart? Still, it wasn’t long at all until the device was showing up inside the VeSync app and responding to Alexa commands. I believe there are warnings out there on the internet that one cannot actually start this device without having to also press some start button on the non-tactile touch screen. It may even state this in the user manual. As of this writing, this is NOT true. One CAN issue preheat and start commands to Alexa and this device will take off doing whatever without having to press anything on any non-tactile touch screen – which is at it SHOULD be. I get the whole so-called “safety” thing, but safety can also be overdone to the point that an otherwise accessible device has been made inaccessible by some cruel, insensitive overly safety paranoid person. It is partly my responsibility as a perfectly safety conscious blind person to operate this appliance in a normally safe manner. If I’m stupid enough to open this thing after it’s preheated to 350 degrees Fahrenheit, stick my bare hand inside it and touch the obviously blistering hot stainless steel interior, then that stupidity is entirely on me, not on ANY company – and properly written laws should protect companies. That would be the instance where I demonstrate my safe operation of the device for ANY attorney or even ANY judge. If they then can’t perceive that as “safe”, that’s on their poor judgment, not on me – because “safe” is SAFE! I have a pair of “oven gloves” specifically to help protect myself from scalding temperatures for both microwave and this oven’s operations. As of this writing, I have used this oven dozens of times without injuring myself. I do NOT want to injure myself, which is the sound reasoning any normal person would take. Only someone hoping to cheat a company would pursue some legal action to gain something for nothing. At that point, let’s perhaps see if this person has a history of bringing such legal claims, and if they do, then let’s consider they’re more than likely trying to get something for nothing, and should therefore be the prosecuted party for pulling such a stunt. But anyway, back to the review. It may in fact be true that you cannot start this oven using the app, but must also press some touch panel start button. But as far as being able to use Alexa to do things, Alexa does whatever without having to touch the touch panel on the device. Next came trying to sort out Alexa commands. This took a bit of experimentation despite all the Alexa command references. A problem is that commands can change, making any included references outdated. However, that’s just yet more of this “fix what ain’t broke ‘til it is” mentality. Once something is working, how about we just leave it be? Anyway, once I got commands sorted out, I made myself some reference notes just in case I forgot something. Using nothing but Alexa, I can tell this device to preheat to any desired temperature (within limits of the device, of course). When it’s preheated, I’m alerted, can put food in and entirely get it started cooking with Alexa. I can also use Alexa to ask the device when food is done and it will tell me how much cooking time remains. I can also pause, resume or stop as needed. I have not tried turning the inside light on or off, though I understand this is possible. However, I mostly just preheat, start cooking and inquire concerning time left until food is done. Otherwise, the device just does what I need it to do and that’s that. One feature I do especially love about this device is that unlike our former air fryer, this one requires no liners. A “crisper tray”, I believe they call it, sits loose inside the air fryer basket on short silicone legs. This serves as your liner. Numerous sighted reviewers noted the safety hazard of this tray coming out when trying to remove food. However, wearing my oven gloves, I simply hold the fryer basket with my left hand, begin gently tipping the basket toward a plate, food generally tipping away from the crisper plate so there’s a spot for my right hand to help hold the tray in place while I finish tipping food out onto the plate. As of this writing, this has worked every time without issues, and I’ve easily used the basket dozens of times. Some items, like mini or personal size pizzas, I prepare using one of the supplied racks and crumb tray. Which rack I use depends on the food. Smaller food items I would prefer on a more solid rack I simply use one of the two dehydrator racks. Larger food items generally on the wire rack. I just typically place the rack about middle of the oven. You may read references which claim this device can handle a normal small to medium pizza. It cannot. One only need measure the interior to realize this. The interior is approximately only perhaps 10.5 inches wide by about 9.5 inches deep. Common sense tells one you are NOT going to get a 10 or 12 inches diameter pizza inside such dimensions. No, at most you’re looking at no more than a mini or personal size pizza of 8 inches or less. You may also read references claiming you should place the pizza on top of the fryer basket. However, according to my hand, there is only about a hand’s thickness between the top of the fryer basket and the grill behind which the fans and heating elements are present. This is why I use a rack. I don’t want my food quite that close. However, do as you wish. Some final hints or tips for cooking and cleaning. Some pre-packaged food products are now appearing with air fryer instructions, but one tip I discovered which generally appears to work well is the “20, 25 method” for conventional oven directions. Allow me to explain how it works in the following paragraph. If conventional oven directions say something like, “cook at 425 degrees F for 10 minutes”, then I’ve found it safe to cook at 400 for 7.5 minutes. Take 25 degrees off the conventional oven temperature, and subtract 25 percent off the conventional oven cook time. Alternatively, you can try taking 20 percent off the cook time, but in central North Carolina, 25 percent has worked just fine for me. What do you do if a product contains air fryer instructions which instead recommend a cooking temperature way below subtracting the 25 degrees? I would recommend trying the product instructions first, then adjusting as you feel safe until you get the results you prefer. Sometimes the product directions seem right on; other times I don’t think they’re quite right. I have this device in the kitchen. Air Fryers are notorious for setting off smoke alarms, so I run the vent fan over the stove on high while using the device and have had no problems. Of course, I also haven’t burned anything yet, but the vent fan should help with this as well. Overall, I’ve noticed this device seems to overall operate superior to the earlier, older device. I don’t think it’s exhausting as much of anything out of the top as the older unit did. Just doesn’t seem it is. To clean the crisper tray and basket, what I most often do is fill the air fryer basket to a bit above the level of the seated crisper tray in the fryer basket with standard tap water, cool or warm, though I have usually allowed the basket and tray to cool first. Squirt a bit of a good dishwashing liquid in. Let it soak overnight. In the morning, I do give the crisper tray and basket a hand wash, but any food particles which might have been on the basket or tray have usually come off so cleanup has been extremely easy as its all non-stick coated. I have some accessory silicone cleaning pads I can use to do a bit of scrubbing if this is even necessary, to avoid possibly damaging the non-stick coating, though I so far haven’t had to use these, even for garlic bread or pizzas on any of the racks. I personally like the Dawn dishwashing liquid. I don’t use my dishwasher because this would require applying a lot of tactile markers, plus I so rarely have that many dishes to wash. I hope you found this review instructive as this is a great little device for a totally blind person living alone. Get yourself a pair of those oven gloves and just exercise some basic common sense. As further aid, below are the three Alexa commands I most often use as examples, having named my device “Smart Oven”: “Alexa, preheat Smart Oven to 400 degrees Fahrenheit” “Alexa, start Smart Oven at 400 degrees Fahrenheit for 7.5 minutes” (or you can say “seven and a half minutes” or “six and a quarter minutes” or so on; this does work!) “Alexa, when is food done in Smart Oven?” (Alexa will respond something like, “Smart Oven has 4 minutes 20 seconds left”)
P**A
Perfect Gift Accessories
I originally purchased air fryer for myself; however, after sharing all the features it had with my mom, I ended up sending it to her as a gift lol I personally did not get an opportunity to use it. My mom on the other hand uses it almost every day! She rarely uses her stove now because most dishes are prepared in her air fryer. Meals are cooked to perfection, juicy, and very little clean up! These accessories are a MUST. Who needs a stove when you have this!! There was a recall on the first air fryer I purchased; however, it was promptly replaced with a new one! Hopefully, I will be able to purchase one for my house soon.
C**E
But as a gift
I bought this as a birthday gift for someone who requested the set specifically. Air fryers is so popular now and they are used so much that you might as well get the most use that you can out of it. That’s where the success rate kit comes in. Makes it easy to bake And to make different kinds of meat in your air fryer and anything else you wanna try with these things. The recipient of the gift was quite pleased with them. So much so that I think I’m gonna order myself some.
J**.
The accessories will do what I need them to do.
I used the kabob skewers and rack to cook pineapple spears with brown sugar and cinnamon. I used to have to pan sear them which doesn't do the crispiness the COSORI did. I've used the small round pan for a no flour dough pizza. Turned out very good. The only one criticism with the small egg bite/cup cake pan is that I feel their too small a portion for some recipes but I'll use ramakins instead. Worth the purchase.
J**E
easy to clean.
Works good.
A**H
Great set for the Cosori
I've had this set for over a year now and i've gotten good use out of most of the pieces. The blue silicone mini muffin thing is PERFECT for making omelet bites and i use it all the time. The small pan is a great size for a mini pizza, and the skewer kit is great for making marinated kabob chicken or steak.
D**N
This was a great buy. I bought it for the metal grill so I can separate Food in the fryer. It was worth the money for that alone. But you get many other useful items with it. Top quality too. Definitely recommended.
N**L
Son perfectos para la freidora, todos son muy utiles pero tampoco son super indispensables para disfrutar tu freidora especialmente si tienes ese tipo de aditamentos en tu cocina que no es mi caso por lo que me cayeron perfectos!
A**R
A bit disappointed by the quality. The Philips pans are definitely of better quality. But the package comes with more accessories.
S**A
Ideal & a must have companion for your COSORI Air Fryer;
B**E
Bons articles pour Air fryer Cosori
Trustpilot
3 days ago
3 weeks ago