✨ Stick on sophistication, peel off the ordinary!
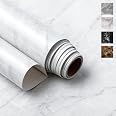
This 24" x 118" high-gloss white marble peel and stick wallpaper by Very Berry Sticker offers a premium, waterproof vinyl surface with realistic marble texture. Designed for easy, precise application with gridlines, it’s removable, reusable, heat and stain resistant—perfect for renters and DIY enthusiasts looking to effortlessly elevate furniture, countertops, and more.


| Material | Plastic |
| Color | White |
| Brand | Very Berry Sticker |
| Style | Modern |
| Item Weight | 1.7 Pounds |
| Product Dimensions | 118"L x 24"W |
| Coverage | 24 x 118 square inches |
| Pattern match | Random Match |
| Theme | Marble |
| Is Stain Resistant | No |
| Pattern | Marble |
| Unit Count | 1.0 Count |
| Manufacturer | Very Berry Sticker |
| Special Feature | Slip Resistant, Removable, Reusable, Heat Resistant, Stain Resistant |
| UPC | 799662248812 |
| Number of Items | 1 |
| Installation Type | Self-Adhesive |
| Part Number | VBS705-3 |
| Item Weight | 1.7 pounds |
| Country of Origin | Korea, Republic of |
| Item model number | VBS705-3 |
| Is Discontinued By Manufacturer | No |
| Size | 24" x 118" |
| Shape | Rectangular |
| Item Package Quantity | 1 |
| Number Of Pieces | 1 |
| Special Features | Slip Resistant, Removable, Reusable, Heat Resistant, Stain Resistant |
| Batteries Included? | No |
| Batteries Required? | No |
J**E
Great Product for renters and flippers
I’m a 39yo female renter and applied the peel and stick countertop by myself. I tested a piece first to make sure I could remove it without damaging what was there and it does come off with no problems 😊. The price, the thickness, ease of application and removal and the clean shiny look, it came out great. All around very satisfied with this product.
A**R
Beautiful temporary renters solution to an ugly countertop
Our rental bathroom vanity was an almond/yellow color and I wanted a temporary but modern/clean look to replace it. I installed this yesterday and really love how realistic the pattern looks and how easy it was to install. Some important notes about the final look. LIKES: (1) It is wide enough such that there are no seams on the countertop- which would have been very obvious and made it look faker. (2) It is very thick and seems like it will put up with a bit of wear and tear. (3) Easy to install (use a blowdryer for stretching it over the edge of a countertop for no air bubbles and a very realistic look!). (4) The pattern is very nice and looks about as real as your standard faux stone countertop (think IKEA). DISLIKES: (1) It is BRIGHT white, so if you have white cabinets that have even a little warmness or tone in them, they may clash- this is why I went for the darker gray cabinets. You can kind of tell with the sink and white cabinet (which I thought was bright white). (2) I went for the shiny finish because some reviewers were saying that the matte stained easily, and I wanted to be able to easily clean it- I think the trade off is that it looks a little shinier than granite/marble naturally looks, which contributes to the faux look- but honestly this is one of the more realistic ones I've come across. (3) If you have a rounded edge countertop you should have no problem blow-drying and stretching the film for a seamless look, but I had square edges and had trouble making it look neat- but I also have no experience and this was my first time applying this.Some things I learned when installing: 1) I Cut the hole for the sink a bit smaller than the sink actually is and then use relief cuts with scissors/razor to round it around the edge. Then carefully use a razor to cut of extra film around the sink. I then used a white 100% silicone caulk on all the seams to make it water proof and prevent peeling (bathrooms do get humid), and also for an altogether more realistic look. I thought I could apply the film as one piece but as I was applying the film I must have stretched it such that there was a huge air bubble that I could not get rid of. To save yourself time I recommend just making a single cut behind your sink which you won't even see.Love the finished result!
C**.
Beautiful, but challenging to install and perfect the finishing touches.
Beautiful, but very difficult to install. Like other reviews mention it's very sticky. Obviously we need it to be sticky, but it’s nearly impossible to set it at the exact position without it sticking in other areas and then having to pull it back up and trying again, and again, and again. Warning! You must have patience if you buy this product because the air bubbles will get to you. Be prepared with a safety pin and pleanty of time. Overall I love the finished look, but boy did it test my patience. ;)
M**.
LOVE THIS CONTACT PAPER
LOVE THIS CONTACT PAPER! This looks extremely classy and clean BUT has to be installed correctly. You can see seams but only when less than 3 feet away (Anything else further away isn't noticeable) The paper was very easy to use and although very sticky, was able to lift up from surface and realign if we got off on laying it down. I recommend using a hair dryer mold it to the counters and to also use maybe a water spray of some-sort underneath. Although we watched some videos on this and thought the install guy would do this, he didn't use either and there are bubbles throughout the entire thing. (some I was able to take a hairdryer to and get out, some not).We wanted to do a very cheap kitchen upgrade to brighten up the area and this kitchen took 3 rolls of the contact paper to cover. Our original counter was cream and the cabinets were painted from brown to black. The counters bothered us so much that we painted the cabinets white, added a glass back splash, and then chose to use this paper for the counters. With paint, the back splash, and this contact paper, we were able to give the kitchen a face-lift for less than 300.00.
D**N
Looks really nice. Great quality
I looked at everyone’s photos and reviews about 10 times before deciding to buy, so I wanted to add my experience and detail shots, plus photos in different lighting. It looks really nice. Takes patience and some trial and error. My counters have rounded corners and that was the hardest part to figure out. I am a perfectionist and did not want any seams, bubbles, ripples, etc. I tried both stretching around the corners with a blow dryer, and creating cuts and aligning the seams. I like the look of the stretched corners better, but both ways were very challenging to do. (I added photos of both) The gloss does get surface scratches very easily, even just the towel I used to press down the vinyl created surface scratches. You can only see them at certain angles, in certain light. Still, a million times better than the Formica underneath. I suggest caulking your edges and being really careful with seams. I overlapped mine and then went back at the end to cut away the overlap. It ended up slightly compromising the glue and made the seams not lay as perfect as I would like. I tried to fill the seam with caulk and silicone, then finally white paint, but it didn’t look good. I also found laying it down dry, smoothing 1” sections at a time, worked best and didn’t leave any bubbles. The method of laying down the vinyl after misting water under it and using a squeegee or credit card to smooth did create bubbles. Overall, I am very happy with the result and it is an excellent option while saving for stone countertops.
Trustpilot
1 month ago
2 weeks ago