☕ Brew your way to coffee perfection!
The Yama Glass 8-Cup Stovetop Siphon Coffee Maker is a premium brewing device made from heat-resistant borosilicate glass, designed to produce smooth, flavorful coffee. It features a reusable cloth filter, a measuring spoon, and a capacity of 24 oz, allowing you to serve multiple guests with ease. This stylish coffee maker is also dishwasher-safe, combining traditional brewing methods with modern convenience.


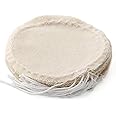
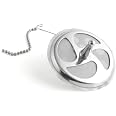
M**)
Love it but learning process!
I was looking for an alternative method. I was tired of the inconsistent results from my Melitta manual that I've been using for twenty some odd years. Still, the Melitta produced superior coffee compared to most drip machine I had sampled. If you went from Mr. Coffee to Melitta you'd be in coffee Heaven.The main gripes I had with that method is that the coffee seemed to fade to luke warm halfway through the cup, and my husband was forever getting the water way too hot resulting in bitter coffee.It isn't impossible to get a really good cup in the Melitta, but the the results are inconsistent for whatever reason.Enter my search for a superior cup of coffee without spending a fortune.First I started with a grinder. After hours of research I ended up purchasing the Capresso Conical bean grinder. Going from a cheap Krups blade grinder, I am now grinding coffee like a pro.After reading gobs of info, complaints and praises, I decided to take the plunge and purchase the Yama 8 cup.I had a feeling that with so many happy people toting the accolades of syphon coffee, perhaps those that groaned and complained had not figured out how to make it work properly,..granted it takes a bit of mad scientist experimentation to achieve java euphoria, unlike said no-brainer "load up the machine with coffee and water then flip a switch" convenient machines. The "difficult to clean" review people are so over the top to the point of just plain silliness, in my opinion. It's about as easy to clean as it can be, other than the fact that you can't lift a paper filter out and toss it. Walk out in the yard and use your hand to scoop out the grains and feed the worms! As far as the filter goes, I give mine a run through the pot with no coffee once in a while and leave it in water in the fridge. Frankly I could care less if it's stained as long as I know that there's no bacteria. A little splash of vinegar (rinsed out before use) will do the trick of keeping nasties at bay.Without writing a book about all the different ways I have experimented and failed, I will say that I put the beans away after 4 or 5 attempts resulting in much too bitter coffee, and started experimenting with just water so that I could understand better when to position the top chamber (bubbles in water plus temp) as well how best to adjust my flame. I highly recommend spending some time experimenting with just plain water first to get acquainted with the science.After quite a bit of online snooping I finally managed to nail an excellent pot, but I did make a few that were pretty darn bad. If you are new to this method, I would recommend that you go buy a cheap can of coffee from the grocery store to do experiment with. I use Pete's coffee and ruined a few pots that I threw out! ($$$)I would like to suggest to all of you considering this pot/method of coffee brewing not to listen to the bad reviews and just know that there will be a learning curve! Once you "get it" you're gonna get a GREAT cup o' coffee! My husband at first was,.."eh...not so great" but has gone to "Wow,...this is really great coffee"!I would post a link to an outstanding video here but it would probably get erased, so if you would like to see it you can view a very good 5 minute video by googling "Syphon, Intelligentsia". It answered a lot of questions I had as well as offering excellent tips.For instance: the reason for letting the top compartment rest in the lower compartment while the water does it's thing...Good luck! Good coffee!UPDATE AUGUST 6 2011:Well I know this is turning into a really long review but for the sake of all who've tried and failed, I have finally reached what we feel is the perfect cup for our tastes.First the beans and the grind: I am using the scoop that came with my Capresso burr conical grinder and measuring one scoop per cup. (8 scoops) I'm grinding on the coarsest setting. Come to think of it the scoop may have come with the Yama but can't remember because I bought them at the same time. My scoop holds a tad shy of 1/8 cup of beans for those of you without a scoop whom would like to try this method. I've tried different grinds and coarse gives the smoothest cup for us. If you like more bitter coffee, try a bit finer grind.For the water and rest of the process:I heat the water in a kettle until boiling, pour into yama to 8 cup setting and turn smallest burner (gas in my case and a very small burner) to medium. If you don't have a tiny burner, you're probably going to use low. I place the top of Yama so that it is resting loosely on bottom,... with the rubber section at the top of the glass tube resting in the pouring spout of the bottom carafe. (it will be leaning) When bubbles start to cling to the chain or a few bubbles start to rise, I engage the top with a little twist. This takes only a moment for those bubbles to appear if your water is already boiling. DON'T get the water too hot or you will have bitter coffee. While the water is rising, I grind my coffee and set my timer for 45 seconds. The water will rise slowly at first and then faster with a burst of bubbles when the last of it comes up. After it's all up north I turn the burner down to medium low and stir the water a little to cool it off a bit, then I pour the coffee in and give a quick stir. (I mean QUICK if you don't want bitter coffee). I then start the timer. After 45 seconds I give another very quick stir and move it off the burner. After it falls I pour it into my Nissan thermos.The coffee is outstanding. Smooth, ...packed with flavor, and perfect strength. WAY better than our old Melitta!FINAL TIPS:I've found that stirring too much results in bitter coffee. I use the flat handle of a wooden spatula (1-1/2 inches wide) to stir.If you have a failure and it starts to drop too soon it is because you lowered your heat too much. Thus the need to experiment with cheap coffee.I have tried to use this on an electric stove and found it near impossible but with some experimentation would have figured it out sooner or later. If you have an electric stove it will be more challenging but hang in there.Another great tip I incorporated into my routine is to use a little bit of bleach each time you clean the filter. Just use a cup of water and splash some bleach in there. Let it sit for a few minutes (it will turn white again) and then rinse well and store in clean water in the fridge.
K**P
Paper Filters, Detailed Dialed-in Procedure, Yama 8-Cup Siphon
As I found many of the reviews very helpful (thank you), I wanted to share my experience to maybe provide a short-cut to achieve the same level of excellent coffee I've been able to get out of the siphon (after a lot of trial and error); I hope it's helpful, and again, want to thanks others for posting their experience/recommendations/suggestions:1) It took us a few months to dial this in; here's the procedure (in detail) that produced an excellent cup of coffee (better than our Bonavita BV1900ts drip coffee maker). We roast our own coffee beans at home in a modified hot air pop corn maker [green beans provided on-line from Sweet Maria's; we like their 8 pound green bean sample pack. We roast a single batch (4.6 oz of green beans) in about 15-minutes, which is two days worth of coffee for us; it's easy and fun too].2) Picture - We replaced the Yama siphon cloth filter & filter assembly with the Hario paper filter & filter assembly (see the Equipment list at the bottom of this review, and the attached picture, showing the two filter assemblies, as you’ll need to switch the spring/chain assembly from the Yama cloth filter assembly (the longer chain with the cloth filer attached in the picture is the original Yama filter assembly) to this new Hario paper filter assembly, as the Hario spring/chain is a little too short,); we didn’t try the cloth filter that came with the Yama 8-Cup Siphon, as we wanted the better filtering of a paper filter (they say paper filters are suppose to minimize cafestol, a cholesterol elevating coffee compound), and secondarily, we didn’t want the hassle of the cloth filter (tying, un-tying, keeping it water in the refrigerator, etc.).3) Weigh out the whole coffee bean (before grinding) on the scale, then place whole beans in grinder's hopper (don’t grind yet).4) Tare your scale with the Yama siphon's empty bottom bowl on it; fill bottom bowl with hot water (we have a instant hot water tap mounted to our kitchen sink (putting out about 165 F hot water, which we love) connected to our under-the-counter reverse osmosis water filter). The water weight in ounces should be equal to the weight of the whole coffee beans (also in ounces) X 16.5 (water to coffee weight ratio); for example, we used 1.89 ounces of roasted Nicaragua coffee beans (home roasted 5.5 days prior), 31.2 ounces (by weight) water, and coarse grind (grind setting of 25 (twenty five) on the Baratza Encore grinder); the coffee looks a little coarser than sea salt. The proper grind setting is very important. We tried the recommended "a little finder than drip grind" setting and many others, but those yielded a more bitter cup; going with a coarser grind requires a longer brew time (as we include in this procedure), but yields a smoother cup.5) Start your timer; wipe outside of lower bowl with clean, dry dish towel to make sure the outside of the lower bowl is dry (to minimize the cracking potential), then place lower bowl on a medium or small size burner on your gas stove; turn the flame on (flame to a little higher than medium).6) While the bottom bowl of water is heating, install a new Hario paper filter (using a new paper filter vs re-using an old one seems to produce a better cup of coffee) into the filter assembly and secure filter assembly in top bowl; pre-heat top bowl with hot water (this will reduce the chances of it cracking and also pre-wets the paper filter); loosely place top bowl on bottom bowl (which is on the stove) at angle (not on tight yet).7) When the timer reaches 4:00 (depending on your stove), fully insert top bowl into bottom bowl (bottom bowl temp should be around 200 F; the water should look like it is at a simmer, just getting ready to boil); once the top bowl in inserted, water will start to rise into top bowl right away, but as it does, turn down flame (to low, want just enough flame to keep water in top bowl without a lot of bubbling, which tends to over-extract the coffee), then place upside down plastic lid on top bowl (in the upside down position, meaning with open part facing up, otherwise condensation will form, catch in the underside lip, and drip down to the bottom bowl, which could potently cause it to break); placing the lid in the upside down also allows you to use the small round cylinder as handle, while minimizing heat loss from the upper bowl.8) Start the grinder and grind the coffee beans (coarse grind).9) Once the grinder is finished, take the coffee container over to the siphon (don't add it yet); stir the water in upper bowl counter clockwise (CCW) with a flat paddle (like the flat handle part of the plastic spoon that came with the Yama siphon) to make a fast and deep vortex (so about 6 full circle stirs).10) Reset the timer and re-start the timer from zero, 0:00, then add ground coffee to upper bowl (to get all the coffee out of the container, do not tap coffee container against upper bowl, use your knuckles or other utensil to tap all the coffee out of the container).11) Use a whisk to lightly submerge coffee grounds (within 15 seconds or so), do not stir (in a circular fashion, just submerge the grounds to get them all wet); timer should be at around 0:30 when done pouring coffee in top and whisking; put upside down lid on top bowl.12) At 0:50, using flat paddle (you're done with the whisk), fold coffee into water from sides of bowl with a downward motion, not a circular stir; go around the entire bowl, then do an “N” stir in the middle (make the letter N with your paddle, going deep, across the filter); do not stir in a circle or it will keep moving and over-extract; this mild agitation should take less than 15 seconds, do not over-agitate, less is better; put upside down lid on to bowl and wait.13) At 2:00, shut off flame, move siphon to counter top (on top of flat rubber-type pot holder), make sure top bowl is tightly on bottom bowl (by gently pushing it down using a pot holder), then give it a fast stir CCW (6 rotations), making sure to also go deep with the paddle to stir the grounds up off the top of filter; put upside down lid on to bowl (slightly off-center, so as to not restrict air that will need to flow into the top bowl during the drawdown) and leave undisturbed during the drawdown.14) At 4:30, you should see the larger bubbles in the bottom bowl; at this point the drawdown is finished, however, it will take about another 30 seconds before you can easily remove the top bowl. The coffee grounds should be in a mound over the filter when it's done, but some will be along bottom too; however, we found that coffee not as fresh (or store bough pre-roasted whole bean coffee) draws down faster and the mounding is more pronounced.15) At 5:00, take the siphon and move it near the sink; put it on top of rubber-type pot holder; gently rock the top and use your thumb (from the hand hold the siphon handle on the lower bowl) to pry up the top bowl at an angle to let air into the bottom bowl to relieve the vacuum; remove the top bowl and place it into the holder/lid on the counter, in a safe area to cool (where it won’t get knocked over and break).16) Swirl the coffee in the bottom bowl; transfer it into a large pre-heated non-plastic coffee mug and put the lid on the mug (a plastic mug lid is okay, as you won’t be drinking through it); as desired, add any pre-heated creamer/half-and-half and/or sweetener to the mug, stir, then put the lid on the mug; don’t drink yet, as this is your coffee “storage mug,” not your coffee “drinking mug,” see below.17) This last step is very important; please don’t skip it. The coffee is too hot to enjoy from the storage mug, and more importantly, drinking it though the mug lid does not allow you to get the full enjoyment (as you need the coffee aroma flow up into your nose), so we pour the coffee from the mug (through its lid) into a second, drinking mug (like a ceramic coffee cup or stainless steel coffee mug) and make sure when we sip it, it’s uncovered, not through any lid (we sometimes cover the second mug between sips, depending on how fast we’re drinking it, but always take the lid off to drink/sip the coffee). Only add as much coffee from the first mug into the second mug as you’ll drink over the next few minutes so you’ll always enjoy hot (but not too hot) coffee. Thanks again to all the other folks that took time to write reviews! Enjoy!18) Equipment (all from Amazon.com):a. Coffee Siphon - Yama Glass 8 Cup Stovetop Coffee Siphon; $55b. Siphon filter assembly and paper filters - 1 X (50 Pcs Filter Paper) Mn Filter for Hario Siphon(Japan Import); $15c. Grinder - Baratza Encore Conical Burr Coffee Grinder with Bin; $129d. Coffee Storage Mug - Contigo Autoseal West Loop Stainless Steel Travel Mug with Easy-Clean Lid, 20 oz; $22e. Etekcity 2000g Digital Pocket Scale, Stainless Steel, Backlit Display, 0.01oz Resolution; $15
Trustpilot
1 month ago
1 day ago