
DOWNLOAD THE APP


Customer Services
Copyright © 2025 Desertcart Holdings Limited
DOWNLOAD THE APP


⌨️ Elevate your desk game with the Keychron K10 — where productivity meets style.
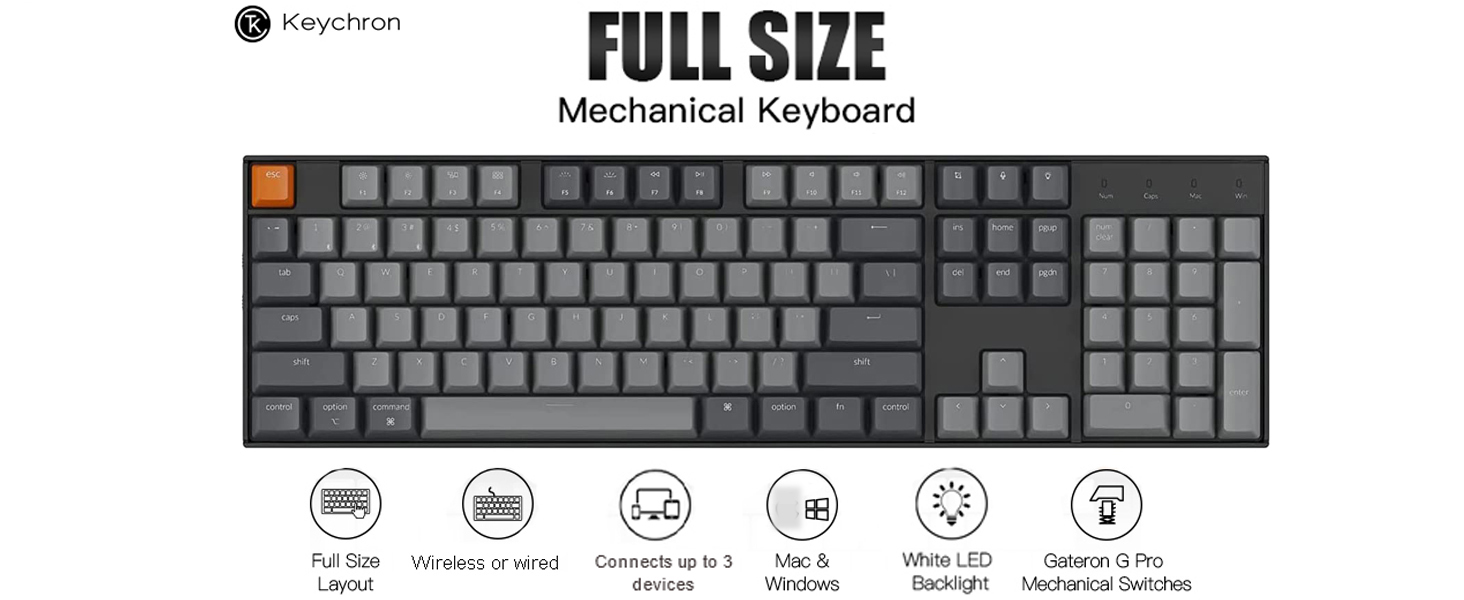
The Keychron K10 is a full-size (104-key) wireless mechanical keyboard featuring Gateron G Pro Brown switches for tactile, quiet typing. It supports Bluetooth 5.1 connectivity with seamless switching between 3 devices and wired USB-C mode. Designed for both Mac and Windows users, it includes dedicated multimedia and function keys, plus extra keycaps for OS customization. Its 4000mAh battery offers up to 240 hours of use without backlight, complemented by white LED backlighting and ergonomic adjustable feet for long-lasting comfort.


| ASIN | B0C5HYWB1L |
| Batteries | 1 Lithium Polymer batteries required. (included) |
| Best Sellers Rank | #1,523 in Computer Keyboards |
| Customer Reviews | 4.3 4.3 out of 5 stars (395) |
| Date First Available | May 17, 2023 |
| Item Weight | 3.04 pounds |
| Item model number | HS-K10A |
| Manufacturer | Keychron |
| Product Dimensions | 17.32 x 5.31 x 1.57 inches |
S**M
Love it - All that i need out of a Mechnical Keyboard and more - Update!
2 months Update: I have used the keyboard now for a while on daily bases. I got to test it even further beyond my initial review and enjoyed having some fun with it by modifying it beyond its stock status (Please see the updated photo with the Blue keycaps for its current status). There is nothing to change in my original review as it still holds true. Love the consistent performance and i still find myself looking forward to typing on it. It is worth mentioning through that only once that i ran into some bluetooth switching issue were the keyboard did not want to reconnect to my Macbook pro and i had to restart the bluetooth on the Mac to address it. Turning off blutooth and on again on the Mac resolved the issue and the keybaord connected successfully right after (Not sure if it was the keyabord or the Macbook Pro bluetooth misbehaving when it happened). I still recommend this keyboard and i am keeping the 5 stars rating i gave it. I will list below the mods I've done in case there is an interest to do something similar. 1. Replaced the stock ABS keycaps with better PBT key caps - I tired few brands and settled on Matrix Keycaps. This improved the quality of the keys dramatically and also improved the typing experience from feel and sound perspective. (Please keep in mind the short (1.75u right shift key was a bit of a hassle to find fitting keycaps for it). 2. I lubed both the Gateron Brown switched and the stabilizers - Completely transformed the experience on the keyboard to a whole new level that exposed the excellent foundation that this keyboard is. I really think KeyChron should consider have the keyboards sold with the switches lubed already. 3. replaced the USB-C cable - This is mostly cosmetic as i wanted to match the color of my setup. I hope the above is answers your questions and concerns. Best of luck with your purchase! Cheers! -------------------------- Initial Review: Product arrived even earlier than the projected time. Was packaged really well and sealed as it came out from the manufacture. High quality product that looks even better than the detailed photos presented on the site and works flawlessly. Within the first 5 minutes i had it connected to my three computers (Windows Desktop, Windows laptop and a MacBook Pro) at my desk over Bluetooth without any issues. I love the ability to pretty much configure everything from the keyboard itself without having to download software to do that. Even then the configuration from the keyboard was super easy and strait forward. As far as rating it in comparison to other mechanical keyboards, this is a super nice one and runs with the the best of them out there especially in this price point. Typing on it is a joy and the Gateron Brown switches are perfect in feel and sound but to be honest this is all about personal preference. Not as loud and clicky as the MX switches but super smooth and just the right click noise for me. If you are not familiar with those then i recommend watching any of the videos on You tube that specifically provide the noise and feel comparison between them and the other switches in the market. The one thing i would've wished for is brighter LEDs and initially that is not an issue if you are planning on continuing to use the included Keycaps but if you are planning on upgrading to PBT Keycaps then that might be a concern for you. The quality of the PBT keycaps you will be buying might or might not impact the visibility of the lED lighting. I definitely recommend this product. Thanks for the premium product all around.
R**S
Nice tactile feel
Very nice feel. Good feedback. The brown switches don't click, but the keycaps make plenty of noise when they bottom-out. So don't expect this to be a quiet keyboard just because it's using brown switches. It doesn't come with a wrist rest. I highly recommend adding one. Keychron make some nice looking wood rests that are sized for each keyboard. That's what I ended up going with and it's very nice. They keyboard works well when wired and when operating with a BT connection. It has a fairly aggressive power saver feature that powers down the BT after a minute or so of inactivity. It takes a few seconds to re-establish a connection. The first couple times it caught me off guard and I had to pause a few seconds and retype the words it missed. But the quality is solid. I'd definitely recommend the K10 if you're looking for a mechanical keyboard.
R**N
Damn good keyboard for the price of a garbage one
What did I dislike? Pretty much nothing. The build quality is astonishingly good, it’s heavy enough to feel substantial, and although the aluminum case is only an aluminum upper, since it’a all you feel while using it I don’t care one bit. As other reviewers have said, the keycaps are not very good, as they are relatively think ABS with what I think are sharp-ish edges and a silly legend design. THey are perfectly usable, however, and I’m absolutely certain that there are plenty of people who are totally over the moon with how they feel. As you can see, though, I already had a set of PBS keycaps I couldn’t wait to put on, and that was the first thing I did when I got it. Bluetooth works seamlessly, the Gateron Brown switches feel perfect, and the overall package design is excellent. Not just for the price, but especially for the prices, this keyboard is an absolutely incredible buy. Highly recommended, although I suggest getting some nice PBS caps to make the board even nicer.
A**R
It is what you pay for
Keys feel great, board feels heavy and well-made, stabilizers feel great. Lighting is simple and the angle of the keys/board feel right. The USB-C port is recessed, and seems too tight for most USB-C cable connectors to fit into the recession. Which means you will most likely need to buy or order another USB-C cable along with this board as the cable that comes with it is ~2 feet long. The bluetooth is terrible, I'm not sure if it's my PC or the board, but it disconnects every 5 seconds, then takes 2-3 seconds to reconnect after pressing a button to 'wake up' the board. Documentation says it doesn't go to sleep until after 10 minutes, but it's 5-10 seconds without touching the keyboard that it disconnects, turns off, and needs to reconnect. I've never used bluetooth with this build before so I can't rule out my motherboard specifically, but for me the bluetooth is useless. It's $50, well worth the try.
K**D
Been wanting this for 2 years and finally managed to get it and very disappointed. First up the 'K' key has an 'M' - so basically i have two M's on my keyboard!!!! Secondly every few days am wrestling with it to just plain work properly. Bluetooth connectivity is super patchy, there is a very noticeable lag, sometimes it starts typing of its own accord, even while writing this review it typed several letters twice. Sometimes it completely stops responding and then i have to unpair and repair all over again. Overall - for all the hype - very disappointing. When it works though - its pretty cool. Looking stunning, and keys are lovely to type on. Its a pity the connectivity issues are a huge pain. Oh and the cable is laughably small. I cant connect the damn thing to my PC without having to have my PC really jammed in my face - so the cable is pretty useless other then for charging.
O**.
It's really great quality and fast delivery. The keyboard looks really so cool with a lot of different lights under the keys. I received some cleaning and removing keys tools. Highly recommended.
J**E
What an amazing keyboard!. There is not much I can say that hasn't been said already. This keyboard looks amazing, feels amazing and sounds amazing! I'm new to the mechanical keyboard world and I'm sure there are many other great ones but if you are looking for a good keyboard you can't go wrong with this one! You can connect up to three devices, wired or via bluetooth, switch between Microsoft and Mac OS, and has the best customisation and functionality in such a small form factor.
M**.
I like it a lot. A little loud but O rings solves that. 1 issue in windows mode. Function keys F1 F2 F3... Work only in Bluetooth mode but not in cable mode which is weird. The light key in the corner is extremely annoying. I press it by mistake almost everyday. i with it was a delete key or rgb on/off only instead of changing the rgb mode. Everytime i press it by mistake i have to cycle all the way through to the white light again. The locking function is stupid. It should allow you to turn the rgb on and off
R**F
Weight of the keyboard - clickiness and pressure are just perfect for me with the brown switches. Works a charme on Windows 11 and on MacOS.
Trustpilot
2 weeks ago
1 week ago