🔧 Snap, Connect, Go! - Simplifying your networking experience.
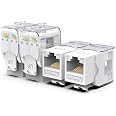
The AMPCOM CAT6 Tool-Less RJ45 UTP Keystone Jack is a self-terminating, no-tool-required module coupler designed for seamless networking. With a durable ABS case and gold-plated connectors, it ensures long-lasting performance and compatibility with various Ethernet standards. This 10-pack offers a versatile solution for all your networking needs.
C**G
Not exactly toolless
One reviewer stated that, if you don't already know how to do network wiring then you probably shouldn't be doing it. Nonsense. There are plenty of videos and websites that explain this. If you have never pulled cable, you probably don't have a lot of the tools needed. Research and you will get suggestions for all that you need.These keystones are not toolless, you will need wire cutters to cut off those wires sticking out (see vendors pictures for the product). I also had to use channel locks to crimp down one because it just wouldn't press all the way in on its own no matter how hard I pressed. That all being said, using these "toolless" type keystones is a lot easier than punching the wires down with a punch tool; and less time consuming. What would have taken 15-20 minutes to put three RJ45 jacks on I was able to do in 6-7 minutes.Make sure to have a jacket stripper like this (cheapy; but they work): https://smile.amazon.com/Stripper-Crimping-Stripping-Telephone-BUSHIBU/dp/B0768QBNWQ/ref=sr_1_5?crid=Z1CNGCDBZ1EB&dchild=1&keywords=cat6+jacket+stripper&qid=1613340307&sprefix=cat6+jacket%2Caps%2C189&sr=8-5You probably already have wire cutters, channel locks, and scissors.Here is how I would do, let's say, three CAT6 cables:- Have your tools and jacks on hand.- Using the jacket stripper, cut the jackets about 1in from the end, but DO NOT remove them!- Once all three jackets are cut, slide a snap-fit over the end of the wire (make sure it is in the correct direction) and then pull the jacket off and spread the wires out in four directions and untwist the wires.- Move the snap-fit piece to the end of the jacket up against the wires.- Following the color coding, put the wires in the correct position for its color. You should already know if you are wiring for 568A or 568B. For instance, my CAT6 patch panel defaulted to 568B so I just went with 568B. As long as each end is the same standard at both ends of the wire, it will work.- Press the snap-fit onto the cable conductor. There should be no gap once it is pressed into place. You may have to use channel locks to get it to do so. But that doesn't happen very often.- Use wire cutters to cut off the excess wire sticking out- Close the clear plastic lock caps together- Boom. Done. Move to the next wire.
K**S
Very easy to use
I am sorry, if you can’t figure these out then you probably shouldn’t be wiring your network. I have been installing networks for over 20 years and this is about as easy as you can get. Step one: strip back your wire about an inch or so and feed through cap. Step two: untwist the wire pairs and fit them into the small channels on the cap according to the wiring diagram. Step three: push the cap onto the jack to terminate the wires. Step four: use some small wire cutters to clip the excess wire. That is all there is to it. I didn’t use the zip ties. It really doesn’t get any easier that.
S**N
A Bit Bulky, But a Huge Time Saver
I do work in the residential subsection of the it industry, which is a bit niche, but we often have to work in cramped, dark, and confined areas, especially in low voltage and networking panels (we install these around the same time lights go in, so we are often actually in the dark). I really like these because they are just so fast. Don't get me wrong, if you are working in a well lit environment where you can maneuver some tools around, or are just doing thousands of them, then these probably aren't going to be worth the extra twenty cents each. However, for low volume installations, it is worth the extra few bucks to save the time and tooling for the install, plus they are just plain easier to use.
P**S
Crap with standard punch tool
I've terminated a lot of cables over the years, these have been the worst jacks yet!The gap for laying the wires down is WAY to large. The plastic backing that is usually used to clip the wire with a punch tool only has a small piece of plastic which makes the wire wonder and NEVER in my life had I had to remember to put the back clip on first before punching the wire into place.These are the worst jacks I've ever seen, I will not buy them again but unfortunately due to time restraints have to make them work at the moment!Update: Had to remove the jacks today and the plastic was brittle enough on the locking mechanism that a couple of them broke.These are by far the worst jacks I've ever used!
M**S
Beats the heck out of punchdown jacks
As someone who just finished wiring their entire home up with CAT6, I'm so glad I spent the extra cash on these. They're not that much more expensive than regular keystones, but the installation is *much* simpler! It works exactly like they say; and getting each wire down into the little channel is a lot easier than punching down each of the fiddly little buggers down the old fashioned way.I also like that the wire connection has a dust cover on it. Normally once you terminate a keystone jack you never have reason to look at the back of it again, this ensures that the contacts will stay clean for years to come.I'd gladly buy these again, and I'd recommend them to anyone else in a heartbeat.
Trustpilot
1 day ago
2 weeks ago