🎉 Paint Like a Pro – Elevate Your Game!
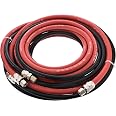
The TCP Global 2 Quart Paint Pressure Pot is a professional-grade painting solution featuring a 2.5-gallon capacity, optimal operating pressure of 25-30 PSI, and a 5-foot air and fluid hose assembly. Designed for efficiency and ease of use, this paint pot is perfect for both large projects and intricate detailing.


| Size | 2-1/2 Gallon |
| Style | Gun |
| Weight | 18 Pounds |
| Batteries Included? | No |
| Brand | TCP Global |
| Manufacturer | TCP Global® |
| Item model number | PT8310 |
| Package Dimensions | 39.4 x 30.2 x 29 cm; 6.35 Kilograms |
| ASIN | B00IK3TTMY |
M**N
Max pressure 43psi!!
I love the durability of this pot! It’s made with nice thick metal and is rather heavy. It shipped on time, although more likely due to the postal service the box was very very beat up and had large rips in it.No where on the pot, the post or online could I find the max pressure this pot is rated for until I read the safety sheets it came with, turns out it’s only 3.0 bar aka 43psi. Not ideal for resin casting if you want to achieve the 50psi or more recommended online, also to note, if you want to convert it for resin casting I recommend just buying all the extra bits on Amazon at the same time. I went to 15+ stores looking for all the stuff I need to convert it. Also the pressure release valve it comes with doesn’t hold max pressure (43psi) and leaks starting around 15 psi, where I live the lowest pressure release valve I could find was like 150psi which isn’t safe to put on the pot since you want it to release the pressure before it’s at a dangerous level. I recommend buying one on here as well. I haven’t actually been able to use the pot yet as I’m waiting for a new pressure release valve. But I have high hopes that I can still get this pot to work for me!The diameter is about 9.5inches and the depth is around 10inches. The bottom is concave so you’ll need an insert if you need the bottom to be flat. I made my insert out of cardboard since it’s easy to replace.Best of luck to anyone converting the pressure pot for resin. It’s harder then it seems so keep working hard! You’ll get it done
A**N
Great Pot! Here’s how to convert it for resin casting.
This pot is a great value and perfect for turning into a pressure pot for casting resin and these are my instructions on how I converted it!This pot comes with almost everything you need to convert to a pressure pot for resin casting. There are a handful of other items you need in order to convert. You can find them all here on Amazon or at your local hardware store. I think I spent another 15$ Total on all these items.1/4-in NPT Mini Ball Valve3/8-in (to 1/4) Threaded Male Adapter Bushing Fitting1/4-in Threaded Cap Fitting1/4-in Threaded Female Elbow Fitting1/4 -in Threaded , 1/4" Male NPT Safety Valve, 60 psi Set Pressure1/4 -in Threaded NPT air compressor coupler fittingTeflon or Plumbers tape1st thing is to remove all the fittings from the lid. Including the pipe that goes down from the lid into the pot. All these parts were extremely difficult to remove, as they should be as this thing is made to hold paint under air pressure! I had to use a vice in order to get all the parts off. And even had to cut one of the fittings off with my Dremel. It was the hardest part for sure.Once all the parts are off clean the two holes with the included brush. There will be a lot of pipe glue that you will want to get off.Next thing is to wrap Teflon tape around all the male threads. This means on all 3 sections of the included T pressure gauge, on the 3/8-1/4 reducer on the air pressure fitting and on the safety valve.Both holes look similar, but they are not the same size/thread. One is a 1/4 and the other is 3/8. You will want to use your 3/8 to 1/4 reducer on 3/8 hole. Use a wrench to make sure the reducer is securely attached.Now let’s talk about the T shaped gauge that comes with the pot. Wrap all 3 male threaded parts with Teflon. On one side of the T connect the 1/4 cap, and on the other side screw on your female elbow. To the elbow you want to put your ball valve(again Teflon all the threads) and to the ball valve goes the air pressure fitting. Make sure these are all tight with a wrench (not just hand tight)Now you want to screw in the bottom of your now complete T gauge assembly to the 3/8 to 1/4 reducer you have already installed on the lid.So all we have left is the 1/4 inch hole in the lid. All we need to do on this one is screw in the 1/4 inch safety valve (Teflon again)So now you should be assembled!It’s worth saying again. All joints MUST have Teflon tape so the air doesn’t leak and you MUST screw them on with a wrench as tight as it will go. A pressure pot can explode if not assembled correctly.Here are some tips on filling with air.When you are filling you will need to have double the amount of pressure (psi) in your air compressor tank than you want to fill the pot to. So if you need 40 lbs of psi in the pot you will need your compressor tank to have at least 80lbs. If you don’t you will notice that the pressure will even out and stop filling.Attach the lid and screw down the clamps opposite from one another at the same time. This keeps the lid level and prevents leaks.If you are losing pressure you can spray the joints with soapy water, where there are bubbles there are leaks. Empty the tank using the ball valve and tighten your joints or take off and use more Teflon before attaching again..Keep the ball valve closed while you are attaching your air compressor hose, and slowly open so you don’t knock over your molds inside the pot.Always use the ball valve to control the release of air. Do not take off the lid while the pot is pressured.Hope this helps!! Good luck!
S**R
Needs fixing!
Seems like a well built pressure pot. But the pressure relief valve won’t stop leaking until the pot is empty. It’s a simple $8 part fix but that’s besides the point and inconvenience. Now I have to do repairs before I can use it. 🤙
G**S
Ideal for resin work like dice making with some modification.
I purchased this pot for making dice sets with resin, and as the picture shows, it does a great job. However, some modifications are required.First, Take off everything, including the pipe inside the pot. get some gloves & some vice grips.Second, you'll need these parts. And don't stress, they all just screw together and let air through. If the air flows & doesn't leak (LockTite linked below), you're golden. There are many ways to put this together, but this is how I did it, and it works perfectly. Make sure to get the LockTite, you won't regret it.Brass Coupling 1/4" NPT Female x Female:https://www.amazon.com/dp/B074884TPL?ref=ppx_yo2ov_dt_b_product_details&th=1x2 Brass pipe fitting cap 1/4" NPT Female:https://www.amazon.com/dp/B000BO8VRE?psc=1&ref=ppx_yo2ov_dt_b_product_details1/8" NPT to 3AN fitting-90 degree female adapter (this elbow is for inside the pot where the air flows in:https://www.amazon.com/dp/B093QP4YXL?psc=1&ref=ppx_yo2ov_dt_b_product_detailsx2 brass fitting 90 degree 1/4" NPT male to female pipehttps://www.amazon.com/dp/B07318CNHG?ref=ppx_yo2ov_dt_b_product_details&th=1Brass fitting - 3/8" male x 1/4" pipe adapterhttps://www.amazon.com/dp/B000BO6OLY?ref=ppx_yo2ov_dt_b_product_details&th=11/4" Male NPT M style air fitting quick connect couplerhttps://www.amazon.com/dp/B000COS0PQ?psc=1&ref=ppx_yo2ov_dt_b_product_detailsAir Hose fittings x2 - 1/4" NPT male threadhttps://www.amazon.com/dp/B074SXBJQP?ref=ppx_yo2ov_dt_b_product_details&th=1Brass inline ball valve shut off switch 1/4" NPT x 1/4" NPT Female fittinghttps://www.amazon.com/dp/B08L36TQJ5?ref=ppx_yo2ov_dt_b_product_details&th=1Safety valve - 1/4" male NPThttps://www.amazon.com/dp/B0081TJHXI?psc=1&ref=ppx_yo2ov_dt_b_product_detailsAND YOU'LL BE GLAD YOU BOUGHT THIS...https://www.amazon.com/dp/B003XZB54O?ref=ppx_yo2ov_dt_b_product_details&th=1
M**S
Easy convert for resin casting, but some dangers
As seen in my photo, i converted this for resin casting, my next note is VERY importantGET A NEW GAUGE AND POP OFF VALVE!!I had no idea the gauge was broken when i first used it, i did not mess with it at all, but it was obscenely inaccurate!! When i pressurized it, from my pov the tank had issues going over 30 psi, the seal would roll and release my pressure until it went to 29 psi. Or so the gauge read. Around my third run, as soon as i activated the plunger, the gauge jumped to 70 psi, so naturally i immediately released all the pressure, there could not have been more than 5 psi at the time...The gauge did not go back to 0, so i got a new one, now its at 40 psi and we are good. My best guess is i was pressurized at over 60 psi when the seal rolled, but regardless as a safety measure spend the extra $13 on a new gauge so this thing doesnt explode on you!!Otherwise, it was easy to convert. My first time, which explains the crude work lol, just be real careful with it because they have a thread sealer in most of the threads so they suck to remove. If you have any questions feel free to message me on insta, the_imperial_scavenger !!
Trustpilot
1 week ago
3 days ago