⚡ Power, Precision, Portability — Own the Cut, Own the Craft!
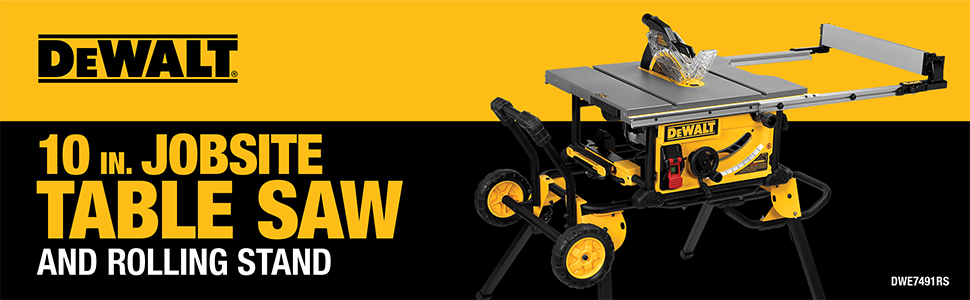
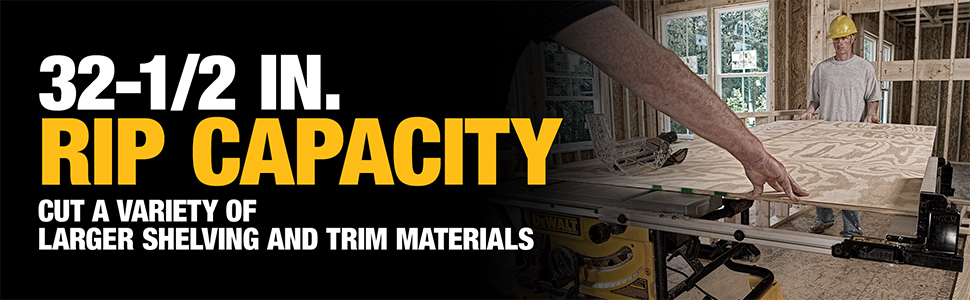
The DEWALT 10-Inch Table Saw with Rolling Stand (DWE7491RS) delivers professional-grade performance with a powerful 15-amp motor spinning at 4800 RPM, a spacious 32.5-inch rip capacity, and a patented rack & pinion telescoping fence system for precise, smooth adjustments. Designed for portability and stability, its rolling stand sets up quickly and folds down compactly. Onboard storage keeps essential accessories organized, while a 2.5-inch dust port ensures a cleaner workspace. Perfect for millennial pros who demand efficiency, accuracy, and mobility in one sleek package.


| Brand | DEWALT |
| Color | Yellow/Black/Silver Table Saw/Stand |
| Blade Material | High Speed Steel |
| Surface Recommendation | Wood |
| Power Source | Corded Electric |
| Special Feature | Brake |
| Included Components | (1) Rolling Stand (1) Push Stick (1) Miter Gauge (1) Rip Fence (2) Blade Wrenches (1) Blade Guard Assembly (1) 10" 24-Tooth Carbide Blade |
| Product Dimensions | 31"L x 24"W x 28.52"H |
| Warranty Type | Limited |
| Item Weight | 110 Pounds |
| Speed | 4800 RPM |
| Blade Length | 10 Inches |
| Number of Teeth | 24 |
| Number of Batteries | 1 Lithium Ion batteries required. |
| Cutting Angle | 90 Degrees |
| Blade Shape | Rectangular |
| Global Trade Identification Number | 00885911329163 |
| Handle Material | Plastic |
| UPC | 885911329163 |
| Manufacturer | DEWALT |
| Part Number | DWE7491RS |
| Item Weight | 110 pounds |
| Item model number | DWE7491RS |
| Batteries | 1 Lithium Ion batteries required. |
| Is Discontinued By Manufacturer | No |
| Size | One Size |
| Style | Table Saw |
| Finish | Brushed |
| Material | Blend |
| Pattern | Tablesaw |
| Shape | Rectangular |
| Item Package Quantity | 1 |
| Number of Handles | 1 |
| Cutting Diameter | 10 Inches |
| Measurement System | Metric |
| Special Features | Brake |
| Batteries Included? | No |
| Batteries Required? | No |
| Warranty Description | 3 year limited manufacturer warranty |
| Assembled Diameter | 10 Inches |
L**M
Nice mobile saw.. Highly recommend.
I finished assembling the DWE7491RS saw/stand combo today and I'd like to offer up some tips and observations.The booklet for the stand is not very clear on some things and you will find yourself looking back and forth on page 1 which has two illustrations of the assembled stand.One of he things it does not tell you is you are going to need a dead blow hammer (rubber mallet) to mate the stand frame sections together.You will also want a 13mm wrench and a 13mm socket/ratchet. If you don't have any metric tools, wrap some electrical tape or masking tape around the handle of the supplied "mickey mouse" wrench. It will tear you hand up if you don't. Don't loose the Allen wrench that comes with it unless you have a metric set. None of the SAE sizes will fit the bolt heads.As you start assembling the stand legs, handles etc., you will notice that on one side the bolt holes (in the yellow structure) are normal round holes. But one opposite side they are slightly slotted. This allows for tolerance differences during the manufacturing and assembly at the factory. I found that if you install the bolts in the normal round holes first, then the slotted ones the bolts fit better. I tried the other way around first and had a heck of a time getting the bolts into the normal holes. It really doesn't make sense to me but that is the way it is.The two M6-12 pan bolts for assembling the frame halves are labeled "Tool & Frame". All the other labeling on the parts bag are fairly straight forward.When you install the saw onto the stand frame you will find that access to the nuts on the saws front side is difficult due to limited clearances. A thin wrench is the best option.Other saw info:The rip fence is attached to the left side of the saw for shipping/storage. I wish I had taken a picture of it before I removed it as I can't figure out how to re-attach it there (figure 45 and the "how to" on page 14 of the saw manual is useless).If you have magnetic featherboards your out of luck. The top of the saw is cast aluminum.There is a button on top of the cord storage that may be a thermal reset button. There is nothing in the manual about it.The power cord is fairly stiff and seems to be well insulated. However the power cord is rather short so if you are using it at job site you are probably going to need an extension cord.Which brings me to the next subject, power. This saw is rated at 15 amps so one would expect a fairly hefty motor. The one that comes with it seems rather small in size compared to some other motors of equal amperage.The miter slot is standard T-slot.I purchased the DEWALT DW7444 Dado Throat Plate (for DW744 saw) and it fits fine although the dado blade size is probably limited to 8" to 8 1/2" inches in max diameter of about 3/8" wide (or so).I have seen comments that the dado throat plate and the standard throat plate snags wood. There are adjustment screws on both of them and the can be adjusted to be lower than the throat cut-out. Also seen a comment that the dado plate doesn't lock. Yes it does just like the standard throat plate.The quality of the unit seems well made and fairly well engineered. There are some plastic parts that I have concerns about especially if one is actually going to use it daily for construction. I would have given this saw 5 stars but I need to use it more before I rate it that high.Update July 22nd:I finally got around to cutting some wood with the saw and must say I was very wrong about the size of the motor vs. actual power. This baby can flat cut wood. I swapped out the factory blade for a 80 tooth Diablo carbide blade and was ripping through pressure treated 2 x 6's like they were soft butter.I did a an alignment check of the Diablo blade to the miter slot (left side) and it was approximate .1mm off (front to back of same point of blade). I raised the blade all the way up the marked a spot on the blade just behind the carbide tip. With the blade rotated so the marked spot is even with the table top on the front side of the saw I measured the distance from the blade to the edge of the miter slot. I then rotated the blade towards the back of saw until the same marked spot is even with the saw's table top on the back side and made the same measurement.The bevel of the blade to the saw table was dead on from the factory.The exhaust port on the back of the saw fit my ShopVac brand vacuum perfectly.. no adapter need. However, will need something to fit the blade guard exhaust port.Couple of cons though. The miter gauge storage takes a contortionist to get it in and out of the storage location. I have reservations on the longevity of the plastic (rubber?) caps on the bottom of the two legs on the wheel side. You have to rotate the saw on these to erect (and lower) the saw. Abrasive material like concrete will wear them down as you rotate the saw up and down. Already seeing black makes on my floor. In regards to the riving knives. There is one "permanently" mounted to the blade guard and the other one is a stand-alone one that is pre-installed at the factory. The manual (page 9 - figure 27)indicates the the "permanent" one is 2.4mm thick and the stand-alone one is 2.2mm thick for thinner blades. The ones I received with the saw are both the same thickness. The two riving knives are shaped differently so I'm not sure if Dewalt changed the thickness after the manual was printed. Finally issue is there is no apparent locking mechanism hold the blade in the selected height position. The tilt is locked down but not the blade height. I guess it relies on the gear friction to hold it in place (?). I would now make this a 4 & 3/4 star rating if I could.16 Sept 2014 UpdateBeen using the saw for a couple of months now and have some updated observations:- As I noted previously, one will definitely need an extension cord if you are more that a few feet from a power source.- The plastic covering on the legs which one rotates the saw up and down is really taking a beating on raw concrete. Probably will not be an issue for a long time if used on dirt.- The saw is definitely powerful and capable of cutting all of the woods I've used on it (oak, cherry, walnut, birch, pine, and extremely hardened pressure treated pine). I use an 80 tooth tungsten carbide Diablo blade for all my cutting and it works very well with this saw.- After finishing a job, you should remove the blade insert, drop the blade all the way down and vacuum out the blade chamber, especially the cloth material that is used to keep the sawdust out of the motor.The cloth gets imbedded with very fine sawdust powder. As a side note to this, I noticed that when the saw is in the stowed upright position, there is a plastic cover over the saw-blade's aluminum housing. The are holes for screws and threaded mating holes in the housing for these screws. The were no screws in these holes on my saw. However, I did not that the plastic cover plate is easily removable and allows access to the saw blade chamber for cleaning.- Although the saw really kicks a lot of sawdust out the back port with or without a vacuum attached, the enclosure the houses the blade will still accumulate sawdust over time and should be cleaned.- The blade insert is made of aluminum but at the end of the slot, there are two black metal (iron/steel?) plates on each side of the opening. With the high humidity here in east TX they have started to rust. They appear to be clipped in and I think I can remove them and refinish them. Don't know whey they are there and don't seem to serve any purpose that I can see.- I had noted in my review previously that there is no apparent locking mechanism to hold the blade in the desired vertical position. I like to cut wood with a minimum piece of the blade protruding up from the cut. On several occasions, I have observed the blade "slipping" downward just enough that the blade did not cut all the way through the wood. In several instances I was using wood that had been planed smooth on both sides so that they were very straight and level. Since it does not do this all the time, I attribute this to where the two gears that raise/lower the blade sit in relation to the height selected. The fix for me is easy, just set the blade height higher than what I used to use. I don't think this will work well when doing dado cuts.Feb 22, 2015 UpdateHave been using the saw for 8 months now and I've upped my rating from 4 to 5 stars.The blade slipping down issue I noted in my previous update has disappeared. I don't know if I was doing something wrong, but it just flat stays locked in place.I absolutely love the rip fence. It seems to be infinitely adjustable and it locks firmly in place no matter where you set it. More importantly, when you use the lock down lever, it doe not move the fence even a fraction of an inch.I was wrong about using the DEWALT DW7444 Dado Throat Plate. The plate fits and locks into the opening but dado opening is not long enough to accommodate an 8" dado blade. Apparently the bade placement in this saw is located closer to the back of the saw. My fix was to use my band saw and cut the slot all the way open (to the rear of the throat plate). That fixed it. So far I haven't found a factory dado throat plate for this saw. I guess one could buy a blank zero clearance throat plate and cut it open with a dado blade set.If you are looking for an accurate saw that stores in a relative small foot print and is very easy to set up or fold for storage, I would highly recommend this saw. It may not be suitable for making quality furniture pieces, but you could not come any closer in a portable unit.Mar 6, 2014 UpdateWas looking at make a zero clearance throat plate for this saw and found one on Amazon for the DW746 table saw. I knew the dado insert for this saw fits so I thought I'd give it a try. Well low and behold it fits perfectly. In fact there is a sticker on the back of the this throat plate that indicates it will fit the following DeWalt saws: DW744; DW745; DW746; DWE7480; DWE7490X; DWE7491RS; and DWE7499GD. For this saw you have to remove the riving knife (aka: splitter), but I have found a solution if you want to keep it with the this throat plate. Measure how far back from the saw blade's does the riving knife extend (you need to raise the blade up all the way to make this measurement). Follow the instructions on how to setup the new throat plate (including the removal of the the riving knife) and make zero clearance cut in he plate. Next mark the throat plate with a line from the back of the kerf cut that matches the length that you previously measured for the length of the riving knife (including the gap between the back of the blade and the riving knife). With the blade fully extended in the zero clearance slot, turn on the saw and pull the throat plate up and towards you until the length of the marked line is cut. Turn off the saw the, remove the throat plate and re-install the riving knife. Assuming you blade is slightly wider than the riving knife, the slot will be wide enough to re-install the throat plate without any problem.This the the throat plate that Amazon sells: Leecraft DW-2 Zero-Clearance Table Saw Insert for DeWalt Model DW744 and DW746. Here is the link to it in Amazon:http://www.amazon.com/gp/product/B0000223V9/ref=oh_aui_detailpage_o03_s00?ie=UTF8&psc=1FYI: The picture in Amazon depicts it as red colored. It is actually a pale tan color and very well made.Follow up Oct 21, 2016The saw is still going strong and the rubber feet have not worn out yet. No hiccups of any kind and surprised at how stable and accurate the cuts this saw can make. Its nearly equal to a lower end cabinet saw. Maybe better than some on the market?- As to the zero clearance throat insert I previously wrote about I did come across a couple of issues with it. It seems the height adjustment screws are not long enough to properly level the insert. It is only one side were it is lower than the other and not flush to the top of the table. The other issue, for some folks anyway, is there is no locking mechanism to hold it in place.Still can't find a "commercial" dado blade throat insert for this saw. I guess the saw is intended primarily for construction use but it would be nice to make so mortise and tendon joints for rough shelving, and workbenches, etc.July 4, 2017Well its been a little over 3 years since I purchased this saw and I've just ran into my first major issue with it. I needed to make a 45 deg cut on a baseboard so I unlocked the blade from the upright position and titled the blade to 45 deg and locked it. After I complete the cut, I started to unlock the black to return it upright so I could lower the blade for storage. For some reason the locking lever would not move. After try to move it for several minutes I took a rubber mallet and gently tapped on the lever until it finally started to move. I finished moving it to the unlock position by hand. Although the locking lever moved to the unlocked position, the blade in fact did not unlock. My blade is now stuck in the 45 deg position. I'm going to have to figure out how to take the locking mechanism apart and see what the issue is. I'm hoping (best case) that there is a pin in lever that engages the locking mechanism and it is worn or slid out just enough to not engage the lock.
J**E
Pushes The Limits For Portability And Flexibility
I'll start with a brief background of this saw (DWE7491RS) and it's fellow mates, the 7480 and the 7490X. These units appear to be late 2013 upgraded replacements to the previously successful 744 and 745 series saws. Upgraded specifications from the previous series are a 4,800RPM no-load blade speed (from 3,850RPM), a larger dust port (2-1/2" vs 2-1/4"), slightly heavier weight and for the 7491, an improved rolling stand system with integrated tool & safety accessory storage. Most interesting to me, the 7490X and 7491RS series feature an improved fence system that has pushed the industry limits of contractor saws past the 24-1/2 inch barrier.Aside from the aforementioned upgrades, most of the other specifications (like cut depths) are identical to the previous 744/745 series. The least expensive model, the 7480, is no longer crippled like the 745 was...even the least model has a 24-1/2" fence to rip sheet goods in half. Both the 7490X and 7491RS can accept dado blades, but Dewalt does now say on the 7480 that dado blades are "not recommended." The new series also seem to carry a heftier price tag at the moment, but the money does seem put to good use. The trusted rack & pinion fence adjustment is still present, so your fence will remain true through heavy use.The new models seem to have similar differentiation as the previous series and the deciding factors are fairly straight forward based on your needs. If you want a basic 24-1/2 rip capacity saw with no stand, the 7480 is your choice. If you want to improve your rip capacity to 28-1/2" and have a stationary (but still portable) integrated stand, the 7490X is your choice. If you want maximum portability in a rolling stand, along with an impressive 32-1/2" rip capacity and a bonus fully integrated system storage, you go with the 7491RS series.Some would say that 24-1/2" rip capacity is all that's needed. It's true that you can rip the short side of a 48" sheet good, but it means you would have a fair amount of material hanging off to the left side of the blade. You can't do it alone, that's pretty well a fact. The improved fence system solves just this problem and provides adequate material support where it's needed. It features two positions for the fence, which can be moved outward to accommodate the large 32-1/2" capacity. The measurement scale accommodates both fence positions with one starting at 0" and the other at 8" and out of the box, it was pretty close to accurate. (See usage update below.) I have noticed that the fence material support bracket is less strong at the maximum distance, but it doesn't seem to make a major difference since it's really only for basic material support.I never used the previous model of rolling stand (744 series), but comparatively I think this one is a bit easier to manipulate from what I saw of YouTube videos. Although the saw and stand are fairly heavy assembled, getting it from storage/rolling position to operating position (and back) is a safe, easy and quick process. It might present a challenge for shorter/lighter folks, but it's easy for me with average height and weight. Once in place, the saw is sturdy as a rock...no problems with movement and it's not side heavy in any particular direction. I also liked that the handle can be positioned in two ways...compact (for tighter storage) and easy-to-carry.Assembly was really quite simple and the instructions/diagrams are clear, it took maybe an hour to assemble and a bit after that to learn the major adjustments and perform blade checks so I could get started. All your common adjustments are found within easy reach and I found that calibration adjustments I wanted to make were quite easy to perform. It's great to have all your safety gear completely integrated into the stand, everything has a place and it's less like for safety gear to be misplaced or unused entirely. The saw features a no-fail recessed power-on button with a large stop that could be easily kneed or kicked in an emergent situation. There's basically no way this thing could inadvertently turn on, but as always, it's best to practice power-off safety when working directly with the blade. The riving knife accessories are super easy to install or remove, which means I'll probably end up using it in most cases!My biggest gripes at the moment are due to a lack of accessories. I've read that the older series dado inserts aren't a 100% match and fit fairly loose in these new saws. Sure enough, Dewalt doesn't list any accessories available for this particular saw as of this moment...so that's probably not a preferred path right now. (Note: As of late 2014, a dado plate is now available, part # DWE7402DI. No infeed or side supports like the 7xx series, though.) You can use a generic adjustable roller stand (or custom built outfeed table) and DIY dado/zero clearance plates in the mean time. I thought about taking away a star for that, but with workable solutions right now, it's not a big deal for me. Also, the provided miter guage is not really practical, but anyone who's semi-serious in outfitting their saw is going to build/buy a decent crosscut sled and a miter sled anyway.Overall, with the increased power and larger fence system, this particular unit is starting to approach cabinet saw capabilities. It's by no means an absolute replacement, but it's certainly more capable than the predecessors and competitors offerings. If you're like me and you want the capacity of a cabinet saw, but the need for storage/portability triumphs above all...then this unit is definitely something you should look at. Yes, it commands the highest price of common portable contractor saws on the market right now, but it's money well spent if the increased fence capacity and refined portability is worth it to you. As they say...buy once, cry once.I'll update this review when I've had a chance to run various materials through it, but initial performance is great. I tried both soft woods (pine, fir) without any incident and I could definitely notice the power upgrade for the hard woods (tried walnut, cherry & QS oak so far). I got nice, clean cuts and quick measurements across the fence were accurate enough for me. As with pretty much any saw, the provided blade is sufficient for rough cuts...but you'll want 60/80 tooth 10" blades for any fine work. I have a couple cabinets to mill down and build in the immediate future, so I'll certainly be putting this saw through a workout of it's advertised capabilities over the next few weeks.Usage update: I've used the saw for quite a few hours now, so I have a pretty good feel for the shortcomings and limitations.* It cuts everything I've thrown at it like butter. I found some 8/4 cherry to try and although it slowed her down more than I'd seen, she chewed through it just fine. I think it could easily take on a 12/4 piece with enough time and patience. I am also loving that large fence and use it more often than I anticipated already...it's been awesome to easily cut larger panels easily. I can only comfortably cut 4'x4' panels on my own, but I did do a 6'x4' panel in two cuts without too much trouble. (One rough, one final.) Anything larger (and especially full sheet cross cuts) and you'll need help or a decent infeed/outfeed system. Do be aware that when you push this saw hard, it will draw more than 15 amps and can trip fuses/breakers that are rated at that level or less. I use a vacuum switch with a 15 amp fuse and it trips when I push it hard...if I didn't have that, my breaker would likely blow.* I mentioned in my original review that the table top was "flat as could be." Well, according to my dial gauge and straight edge, there is a slope of about .015" across the width of the table. This doesn't have any significant impacts as far as I can tell, as long as your blade is 90 degrees (or the desired bevel setting) to that slope. Also, I'm not thrilled with the tabletop or coating. Upon building my panel and cross cut sleds, I found it would fairly easily rub off with even the lightest friction. (It didn't take long at all to get that "used" look.) It's also not at all ferrous, so no attaching magnets...probably to save weight since actual metal is, umm, heavy. Plan on using using clamps if needed to secure things, both regular and miter slot as desired.* Upon a full tune-up/settings check, my fence distance gauge was off by over .015". No big deal and an easy fix, but I was having trouble getting even close to precision for some cuts off the gauge. Also, my fence was off parallel to the miter slot at position 2 by almost .010" front to back. Probably not enough to cause problems with most cuts or rough work, but too much for my preferences. Also an easy fix, but it did take some fussing to get it "just right." The arbor and fence at position 1 were close enough to perfect. It was a little irritating to have to tweak a new saw into perfection, but it wasn't too difficult and is probably due to the primary market for this saw being rough work, not cabinet grade. If you're going for precision, you may need to adjust from the factory. I recommend a quality try or combo square, a shop made fence measuring jig (or an A-Line It jig) and a digital or analog caliper for determining error rates.* I found that my 60+ tooth fine blades require me to remove the dust shroud in order to remove the blade. An inconvenience and it adds about 1 minute to the process, but not that big of a deal unless you're constantly changing blades.* Total dust collection is a mystery until Dewalt does something. At least if you rely on a Shop Vac and 2-1/2" hose. The 2-1/2" port is solid, no problem, and catches most dust. But, a fair bit of dust kicks up as usual...which is why they designed the riving knife with integrated dust chute. Awesome option, but absolutely ludicrous to plumb for at this time, making the accessory virtually worthless. There is no 2-1/2"x1-1/4" Y adapter out there and I'm not going to use 5+ fittings, convert to 4" and add a bunch of extra hose to do it. I find the normal fallout with the regular knife preferable to shooting it six feet across the room.* Some quick things that are hard to find about this saw. It takes up to a 8" sized dado blade, up to 13/16" in width. (I haven't used a 6" dado, but an 8" worked fine...I can imagine a 6" would work with less max depth.) The working table top height is 36-3/8". Maximum storage height is about 44-3/4" with the handle in compact position or just over 48" in easy-carry position. There's a lot of mis-info in the Q&A here and even from the manufacturer, these measurements are from my actual 7491RS saw. Feel free to comment if you want other fairly precise measurements. Accessories for this saw will start rolling out Q1 of 2014, with a dado plate being the first anticipated accessory to roll out from Dewalt.Other than those things, I still think it's an excellent saw. Maybe 4.5 stars would be my actual rating due to the from-the-factory adjustments I had to make and my disappointment with the table top. Other than that, it's been comfortable to use and work with and is giving me great results and perfect joints. I'll update if anything else comes up.
Trustpilot
5 days ago
2 weeks ago