🪟 Elevate your space with cordless chic—privacy and style, no strings attached!
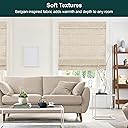
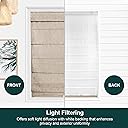
The Chicology Cordless Roman Window Shade in Belgian Flax (27"W x 64"H) offers a modern, cordless design that combines child safety with effortless operation. Crafted from light-filtering fabric, it softens sunlight while providing daytime privacy and a warm ambiance. True-to-size dimensions ensure a perfect fit, and versatile mounting options (inside, outside, ceiling) come with all necessary hardware. Installation is quick and manageable solo, making it ideal for stylish, functional home décor in any room.


| ASIN | B07DPMGNS8 |
| Additional Features | Durable, Easy to Install, Light Filtering, Modern Fabric, Routless |
| Best Sellers Rank | #21,453 in Home & Kitchen ( See Top 100 in Home & Kitchen ) #15 in Roman Window Shades |
| Brand | CHICOLOGY |
| Brand Name | CHICOLOGY |
| Closure Type | Cordless |
| Color | Belgian Flax |
| Compatible Devices | Doors, Windows |
| Control Type | Cordless |
| Customer Reviews | 4.2 out of 5 stars 3,320 Reviews |
| Global Trade Identification Number | 00817568029035 |
| Included Components | Clear Plastic Handle, Cordless Roman Shade, Inside Mount Hardware, Outside Mount Hardware, User Manual |
| Item Dimensions L x W | 64"L x 27"W |
| Item Type Name | Roman Shades for Windows , Window Treatments , Roman Shades , |
| Item Weight | 2.7 pounds |
| Lining Description | Polyester |
| Manufacturer | CHICOLOGY |
| Manufacturer Warranty Description | 1 Year Limited |
| Material | Fabric, Metal, Plastic, Polyester , Steel |
| Material Type | Fabric, Metal, Plastic, Polyester, Steel |
| Model Number | CH-ROMAN-1 |
| Mounting Type | Inside Mount |
| Number Of Panels | 1 |
| Number of Items | 1 |
| Opacity | Light Filtering inches |
| Operation Mode | Manual |
| Product Care Instructions | Lightly dust and/or vacuum with upholstery attachment, Spot clean only, please avoid contact with chemical liquids., Steamable material |
| Product Dimensions | 64"L x 27"W |
| Recommended Uses For Product | Indoor |
| Room Type | Bedroom, Dining Room, Kitchen, Living Room, Nursery |
| Shape | Rectangular |
| Size | 27"W x 64"H |
| Specific Uses For Product | Home Décor, Window,Door |
| UPC | 817568029035 |
| Unit Count | 1 Square Feet |
| Water Resistance Level | Not Water Resistant |
S**E
Great buy
Love these. It was a little difficult to actually see how to install these, but after I watched a few videos, it went fast. They look great and raise and lower with ease
A**M
Nice Shade
Ordered the Del Mar Moon Shell variety. It is a nice cream/off white color that worked with my curtains. We really needed 34.5, but this worked with curtain. I’d call it room darkening rather than blackout. Looks good from the back as well as the front.
A**X
Love these! Buy them!
Love these! But them! They are a must!!! They look just like my expensive Roman shades. They proud designing vision for the living room to life. :)
J**O
A good value
These make the room darker, but not blackout. They look ok and the up/down function is good.
M**T
Some tips for installing
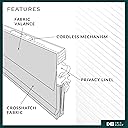
I'm quite happy with this window shade (36" Belgian Flax, Light Filtering). I did an Outside Mount, so I got a shade that is just a little wider than the inside edge of my window frame, and that worked well. (The metal headrail at the top sticks out about 1.75" when installed, and the fabric hangs down from the front of that, but the white-fabric backing hangs down flush to the window frame, so it gives you privacy at the edges.) The shade is sort of wrinkled, but I'm hoping it will smooth out, as I just installed it. If it doesn't smooth out on its own, I might try to iron it on low heat. I did have a little trouble when trying to fasten the metal brackets to the top of my window frame, because I wasn't sure what size drill bit to use to drill the holes for the screws, and the first size I tried drilled a hole that was a little too small, and then the screw got stuck when I tried to screw it in, though with some effort I managed to get it out again. I wish the instructions told you what size drill bit to use. I tried again with a 1/8" drill bit and that worked OK. I also had a little trouble understanding how to snap the headrail into the metal brackets once they were fastened to the top of the window frame. One other reviewer wrote, "The only thing I had trouble with was attaching them to the brackets. The written instructions and picture weren’t super clear to me but I found a different version on the company website and figured it out." I agree with this comment. If you go to the Chicology website, go to the Help menu, and then click on "Measurement & Installation." On the next page, scroll down to "How to Install" > "Shades" > "Roman Shades," and then click on the PDF instruction sheet. This is clearer than the instruction sheet that came inside the box. (Picture A3 on that PDF shows how to snap the headrail into the brackets for an Outside Mount.) Another installation tip, though, is on the written sheet that came in the box, but is not on the PDF sheet on the website -- and that is the recommendation to position the brackets approximately 2 inches from the ends of the headrail. About the little plastic handle you grab to pull the shade down: When the shade is all the way or mostly pulled down, you can see that little plastic tab at the bottom. But if you push the shade up, at a certain point the part with the plastic tab will disappear behind the front fold, so you have to reach behind that front fold to grab the tab. I hope this shows in my attached photos. (The color of my shade looks pretty different in my photos; that's because of differing amounts of light when I took the photos.) ———- Additional note after having the shades up for about five months: I just LOVE this shade! My old shade had a rope I had to use to raise or lower it, and so I had to unwind the rope from its little bracket on the side of the window every time I wanted to move the shade up or down, and then rewind it again. Now with this new shade I just have to grab the little plastic tab at the bottom of the shade and push up or pull down, and it’s so easy and quick! Also, my photos showed that my shade was pretty wrinkly when I first got it. (I think that might be because mine was not in its original packaging, so wasn’t neatly folded up the way it was supposed to have been.) In any case, I never did try to iron it, but over time the wrinkles just sort of went almost completely away and now the shade doesn’t look all wrinkly any more. ———- Another additional note after I purchased a second shade, identical to the first, about two years after purchasing the first one: Though these shades are a little pricey (and the cost for this second one is almost $10 more than the first one I purchased), I decided to get another of these shades because of how much I like them. This second one is not wrinkled like the first one was (as I noted earlier, the first one was not in its original packaging, so was not properly wrapped, which is why it was so wrinkled). As was true with the first one I installed, once again I had some difficulty with how to snap the top of the shade (the headrail) into the brackets, after I had drilled holes and then screwed the metal brackets up at the top of the window frame. And this was even though I myself wrote notes (above) about doing this! Sigh. Anyway by looking at my already installed shade, I remembered that you have to snap the headrail piece in so that the open part is at the top. I’m attaching photo of what it will look like at the top when you have snapped it in. (I’m also attaching a couple of photos of this new shade after it was installed.) And here’s another mistake I made: Because I was concentrating so much on how to snap the headrail of the shade into the metal brackets, I didn’t pay attention to getting the shade centered over the window frame, and after I finally got it snapped in, I realized that the shade was positioned too much on one side of the window. Darn! So then I had to figure out how to snap the headrail back out of the metal brackets so I could reposition it. That was difficult—but with the help of a straight screwdriver I finally managed to snap it back out, and the snapped it in again after I had gotten it properly centered. I’m hoping these notes will help other people who may encounter the same difficulties I did. I’m sure a seasoned handyman would have no trouble at all getting these shades installed, so these note are really for those of you who, like me, are not so seasoned at doing jobs like this.
M**.
The Good and Bad of the Situation
So let me say this is a long story so I'll keep it as brief as I can. When I ordered the shades everything seem fine and the order got here in a sufficient time frame. Not quick but decent. I needed the shades here by a certain date so I was just glad they got here a week before I needed them. Sadly upon opening them they were the wrong color as their color names are very similar. This then sent the situation into a tailspin. I needed them by a certain point and I could not get a hold of the company and Amazon was doing their best to get a hold of them as they were showing my replacements wouldn't be received till after I needed them. Long story short of a lot of back and forth the company finally responded after the holiday weekend and was able to overnight ship them. For that I was grateful and rate them well in what they were able to do at no cost to me. 5 stars on that. Now the shades themselves are nice and overall seem like a good quality until you get to the brackets and the top mechanism. My husband and friend are very quick at things and this didn't seem like rocket science but we are unsure how so many reviews said these were SO easy to install. We would struggle forever to get the shades locked in place. Getting the back part in was a breeze but the front was a bear. Then we came to find out the top mechanism isn't made of aluminum/metal like we thought but plastic. We ended up having one break but we were able to make it work without needing to send it back. Now that they are up they look great and seem to work just fine. So if you were to look at them I'd say a solid 4 stars but it shouldn't take us 3 or so hours to get up 4 shades. It should just snap in easy. And the shades should be made of a better quality than to snap like that. The brackets seemed they were out too much and had just a few things been different it would of been easier. I am concerned to buy these again just because of how bad the install was. Otherwise I wouldn't have minded purchasing again as they were great about getting me the product on time. So because of that I rate that part about a 3 star.
R**W
Durable and easily installed
Installation was easy. I have had these in one of my bedrooms for a year and have enjoyed them so much I purchased four more to put up in all the other bedrooms of my home. The easily pull down and push back up. The cordless feature is perfect. They let in only a small sliver of filtered light around the edges because I have a quarter inch gap around mine due to window size. I am very happy with them.
M**N
Very decent
These are easy to install and look and work well. While the fabric isn’t the highest quality, they are better than I expected. No complaints, but the white is very bright white
J**K
Roman blind
Easy to install. Looks great. Good quality, light blocking. No need to cut. Perfect fit. Fabulous value for money.
R**A
Excelente
Me encantó, súper fácil de poner y da un detalle excelente sin cubrir demasiado la claridad
S**9
Amazing
Beautiful, Excellent quality!
B**A
Great blind but sent wrong color
I want to return it, it come in wrong color
ه**ف
العزل
عزلها ليس جدا قوي
Trustpilot
3 weeks ago
4 days ago