


Buy anything from 5,000+ international stores. One checkout price. No surprise fees. Join 2M+ shoppers on Desertcart.
Desertcart purchases this item on your behalf and handles shipping, customs, and support to USA.
🚪 Upgrade your curb appeal with wood-look magic in a single afternoon!
The Giani Wood Look Paint Kit in English Oak is a water-based acrylic paint system designed to transform garage doors into realistic wood finishes within 3 hours. Covering up to 180 sq. ft., this durable, weather-resistant kit includes all necessary tools and offers a low-odor, eco-friendly solution that requires no priming. Perfect for metal or wood doors, it delivers authentic wood grain texture and long-lasting curb appeal.


| ASIN | B076657Y5Q |
| Age Range Description | Adult |
| Best Sellers Rank | #26,482 in Tools & Home Improvement ( See Top 100 in Tools & Home Improvement ) #66 in Interior & Exterior House Paint |
| Brand | Giani |
| Brand Name | Giani |
| Color | English Oak |
| Color Code | #492A1F |
| Container Type | Can |
| Coverage | 180 |
| Customer Reviews | 4.5 out of 5 stars 1,517 Reviews |
| Finish Type | Wood Grain |
| Full Cure Time | 3 Hours |
| Included Components | Two 16 oz. English Oak Wood Tone Base Coat Two 16 oz. English Oak Wood Grain Finish Coat Giani Paint Mitt & Adjustable Wrist Band 2" Brush 2 Plastic Tarps Roll Painter's Tape 6" Roller Arm & 1 Cover 2 Stir Sticks Step-By-Step Instructions |
| Indoor Outdoor Usage | Outdoor |
| Is Waterproof | True |
| Item Form | Liquid |
| Item Type Name | Paint Kit |
| Item Volume | 16 Fluid Ounces |
| Manufacturer | Giani, Inc. |
| Model Name | Garage Door |
| Model Number | Wood Look |
| Paint Type | Acrylic |
| Part Number | FG-WL ENG 2 KIT |
| Size | 64 Fl Oz (Pack of 1) |
| Special Feature | Translucent |
| Special Features | Translucent |
| Specific Uses For Product | Garage Door Paint |
| Surface Recommendation | Metal |
| UPC | 856512007163 |
| Unit Count | 64.0 Fluid Ounces |
| Water Resistance Level | Water Resistant |
A**L
Looks like real wood!
Absolutely love this kit! It completely transformed my garage door and gave it a beautiful wood look without the cost of replacing it. The process was straightforward, and the results look high-end and realistic. I’ve already gotten so many compliments—highly recommend!
B**R
Wood grain door review
We bought this to freshen up the appearance of our weathered and faded aluminum garage doors. The first order arrived with a leaking can of paint that was readily replaced. We put on the base coat with the included roller. It went on nice and even and maybe took 30 minutes to do a standard garage door. We let the base dry and then I applied the wood grain paint with the included mit. The application was fairly easy and turned out pretty good. My only bought was it was difficult to fade the wood grain in evenly along all the edges. Perhaps a roller head with a similar material as the glove would allow more even distribution of the wood grain paint along the edges. I’ve read where most people had enough supplies for two standard doors. I guess I put it on to heavy since one kit only covered one door but saying that I also did the wood trim around the door seals. Overall, I’m satisfied with the outcome and wood recommend it if your looking for more of a weathered burnt look. Ultimately we had to use two kits and maybe had 3-4 hours in total on both doors. A case could be made for just painting the doors if you’re wanting it done fast with less work. Again, I somewhat pleased with the outcome and it’s growing on us.
A**R
Easy process for a realistic wood look
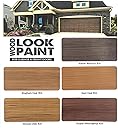
I looked into different products and read lots of reviews before deciding on this brand. Although this seemed to be the better option for me, based on reviews and an online tutorial, I had already decided that I wasn't going to use the mitt included with the kit. The first coat went on nice and even (first picture- tan color), and I had at least 1/4 of the paint left over. The darker color that goes on top is more of a glaze or gel stain. I followed the directions carefully, making sure to only apply when the sun was not directly shining on the garage, and when the temp was below 85°. I brushed it on using the paint brush included in the kit, then I used an inexpensive chip brush (dry) to brush through the wet stain. This helped to pull the stain through, making it more even, and more realistic looking. I brushed in long horizontal lines for the borders of each panel, then brushed the panels in vertical strokes. I even added diagonal "mitered" lines in the corners. You could use masking tape to make all of the lines crisp and realistic looking, but I free handed it. After applying one coat of the gel stain (darker color) I had half a can left, which I intended to use for touch ups, or to even out drastic color variations. In the end, the family consensus was that it looked great just as it was, so I reinstalled the decorative hardware and called it good. We have had several neighbors stop by to tell us how much they love the transformation, many saying they would have thought it was real wood. I can't vouch for the mitt method, but bad on my end results, I would highly recommend this product
A**B
Fabulous, but altered the technique
Really great!! My only advice is to buy the wood graining tool and use it on the second coat (which I rolled on a little watered down version of the glaze) then use the graining tool that Amazon sells. Then, do another roll on coat of the glaze after that dries. Looks so much like wood it’s nuts!! My neighbors thought I bought a new front door and garage door.
B**K
A terrific low cost project for much needed curb appeal
I live in an HOA and several of the house have wood looking garage doors. I’ve always been envious of them, but the cost of a replacement wood look door is 5-8k or even more. I was browsing on Amazon on day when this kit showed up as a recommendation. I read some reviews and purchased. My current garage door is plain white and is made of metal. The first step I took was to sand the door lightly using 220 grit sandpaper. After that I scrubbed it with dawn soap and water and let it dry overnight. The next morning I put 2 coats of the base paint on the door. 2 coats ran both pints dry. After letting that dry completely, I put on the included glove and went to work with the stain. I was able to coat the door twice using only 1 pint of the stain. I may eventually add a third coat, but I think I’m happy with the results. The kit included everything you need to get the job done, minus a roller tray and a tray cover. The quality of the base paint and the stain was fantastic. I feel like it’s going to be very durable in the weather here. I took out the windows and spray painted the frames black to stand out. I liked that they offered 4 colors, but my brick is darker so I wanted to go with a slightly darker color. I rolled the base coat on using the included roller and applied the top stain coat with the included glove. So let’s talk about the glove. I’m 6’ and have big hands. This glove, or rather a mitten, was humongous on me. The mitten itself was about 1 and a half times the size of my hand. Unfortunately, there is a plastic insert inside the glove that protects your hand from the stain. The insert is normal hand size. So it feels really weird to wear the mitten that your hand won’t fully fit. I ended up just balling up the top part of the glove and rubbing the stain in like that. After all said and done, I added some magnetic accessories to the door that I found here on Amazon also. The total finished look is fantastic. I couldn’t be happier with the end result. I feel like the whole kit is super easy to use and the value is incredible. I would recommend this product to anyone who is interested in a DIY door upgrade. My neighbors have all commented on how great it looks. Very happy I decided to purchase and do this.
K**R
Easy
I love these. So easy and it looks great!
J**S
Doesnt last long- don't waste your time or money
I was so excited about this product! Replacing my old wooden doors was not in the budget so I saved up to attempt to revive them for the time being. I replaced the bad pieces of wood, chipped off all of loose paint, caulked all the cracks and bought an expensive primer to make sure that the surface was ideal. I followed the directions to a T and I was so pleased with the outcome. I thought it looked very nice when everything was done and the process, while time-consuming, was not very difficult. I finished right before June of 2023 so it went through a Kentucky summer and a Kentucky winter. Neither of which are very extreme. I started noticing in February that the walnut stain was chipping off. A couple of months after that I contacted Giani about my concerns that it was chipping in less than a year and they told me that I should have applied a top coat to protect it. Nowhere in the directions did it say anything about applying a top coat of sparuathane. And furthermore, when buying a kit you would think that if the top coat was so important in protecting the stain for garage doors it would have included that in the kit. I ended up getting some gel stain from Rust-Oleum to repaint the chipped off Gianni stain. Rustoleum was cheaper and much thicker. I will apply a top coat this time and hope for the best.
M**T
Amazing! Looks like wood !
After getting a $16K quote for a real wood garage door to match our front door, my handy wife decided to try painting our door first. This was pretty much the only kit she found. The toughest decision was whether to buy the Honey Oak or the English Oak and we decided to buy the latter which was the right decision. The whole kit comes with two little cans of primer, two little cans of wood paint, a mitt, a brush, gloves and I think a drop cloth. We just had to buy a paint tray or two. At first I thought it wasn't going to be enough but I still have a can of primer and half a can of wood paint. After doing a ton of research on the best method, I applied the primer with the awesome brush. The primer is very good quality and goes on so smooth. I let it dry overnight and the next morning, I tried applying the wood paint first with the mitt and then the brush separately on my own on the lowest panel. Not easy because the paint dries really really fast. Personally, I think you need to use both - use the mitt to apply first and the brush immediately afterward to even out the paint. Thank god my wife loves to paint so for the rest of the door, I applied with the mitt while she followed me with the brush to even it out. I think we applied about three layers in about two hours before the sun came out and it took about 24h to completely dry in hot weather. The cleanup was also super easy because it's water soluble while wet. We and our neighbors can't get over how much our door looks like real wood!! If you want it lighter, just apply two coats and keep applying if you like it darker. (The pic with my hand is one coat, the honey color is with direct sun and the darker pictures are the final. We painted it a bit darker because it will likely fade a bit in a year.) You just need to be mindful of letting each layer dry thoroughly or it starts to get sticky and gummy each time. If you have the bevels in your door, it tends to accentuate the wood like. Have fun!
A**R
Easy to work with and get the result
I have painted my garage doors last year and happy with result - however, the amount of primer for two garage doors are sufficient, but the actual Wood Look Paint Black Walnut was not enough to get best result.
J**A
Achieved!
The instructions was straight forward. But to achieved the wood look grain, you have to apply the wood stain several times. Other than that I have no problem...it save me thousands of dollars to replace a functional door for cosmetic reasons.
A**R
Black walnut
Definitely not a 3 hour job as they claimed, took me 3 days including prep work (wash and sanding). But I have never did this type of job before. I had to purchase 2 kits for a double garage and double front door. I chose black walnut and probably had to do 4-5 coats of top stain to get the results until we were somewhat satisfied of. If we just did 2 coats as the kit suggested it kind of just looked like a bad painting job. It was not an easy project, but I am glad I finally did it. Received some compliments from neighbour's and friends.
J**Y
The product is not for me
The idea of an all-in-one kit that would be all thought out for me seemed like a good idea. Unfortunately, the result is not a look that I would want on the front of my house. As usual, if we want to have exceptional results we have to put some time and effort into it. Doing some research on YouTube I found out some techniques that could provide that great look that I was looking for and how to do it. With a beige latex base and a mix of gel stain and clear coat (about 3 parts stain to 1 part clear coat) and a little creative artwork, you can do something worth putting on the front of your house. Unfortunately, this product is not worth the money and does not give a wood grain look, and both the seller and Amazon will not refund or help me in this matter. I lose $115 in the experience and had to find my own solution to do the job over.
K**Y
Absolute garbage! It hasn’t even been a year and it’s all peeling off of our garage!
Horrible product. Not even a year and it’s all peeling off our garage. Looks awful!
Trustpilot
1 month ago
2 months ago