Desertcart purchases this item on your behalf and handles shipping, customs, and support to USA.
🖤 Elevate your space with sleek privacy and cool comfort — because your windows deserve the upgrade.
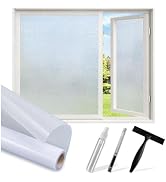
SUNBABY Window Tint is a premium static cling film designed for home and office windows, offering 98% UV protection and 92% infrared heat rejection. Its one-way mirror effect ensures daytime privacy without sacrificing your view, while the no-glue installation makes it renter-friendly and residue-free. Sized at 17.5 x 78.7 inches with included professional tools, it’s a versatile, energy-saving upgrade that’s easy to install and remove.


| ASIN | B0BXDP9TNL |
| Best Sellers Rank | #6,307 in Home & Kitchen ( See Top 100 in Home & Kitchen ) #24 in Window Films |
| Brand | SUNBABY |
| Brand Name | SUNBABY |
| Color | Black |
| Customer Reviews | 4.0 out of 5 stars 3,741 Reviews |
| Installation Type | Static Cling |
| Item Dimensions L x W | 78.7"L x 17.5"W |
| Item Type Name | window film |
| Manufacturer | SUNBABY |
| Manufacturer Part Number | 151BK-45200 |
| Material | Polyvinyl Chloride (PVC) |
| Material Type | Polyvinyl Chloride (PVC) |
| Model Number | 151BK-45200 |
| Number of Items | 1 |
| Product Dimensions | 78.7"L x 17.5"W |
| Size | 17.5 x 78.7inch |
| Ultraviolet Light Protection | 98% UV Blocking |
| Unit Count | 9.56 Square Feet |
S**G
Works fantastic on windows
Amazing! This product was put on the bedroom windows & the room was about 10 decrees cooler!! Excellent for the Arizona sun!! Definitely recommend!!! Easy to install, looks professional & great price.
I**Y
home window tint
The material feels very high quality, durable, and has a rather elegant, mirror-like finish. During the day, it offers excellent privacy: from the outside, you can't see inside, but from the inside, the view to the outside is clear and comfortable, which I loved. Another big plus is its ability to block heat and UV rays. After installing it, I noticed a real difference in the room's temperature, especially during the hottest hours of the day. The room stays cooler and more comfortable, which even helps reduce air conditioning use. Installation was much easier than I expected. Since it's a static cling film without adhesive, you only need water and the included tools. It went on perfectly, without bubbles or wrinkles, and the best part is that it can be removed without leaving any residue if you ever want to change it. Besides being functional, it significantly improves the appearance of the windows, giving the home a modern touch. I consider it an excellent investment for the price, both for the privacy it provides and the energy savings it offers.
K**G
Good value and function.
Great tint, perfect depth and heat rejection, Easy to install. Good adhesion. The size is a bit narrow. Watch out for creases, once it dries, the creases are not going to come out.
J**.
Zero complaints, great product.
Tint is great. I have all west facing windows in my apartment and he sun is brutal. I have had my blinds and curtains closed a majority of the time I have lived here, yesterday I didn't close them at all. The tint provides daytime privacy which is nice, as no one can see inside. Installing on my 4 large windows took about 30-45 minutes myself. For someone with no experience it will take longer unless you have someone to help. The tools come inside of the tube roll and did the job with no issues. I have no complaints about the product and would definitely repurchase and recommend.
A**R
Easy and simple to install
Great product, easy to install with simple instructions. It was convenient that the tools for the install were included with the product. Took me 2 1/2 hours to do 2 windows. Turned out so well I ordered more
A**G
It’s a life saver on my power bill
I have a window that the sun shines through from the windshield and the hood of the cars in the parking lot where I live, it heats up my bedroom so bad. plus it’s also very bright . I already have blackout curtains, but it is still the heat comes through the window , and they are dual pain. I can’t put anything on the window that will stay forever because I might get charged for the removal of it and my deposit I want it back so this is really good stuff to apply in a rental property. It was actually pretty easy to apply. I like the fact that it’s got the mirror side so it faces out, and so does the reflection from the sun hitting the car windshields. I wasn’t able to finish the other window pain but just having the one side done makes a very noticeable difference in my room now.
C**S
Window tint
Went on to window easy .But didn't keep the heat or sun out very well
B**1
Not an easy project, but a good product for an excellent price
Unless you’re Bob Villa or similar, it is not a 15-minute job. It will take you a lot longer, particularly if you’re working alone. If you have multiple windows, I suggest that you work on one pair at a time and that you start with your smallest and/or in the most obscure location. Pictured: my medium size window, the product installed on the right, not yet on the left. The slider window was more difficult due to the size I was working with, there was some curling, and the end result was not as good as the Coavas competing product: I ended up with some bubbles (looks better in natural light than my pic). First, note that the included “tools” are crammed inside the roll. I almost missed this until I picked up the roll from one end and shook it: one of the tools slid inside it; they’re quite tight in there. I had ordered two rolls, and I thought that they had skimped and had only sent me one set of tools. Not so: the others fell out later. As mentioned, they’re tightly squeezed in there! All tools are useful and appropriately sized. The instructions on this page are helpful but basic, though differ slightly from what’s inside the roll: be careful when opening the roll to not cut the instructions (a blue sheet for me). My modified instructions are: (1) If you have multiple windows you’re doing this on, figure out how to use the product(s) most efficiently by mapping it out on paper, ideally using at least two of their edges (which would leave any extra in the middle) (2) Decide a large smooth surface where you’re going to measure the material, sweep it of dirt first. I used a bathroom floor. (3) Measure the windows, ideally with a ruler as long as one of your dimensions; (4) Clean the window(s) you’re using this product on; (5) Gently lay out the product - it dents fairly easily - and, using an erasable marker, with measurements a marker width wider than what you came up with in step 3, mark the product for the first pane. You will need multiple heavy things to weigh down the edges, for you’ll be fighting the constant curling. A floor lamp may also help you see your marker marks. I tried using masking tape to help hold the product down, but it was a mediocre solution. By far, this was the most time-consuming and frustrating part. (6) Cut the product: I used scissors, cutting inside the marks (if you use the included knife, you’d have to have something under the product). (7) Wipe off your marker marks. (8) Hold what you cut on the window (dry) that you’ll be putting it on for checking your accuracy. If it’s slightly off, use that on the top of the two-pane window (what I had) or have the “off” part where it would be least noticed. (9) Fill their bottle with water and lotion (not detergent), mix well so that it’s relatively clear. Place a towel in front of the receiving window, and generously spray the receiving window. (10) Peel off the back of the product- they include tape, I used my fingernails one time, then their included tape on one side, which probably worked better, hold the film over the towel that’s near the window and generously spray the side you just exposed. (11) Apply the product to the window. (12) Wrap a squeegee (theirs or yours) with a washcloth/hand towel to avoid scratching the product and remove the bubbles and water. (13) Press around the edges to force the curl away from the window (14) You can easily make a mistake if you opt to trim off extra material with the included knife to trim off any excess material. In retrospect, mine was "close enough" and better not to trim, as that isn't nearly as obvious. (15) Relax, whew, that’s one down and … to go. I waited until the next day to do window number 2 so that I could see how window number 1 fared overnight from being applied. So far, so good. While not super easy, it's far easier than doing this for your car's windows. WIth both, you can tell, but with this, you have to be very close, and as long as you cover 99% of the window, you're good! Darkness: noticeable difference. Install done for an upstairs bedroom/office that gets a lot of light, great for crack of dawn risers, but not the rest of us; it also gets hot later in the day. These were my motivations for doing this work. Heat gain: will update when the largest set of three windows is received and done (different brand) and when hotter days return (I scared them away with this project).
U**Z
سيئ جدا
سيئ جدا
Trustpilot
2 months ago
2 weeks ago