


๐ก Elevate your ceiling game with smart, sleek, and safe pendant power!
The MK K1186RPWHI 150mm Thermostat Pendant Set in white combines high-grade aluminium construction with a scratch and colour fade resistant high gloss finish. Designed for easy installation with clear terminal markings, it supports up to 3kg light fittings and operates at 150 watts on 240 volts. Fully compliant with British safety standards and backed by a 10-year guarantee, this energy-efficient pendant set is the perfect blend of style, durability, and reliability for modern homes.
| ASIN | B00TS5UXXW |
| Base Type | BA15d |
| Best Sellers Rank | 8,407 in Lighting ( See Top 100 in Lighting ) 243 in Pendant Light Fixtures |
| Brand | MK |
| Colour | White |
| Customer Reviews | 4.6 4.6 out of 5 stars (9,590) |
| Global Trade Identification Number | 05017490767578 |
| Included Components | 1 x pendant set |
| Item Type Name | Pendant Set 6A 150MM |
| Item Weight | 0.12 Kilograms |
| Manufacturer | Honeywell |
| Material | Plastic Metal |
| Mounting Type | Ceiling Mount |
| Unit Count | 1.0 Count |
| Voltage | 240 Volts |
| Wattage | 150 watts |
R**E
Well made
Well made easy to install , does what is required great price quick delivery
P**L
Reliable and sturdy ceiling pendant โ easy to fit and looks neati
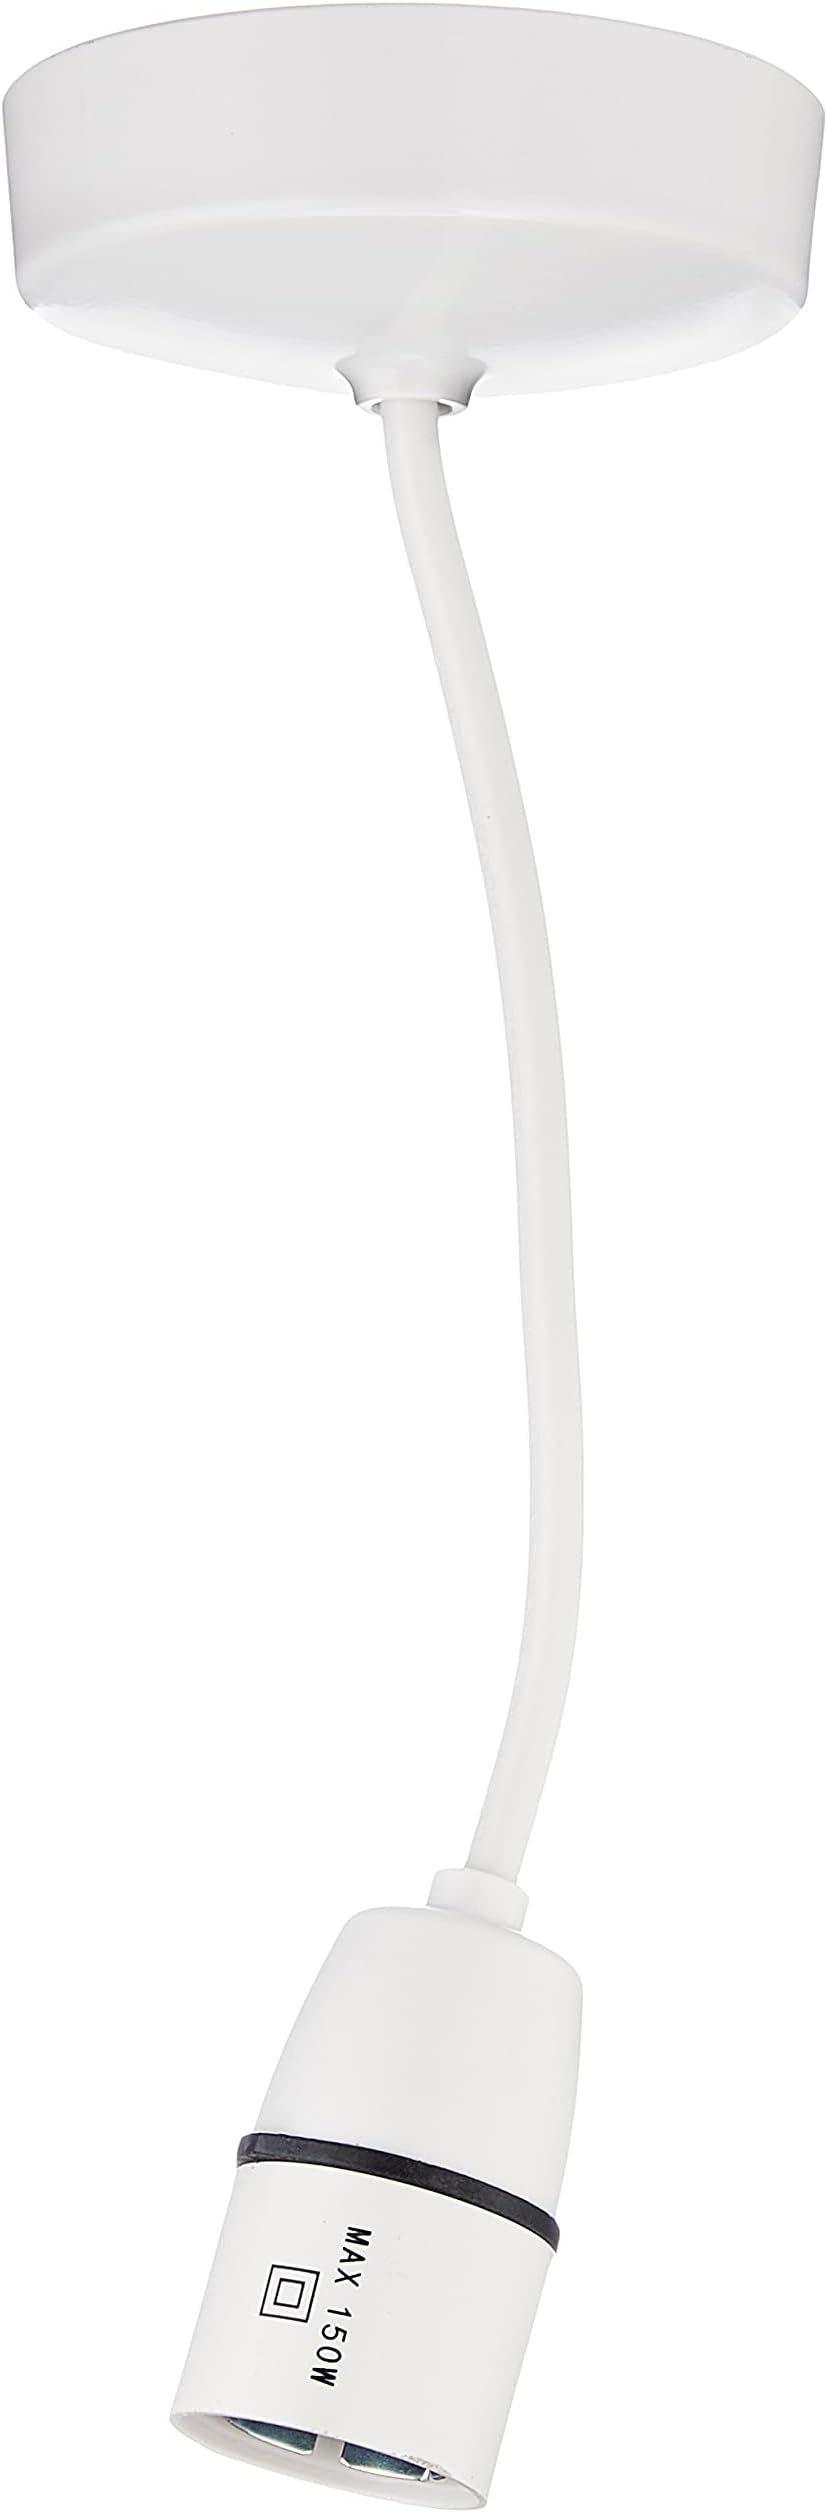
I bought the MK K1186RPWHI 150mm Thermostat Pendant Set to replace an old ceiling fitting in my bathroom, and it didnโt disappoint. As with most MK products, the build quality feels solid and professional. The white finish looks clean and blends perfectly with standard white ceilings, giving a tidy and modern appearance once fitted. Installation was straightforward. The wiring terminals are clearly marked and have plenty of space to work with, making it easy even for those with basic DIY skills. I particularly appreciated the design of the heat-resistant flex and the good quality lamp holderโit feels far more secure than cheaper alternatives. The pendant set also complies with safety standards, which gives peace of mind for use in warmer or enclosed spaces where a thermostat-rated lampholder is essential. Once fitted, the fitting holds bulbs snugly and hangs neatly at the right length with no tilt or twist, which is great for maintaining a professional finish. No buzz, flicker, or looseness whatsoever. If youโre upgrading or replacing a ceiling light point and want something safe, neat, and long-lasting, this MK pendant set is an excellent choice. Itโs a simple product done right โ reliable, sturdy, and worth the small premium for quality.
U**A
Reliable and Functionl
The MK K1186RPWHI 150mm Thermostat Pendant Set is a great option for anyone looking for a stylish yet functional ceiling light solution. The high gloss finish looks sleek, and I appreciate that itโs resistant to scratches and color fading, keeping it looking fresh over time. The installation was straightforward, and the pendant set holds the lightbulb securely. It provides a clean, modern look that fits well in a variety of rooms. I also like the peace of mind that comes with the ten-year assurance. The only reason I didnโt give it 5 stars is that it could be a bit sturdier, but overall, itโs a solid product at a great price! Would definitely recommend.
M**E
Good
Good quality, a little too rigid and though they straighten over time, they take ages. The look nice, bright white and clean, compact. Easy to fit and they fit well and function great.
A**E
Great product
It does the job and fits greatcand looks much better. Installation ead easy to do. Definitely value for money.
J**K
Ok
Seems ok
A**Y
I'd never done anything like this before - here's what I did...
Over the last few months I've started doing bits of DIY for the first time. In each room I kept splatter paint on these light fittings, or leaving obvious gaps around them - too afraid to touch or look into anything electrical. Finally when painting my hallways ceiling I decided that the ugly hexagon ceiling light from 1986 was going to have to come down, so I bought one of these off amazon. I was happy to part with ยฃ3, as even if I failed I wouldn't be too bad! Here's what I did: Things I needed: - Screw drivers - flat head, philips head and zero point set - A step ladder - A drill - A box of screws in a variety of sizes - Location of thr main power fusebox I am not an electrician, but my hope is to be helpful to anyone who is thinking about giving it a go. 1. ALWAYS First Turn off the power at your fuse box before doing anything! This will most likely be in the hall and have 2 big red master switches to cut the power completely from the house. If you can't do this and ensure power is off then do not proceed. 2. Get a step ladder - you need to see everything up there properly to connect the wires and see what's going on. 3. Carefully unscrew the old fixture (this will always be different, but either twist or remove screws) and take photos with your phone from every angle. Take note of how everything is running from the ceiling into the old fixture before completely unplugging. You may need a zero point screwdriver to disconnect some of the wires. 4. Think about how the same cables are going to connect into your new simple fixture. Earth to earth, live to live, neutral to neutral. Your colours will vary depending on your house, but use google to understand your wire colours. 5. Unscrew the connections in your new fixtures so that you can thread the ceiling wires through your plastic circular part. Push then wires in and screw down on them so that they are secure. 6. Check your work. Double check each cable is in the marked hole. Give each cable a little tug to make sure it won't come loose. Make sure the earth wire is definitely there. 7. Get a drill and some screws. This does not come with screws, so you need to get one of those boxes with lots of different sizes. Find a screw that fits through the hole but also pushes against the plastic. Your screw should be going into a joint in your ceiling, but this likely to be where it is going if there was a previous fixture. Align a 3mm drill bit with the hole and your ceiling to make two very small pilot holes. Do not go too deep if you don't need to. Get your screws and screw them in part way. 8. Twist the white plastic cap over the clear plastic cap until it touches the ceiling. Turn back on your main power and give the switch a test! The pendant itself is very simplistic and looks good with a lampshade over it.
A**R
Great for the price
Very good,
Trustpilot
5 days ago
1 month ago