

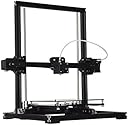


Auto leveling 3D Printers DIY Kit Aluminium Structure LCD 2004A Cover Box Print Size :220x220x300mm X3A
Product ID: 43290061
Review: Instruction manual is useless and refers to firmware that is different then what ... - Definately NOT for the beginner! Instruction manual is useless and refers to firmware that is different then what ships with the actual printer. No source code, so nothing printer/manufacturer specific to modify. Don't expect any level of support whatsoever from the seller, and you can't track down the manufacturer to get any either. Which means modification of the firmware is completely trial and error, including trying to figure out resistor settings for the hot end, heat bed, extractor, motors, etc. Not bad quality product for what you're paying for, but expect to be putting in a lot of time to dail it in correctly. You'd be better off spending a little more getting a product that offers support to cut down on aggrevation. Returned mine after two weeks of unsuccessful attempts at getting the zeroing of the z-axis to hold steady. Review: Several times thought I needed to goto hardware store for set screws or other things but after digging in crevices of box or in - the kit came with all the screws and bolts thrown together and loose in the packaging. the first steps required getting familiar and sorting all the pieces.. realized instructions on USB flash included with kit.. Then assembling a few steps at a time, and in no rush... There was some assembly done in factory that had to be disassembled to work per pictures and video. Also added some washers needed at the angle brackets. Several times thought I needed to goto hardware store for set screws or other things but after digging in crevices of box or in between foam packing and I was able to find pretty much everything in there.. Don't do what I did.. I got all excited to have the unit complete and didn't understand how the auto-leveling sensor worked and thought it was pre-assembled ready from factory.. the sensor was set way to high, and stripped out the z-stepper motors as soon as I hit in controller navigation.. $30 for new motors to get it back up and running. guess I should chalk that one up as the cost of a lesson? use the software to control the printer, not the firmware, and make sure you can quickly access the power switch if something goes wrong.. It is printing out very accurate prints very quickly after assembly. So far with 200+ hours printing, the prints are improving all the time... **edit: i was randomly having problems. often prints were stopping halfway through or sometimes the LCD getting garbled. can remember turning on/off lights or equipment to find print stop with no explanation. it turns out this is because the provided USB cable is not a shielded cable. It is common practice for units such as this to be sent with a similar usb cable, however i'm pretty sure these are not shielded cable. recommend using a sheilded usb cable to avoid frustration and potential issues printing.
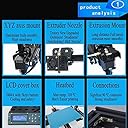
| Compatible Material | Aluminum |
| Connectivity Technology | USB |
| Customer Reviews | 3.0 out of 5 stars 2 Reviews |
| Manufacturer | Senhai3D |
| Material | Aluminum |
| Operating System | Linux |
A**N
Instruction manual is useless and refers to firmware that is different then what ...
Definately NOT for the beginner! Instruction manual is useless and refers to firmware that is different then what ships with the actual printer. No source code, so nothing printer/manufacturer specific to modify. Don't expect any level of support whatsoever from the seller, and you can't track down the manufacturer to get any either. Which means modification of the firmware is completely trial and error, including trying to figure out resistor settings for the hot end, heat bed, extractor, motors, etc. Not bad quality product for what you're paying for, but expect to be putting in a lot of time to dail it in correctly. You'd be better off spending a little more getting a product that offers support to cut down on aggrevation. Returned mine after two weeks of unsuccessful attempts at getting the zeroing of the z-axis to hold steady.
M**O
Several times thought I needed to goto hardware store for set screws or other things but after digging in crevices of box or in
the kit came with all the screws and bolts thrown together and loose in the packaging. the first steps required getting familiar and sorting all the pieces.. realized instructions on USB flash included with kit.. Then assembling a few steps at a time, and in no rush... There was some assembly done in factory that had to be disassembled to work per pictures and video. Also added some washers needed at the angle brackets. Several times thought I needed to goto hardware store for set screws or other things but after digging in crevices of box or in between foam packing and I was able to find pretty much everything in there.. Don't do what I did.. I got all excited to have the unit complete and didn't understand how the auto-leveling sensor worked and thought it was pre-assembled ready from factory.. the sensor was set way to high, and stripped out the z-stepper motors as soon as I hit <home> in controller navigation.. $30 for new motors to get it back up and running. guess I should chalk that one up as the cost of a lesson? use the software to control the printer, not the firmware, and make sure you can quickly access the power switch if something goes wrong.. It is printing out very accurate prints very quickly after assembly. So far with 200+ hours printing, the prints are improving all the time... **edit: i was randomly having problems. often prints were stopping halfway through or sometimes the LCD getting garbled. can remember turning on/off lights or equipment to find print stop with no explanation. it turns out this is because the provided USB cable is not a shielded cable. It is common practice for units such as this to be sent with a similar usb cable, however i'm pretty sure these are not shielded cable. recommend using a sheilded usb cable to avoid frustration and potential issues printing.
Trustpilot
3 weeks ago
3 days ago