Desertcart purchases this item on your behalf and handles shipping, customs, and support to USA.
🏡 Elevate your outdoor living with strength, style, and all-weather confidence!
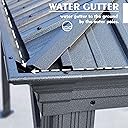
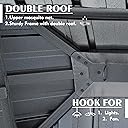
The Kozyard Alexander 10' x 12' Hardtop Gazebo features a robust aluminum frame with 4.7” x 4.7” poles and reinforced beams, supporting up to 2,500 lbs of snow and 60 MPH winds. Its galvanized steel double roof includes an integrated gutter system for superior water management. Designed for spacious outdoor lounging, it comes with privacy curtains and insect netting, plus a ceiling hook for added functionality. Perfect for millennial professionals seeking a durable, stylish, and versatile outdoor retreat.


| ASIN | B09XGQZWLH |
| Best Sellers Rank | #77,348 in Patio, Lawn & Garden ( See Top 100 in Patio, Lawn & Garden ) #167 in Gazebos |
| Brand | Kozyard |
| Brand Name | Kozyard |
| Color | Gray |
| Customer Reviews | 4.6 out of 5 stars 1,563 Reviews |
| Floor Area | 120 square_feet |
| Frame Material | Metal |
| Item Dimensions L x W x H | 144"L x 120"W x 115.2"H |
| Item Weight | 320 pounds |
| Manufacturer | Kozyard LLC |
| Manufacturer Part Number | KZAHG1012GRA |
| Material | Aluminum |
| Material Type | Aluminum |
| Model Number | KZAHG1012GRA |
| Number of Items | 1 |
| Number of Packs | 1 |
| Product Dimensions | 144"L x 120"W x 115.2"H |
| Shape | Rectangular |
| Style | Modern |
| Style Name | Modern |
| Ultraviolet Light Protection | UV protection, level not specified |
| Unit Count | 1 Count |
| Water Resistance Level | Water Resistant |
J**R
Perfect Gazebo For Our Deck
We wanted a cover for our deck so we could enjoy eating more often outdoors and to enjoy a nice evening thunder storm. This Gazebo fit our deck almost to the inch, perfect fit. It was easy to schedule the delivery, they put the 5 boxes it comes in exactly where we asked them. The fun part was assembling, which took a few weekend to finish. I had watched a video online for an older version of this gazebo and it looked pretty simple. Most of it can be put up with one person assembling, but there are a few parts that require the help of another person. The base part was simple, all parts fit perfect, screws went in easily, no bad parts and didn't have to struggle to make things fit together. The directions were mostly understandable, only a few parts were confusing, especially when we got to putting on the roof parts. Sometimes it is easier to leave the screws loose until you get each step completed, and then tighten them. The assembly of the roof was the hardest and most time consuming. The top-top roof was difficult to put on the roof panels as the edge clips that you have to put on each panel kept coming off when pushing them into place. I found a tip later in the instructions to use the two-sided tape to hold these in place for the lower roof panels, would have been nice to have that tip earlier. The framing went pretty easily. Putting on the roof panels was the hardest. Make sure everything is square, do not tighten the screws so you can jimmy the sheets around so the holes line up. I had a few where a screwdriver was used in a few screw holes to shift the panels so the screws holes would line up. It was an adventurous assembly, and sometimes frightening, but overall it wasn't too hard to do. Prior reviews gave a lot of tips that Kozyard seems to have addressed as those tips were not needed. It is super sturdy and solid. I really enjoyed the experience and look forward to enjoying the outdoors a little more. Very happy with this purchase and would recommend to those that are looking for something similar.
L**E
Quality DYI Gazebo
Let me start this with it has taken me about a year to get started on this great project, as no fault of product or delivery this crated package has been sitting in the garage since the outbreak of COVID-19 and had to patiently wait in it's boxes until help was available. Now with that said, the Total time this took to assemble was about 9 hours in 2 different afternoon's, not because it's difficult to assemble or any problem with instruction booklet which was referred to quite often as the build was being done, but as we fit and unpacked the quality parts and finding what went next. The packaging's are remarkably secured within the shipping containers (good thing) but somehow one of the roof panel rafters had a scar on a part that shows beneath the roof and one of the gutters had a small depression at one end, neither of these caused any issue and I will touch up the bare aluminum come spring. So the Pros are, easy to assemble with 2 person's having some knowledge of construction. The quality of the structural piece's are top rated. The alignment of the parts are surprisingly great (I only found 5 of the holes that did not align perfectly and had to spin the screw through the misaligned holes to make them work fine. I did have one blind hole that was stripped before assembly but with a shim in the hole in took the screw and tightened correctly. The finish of all the materials are professional and rich looking, this unit comes with insect netting and privacy/sunshade curtain's (that will be installed coming spring) The anchor plates on each leg are sturdy and broad and can be trusted to withstand mild winds in a free standing garden area. The customer service is Great although I did not need to contact them they was eager to contact me via Amazon message to give me a reassurance that they are ready to help with any issues. Now for the Cons which are very minimal in my review, those piece's are very sharp in some of the corners and hand protection is suggested throughout the Manuel which is nicely printed, the clips that seal the roof panel into the channels are time consuming but effective to install, there are "million's" (not really) of screws that are hard to hold onto with arthritic hands LOL (glad there are extras) however the tool's that come with this unit (are recommended not to use unless you haven't any other) will make this project a complete summer project to complet. Scenario if you use a drill driver take caution to not over tighten any fasteners and leave the panels and assembly loosened enough to adjust throughout the build and then go back and torque everything to a light torque setting. Final thoughts, this seems to be a quality structure that should last for many years and I would purchase this companies brand again if ever needed, so yes I can recommend this to my family and friends to make this their own Gazebo. Pictured after the first afternoon and then the completed project on the second afternoon built/assembled on a 12 foot square wooden frame deck of 2 x 6 treated and 5/4 decking.
P**S
Great Gazebo with qualifications (12X16 model)
Pros: Quality of materials - sturdy, and a beautiful hammered bronze look for both the frame and roof. Design - 3 metal loops in top of cupola allow you to easily install 2 outdoor ceiling fans + a light in the center Includes Curtains as well as mosquito netting - Curtains are great looking, but need a hem in the bottom to put weights in - they flop around quite a lot in the wind otherwise. Fasteners are actually pretty good quality Cons: Directions are awful - simple line drawings that do not do the assembly justice AT ALL Parts - especially fasteners are labeled and referred to in directions in a very non-intuitive manner No online videos - the Sojaq brand videos are just similar enough to be frustrating Gutters do not drain INTO corner posts, but just outside them, causing splashing Gutters require center seam sealing, or you WILL have leaks at the center of each gutter, causing splashing Freight forwarding companies can be a challenge to deal with Hints: Two people with a sense of humor and who get along are necessary (and sufficient) Two stepladders are necessary. 5 footers will get the job done. 8 footers are what I recommend SEAL the center seams of the gutters BEFORE starting roof install. Use a screwdriver or drill (set to very low torque) to tighten the thousand fasteners with the correct hex size Budget TWO FULL DAYS for construction. Go Slow. Keep parts out of direct sunlight as they get HOT. HAND TIGHTEN everything until the last roof panel is in. There is a LOT of tightening/loosening involved to get the parts to seat correctly. TEST YOUR GUTTERS BEFORE putting on the roof panels. You'll want to A) seal the center seam on each side, and B) modify them to drain INTO the corner posts. I love this gazebo, I really do. But, I wish that I could go back in time a few days to redo the assembly, as the directions SUCK, and there are a lot of tweaks to the assembly process that could have been made in order to make life easier. As it stands, I'm looking for ways to seal the center seam of the gutters, as well as making a tweak to get them to drain INTO the corner posts. This is 100X more difficult (and frustrating) now that the roof panels are on. Glad I did this...but shaking my head at how much better and easier it would have gone with actual directions and a video - not too much to ask on a $2400 product IMO.
W**E
BEAUTIFUL~ Rich and Very High End Quality!
Amazing Quality for the price. Couldn't be happier, a real game changer for my deck. 2 men 42/75 (ages) put this together in about 8 hours, including opening all the boxes (5) and laying out the pieces in order. Every piece marked, making it easy to assemble. I haven't put the netting or curtains on yet, but will be easy, and both seem very high quality as well. I highly recommend this product for anyone looking for a do it yourself gazebo. Comes in several sizes as well. Mine is 10x12. I am looking forward to many years of enjoyment. Especially listening to rain on the metal rooftop in spring and fall. Shade in Summer!
J**E
You want this gazebo!
I am loving this 10x12 gazebo. After much research and shopping around we decided on this one. I wanted one where the mosquito netting met the frame and did not leave a gap like others do. My last one (not a hard top) had a gap of 2+ inches that was not effective in keeping the mosquitos out. Assembly: We are older and had to pace ourselves and also work when the sun wasn't directly on it because the parts get hot, so I can't give an accurate time frame for assembling it. It did take us multiple days and if you can have extra people for certain steps it will make it easier. Most impressive is the packaging and having no major issues with the pre drilled holes lining up. I kept expecting to run into something that didn't line up but fortunately that was not the case. The parts are not just thrown into the box, they are wrapped well and fit together in the boxes so there is minimal movement. This is a sturdy gazebo and a great value. The mosquito netting seems to be a better quality than any others I have had with heavier duty zippers and I look forward to extending the season by using the solid curtains once the weather cools down. The instructions are for the most part clear once you get used to how they are trying to tell you what to do, but having someone with good spatial recognition is very helpful. For some reason we were sent an instruction booklet showing different parts that what we received. Contacted customer service and they quickly sent the new instructions and the parts that were needed. It seems that they have made some improvements from their earlier model and we got the old instructions. The gazebo was shipped in 5 boxes. Parts are clearly marked, but there are a lot of parts!! Work gloves are helpful to push the roof panels into place. Only suggestion would be to include a better type of hex wrench that can be used with a drill or some type of attachment/extender. Overall, I am very satisfied with this gazebo and I think we did a good job putting it together since there were no leaks when we had a heavy downpour.
D**L
Excellent quality, but a few assembly hints!
The gazebo is very sturdily constructed and should last a very long time, but it takes some time and patience to assemble it correctly! It CAN be assembled by one person, but with some creative use of step ladders (6' and 8' helpful!) and painters tape. The only flaw in the instruction manual is the timing of when to add the "Outside Roof Connector", Step 11. Do this AFTER adding the Upper Roof Panels in Step 13. These Panels will get blocked by the Outside Roof Connector if it's already installed. Also, the instructions don't mention it, but you'll have to remove and reinstall some connectors as you add more parts to the gazebo. This becomes obvious when new parts line up with already installed connectors, but it's nice to know this in advance so you don't think that you screwed it up. Other helpful hints: use painters tape to secure the large panels after laying them in place. You'll need to climb to the top of the gazebo to wrangle these into the slot, and they can easily slide off and do major damage to your neck if a small breeze kicks up. Consider using an M6 tap to clean up any threads which are difficult to screw into, better than jamming or stripping the inserts. Definitely keep the C1, C62, B1, & B61 Joint Bars very loose until the roof panels are installed! These are the hardest connectors to line up and will require some adjusting with an appropriately sized Philips head screw driver shaft. Don't be shy about lining up the slots with the screwdriver shaft, everything will fall into place when the connectors are tightened. Finally, two hints about the "7#" screws and nuts. These are the ones that go in the middle of the roof panels and can be very hard to reach once most of the adjacent panels are installed. Use the painters tape to fasten the flat wrench to the nuts at the bottom of the roof so you can climb to the top of the roof and allen key in the fasteners. You can also squeeze the rubber "S" spacers to keep the fasteners from spinning so you can pre-tighten the nuts from the bottom of the panels without requiring arms like an orangutan, although that would be helpful also. Be patient and give it time and you'll get a great result! A couple of updates: a minor quibble with a solution plus another assembly suggestion. In addition to or instead of sealing the gutter system with the supplied black silicon goo, consider applying adhesive waterproof sealant tape normally used for flashing windows. An easy update that should permanently seal the gutters! And now the quibble: the hooks for the "mosquito netting" will definitely pull out of the slots when you're trying to tie back the screens. The track for the privacy screen is blocked by the gazebo corners, but the outer track is sufficiently open at all ends to allow the hooks to easily slide out. My solution was to install blocking screws at the end of each track (8 required). See photos. I used M6 by 12 screws with locking nuts and flattened washers to fit into the slots. Not a difficult fix, but maybe should be part of the hardware supplied by Kozyard and covered in the installation manual.
D**A
Fantastic Gazebo, Great Customer Service
The Alexander gazebo is very good quality and super sturdy. I assembled it by myself in small increments of a few hours when time permitted, all together it took maybe an entire day, although I HIGHLY recommend two people. Mine is a 10x14. The instructions are very clear and there’s a YouTube video of this exact model you can watch and it made the assembly so much easier. Is it easy to assemble, no not by yourself but it’s not impossible either. The hardware was very good quality as well and nothing was missing. Assembly tip leave the entire roof and structure screws slightly loose to install the roof and panels so the holes align then tighten the roof then go back and tighten the entire structure you’ll thank yourself later. Another thing to note they have insanely good customer service. One of my legs had a small dent in it and after contacting them they replied immediately, and I had another new pillar leg on my porch in two days via fedex. I was impressed how they handled it and I got touch up paint with it as well. Glad I chose this one over wood, I couldn’t be more satisfied.
J**S
Very nice kit, a bear to put together, but very happy with the final result and quality
Ships as 5 (heavy) boxes, we previously had a soft top gazebo and wanted to try a hard top. This is the same size 12x12 as our previous gazebo, it sits on our elevated (wood) deck. We (wife and I) watched some installs online (youtube), lots of good tips, there are some irritating things, (double sided tape to hold some plastic brackets on the solid top pieces that just doesn't work, probably should have glued them), but watch some youtube installs (none are perfect, some are for what look like older versions of the gazebo), it was very helpful to get hints from the installation videos. Most of the instructions were correct, although its sometimes hard to figure out exactly how pieces are oriented (there are soooo many). Very important to have a clutch capable electric drill for screwing in pieces, (but don't tighten until after you get them all in, so you can still wrangle the pieces over the pre-drilled holes). TONS OF SCREWS TO MANAGE, certainly wouldn't want to install them manually, definitely want to prepare for handling the many many screws, sort them, label them, etc. We put labels on cups and kept the different screws being used for a given phase of installation in unique (and labelled) cups. Final product is high quality in my opinion (for the price), although manual says the gazebo will only withstand 40mph, and we still haven't figured out exactly how to lock it down to our deck (instructions only talk about installing on cement). Took us 4 days all in, starting from carrying the packages onto our deck (one or two of them needed two of us to move them). We avoided the full sun hours (1-4PM) as our deck is full sun and we would be burnt to crisps, so say 9:30 to 12P, then after 4P until dusk sort of deal, (two of us working), a ladder and two varied height step stools, multiple electric drills. The parts were packed very well, with material between the parts in each box to keep them from scratching each other. The screws were all high quality, they went in without too much wrangling, although fitting the many many solid top pieces to the frame takes some man handling. Still, very do-able, just a big time commitment. Its up, beautiful, and we are enjoying sitting under it on our sunny deck, screens are installed, but we haven't tried to use them yet.
A**E
Wonderful gazebo!!!!!!
Sturdy structure. 12x10 is a perfect size. Construction was slightly difficult. Following directions is important. Must work slowly and methodically. Patience is required. This gazebo compliments any deck or patio. Very happy with this purchase.
L**T
bien content du résultat
Prend du temps a assembler et préférable d'être habile manuellement
Z**E
PRE-DRILLED NIGHTMARE
The predrilled holes are not very accurate, especially in the roof. It is so bad that the screws are unable to fit, so the roof is still unfinished. I’m not sure what I can do to fix this.
Trustpilot
2 days ago
1 week ago