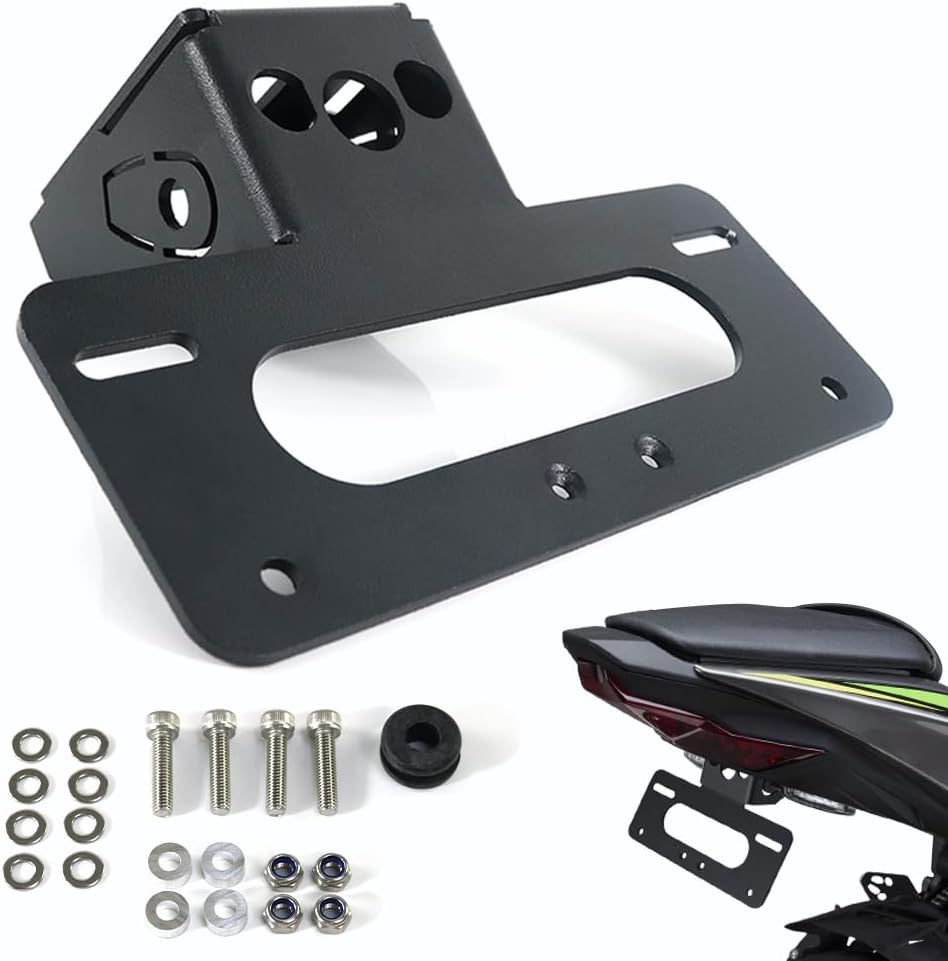
The directions are mostly ok but unclear in some parts and some steps seem unnecessary. Essentially what you need to do is remove the passenger seat, temporarily move the servo motor to the side (loosening the side rear fairings does help), disconnect the wire harness connectors, unscrew the old fender (6 fasteners in the middle at the bottom of the tail cavity), remove stock signals and plate light from old fender, put them on the new bracket (after breaking the tabs off of the new bracket for the signals, you must fully file down any remaining nubs flush with the hole), using the supplied hardware install screws and washers from the inside of the tail, spacers, bracket, washers, and lock nuts outside, tighten, then reconnect all electrical connections, replace servo motor, and passenger seat. Key things to be aware of which can be tricky: - In order to fit the grommet on the cable for the plate light, I needed to remove the electrical pin contacts from the plastic connector by sticking a very small object like a screwdriver for eyeglasses/phone repair between the end of the electrical contact and the locking tab (for each separate wire) inside the connector so that I could pull the wire out the back of the connector. Once I did this I labeled the wire and then marked the side of the connector so I did not forget which side to put back in. I did the same for the second wire, And once I had both wires out of the connector I could easily get the grommet over the cable and slide it up to the plate light. Then all I had to do was simply push the wire contacts back into the connector. - (***UPDATED*** after writing this review I realized overlooked that there are two rubber grommets on the original fender which need to be fit on the new bracket. So I may go back and replace the washers I described below) This is probably my biggest negative about this product: The OEM plate light mounting screw holes are in bosses that stick out quite a bit past the rear of the plate light, and after installing the plate light on the new bracket, even with the supplied grommet, the fit is loose and so custom washers need to be fabricated to provide something for the screws to push against (see photo). I used a hack saw to cut 2 pieces of ~0.2-in thick clear polycarbonate material that I had on hand, approximately 1 in long by 9/16-in wide with a 3/8 in hole in the middle. - In case you forgot to write it down, the black connector is on the right turn signal and the blue connector is on the left turn signal. But if you think about this while you're a disassembling the stock fender you can mark the connectors to help you remember later. - It is quite challenging to fit the stock turn signals into the new bracket. You definitely need to make sure you file out the holes smooth after breaking off the removable tabs because the fit is tight. I had a difficult time wiggling them into place because the rubber is flexible and the hole fit is quite tight. I managed to do one "in the air" by hand and for the second one I discovered that if I temporarily lag the bracket upsidedown to my workbench with a couple of screws then I can apply a lot more force with a lot more control to fit the second signal, this way I could apply pressure and wiggle into position and also use another tool with my other hand to help push in the rubber all around. Don't forget the little clip pieces from the OEM assembly which fit inside the rubber, then the other black piece on top of the rubber, and the screw to clamp everything together. - One other thing on the signals, you can easily access one of the screws for the signal clip which fits into the rubber, but once you install the second signal you cannot get to the end of the screw for it with a normal screwdriver, so what I did was use a short Phillips bit like you would use on a manual screwdriver with interchangeable bits and just grabbed it with pliers at a 90° angle and uses that to gently tighten the screw for the second signal after installing the clips. - I read many comments about the struggles with assembling the bracket together with all of the spacers on to the tail of the bike. My first thought was to just add a bit of painters tape from the side of each spacer down to the surface of the bracket, kind of like an adhesive gusset. I did this on all four spacers and that actually helped hold the spacers from falling during assembly and I only needed to attempt the assembly essentially once. As soon as I had the bracket roughly in place and the screws were passing through all of the spacers and bracket I could hold it there loosely while I removed the tape before proceeding. I would say this is not an easy install but if you have good mechanical sense, a variety of tools to work with, and maybe even a helper for a few parts of the process then it can certainly be done. It definitely cleans up the look of the bike. I like the OEM turn signals because they do stick out a bit and I imagine that would make a left or right turn seem more obvious to other drivers than if the turn signals were right next to each other directly under the tail. In working with the bracket during the installation, it does feel like a solid piece and I expect it will be durable. I definitely feel like this fender eliminator kit is functional and worth the money compared to the alternatives which are four times the price or more.