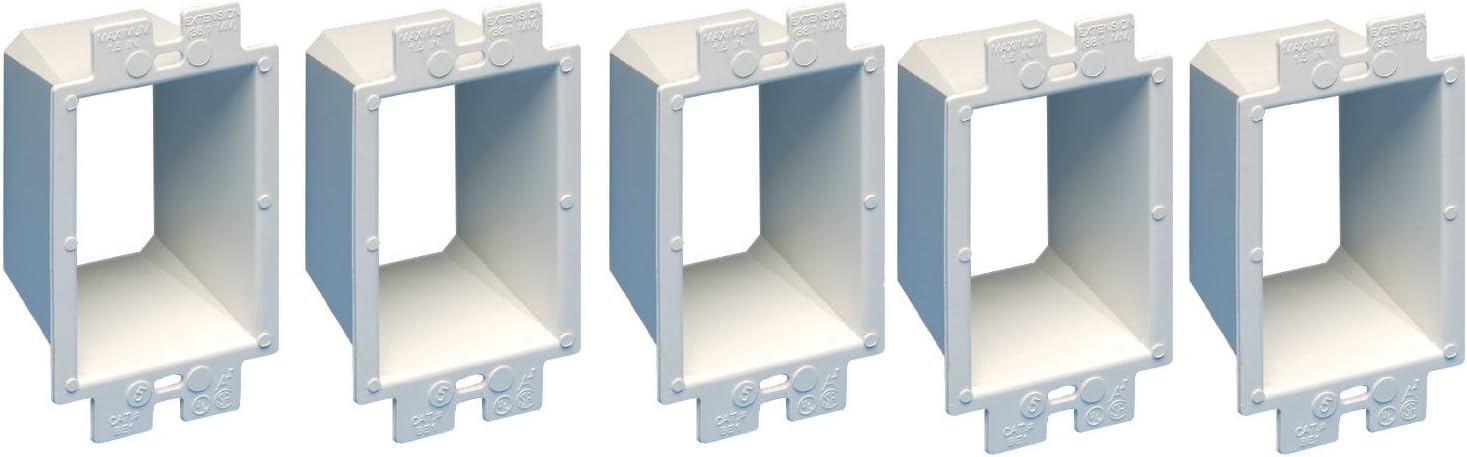


Arlington BE1-5 Electrical Outlet Box Extender, 1-Gang, White, 5-Pack
Product ID: 3668830
Details
- BrandARLINGTON
- ColorWhite
- MaterialPlastic
- Product Dimensions2.3"D x 4.2"W
- Style1-Gang
⚡1.5" extension
✅NEC compliant
🔥Flame retardant
Buy anything from 5,000+ international stores. One checkout price. No surprise fees. Join 2M+ shoppers on Desertcart.
Desertcart purchases this item on your behalf and handles shipping, customs, and support to USA.
🔌 Elevate Your Electrical Game!
The Arlington BE1-5 Electrical Outlet Box Extender is a versatile solution for extending set back electrical boxes up to 1.5 inches. Made from flame retardant plastic, it ensures safety and compliance with NEC standards. This 5-pack is perfect for both professional and DIY installations, providing seamless support for outlets, switches, and GFCIs.
| ASIN | B00303FYHS |
| Best Sellers Rank | #184,379 in Tools & Home Improvement ( See Top 100 in Tools & Home Improvement ) #420 in Electrical Outlet Boxes |
| Brand Name | ARLINGTON |
| Color | White |
| Customer Reviews | 4.4 4.4 out of 5 stars (1,142) |
| Finish Type | Painted |
| Global Trade Identification Number | 00018997042521, 30018997042522 |
| Included Components | Wall plates |
| Installation Type | Wall Mounted |
| Item Dimensions D x W x H | 2.3"D x 4.2"W x 9"H |
| Item Type Name | Wall plates |
| Manufacturer | Arlington Industries |
| Material | Plastic |
| Model Number | BE1-5 |
| Part Number | BE1-5 |
| Specification Met | Ul |
| Style | 1-Gang |
| UPC | 018997042521 |
| Unit Count | 5.0 Count |
| Warranty Description | In the event any of our products are found to be defective, we will replace them with new product free of charge. |
C**N
Works as Intended
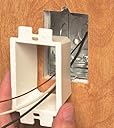
My wife tiled a wall and we needed to extend the box for a socket. The procedure: 1. Figure out which circuit it is. 2. Turn off the circuit breaker. 3. Test to make sure you got the right one. 4. Pull the old socket out of the box and disconnect the wires. If the wires are pushed into the back of the socket, they are released by pushing a little screwdriver into the slot below the wire hole. Remember where the wires connect. Draw a diagram or take a photo or bend them into the correct locations. You might be able to just fit the socket through the extension by bending the wires close to the side of it and ehn you don't have to disconnect anything. 5. Put the wires through the extension and the extension into the old box. 6. Reconnect the wires to the socket. 7. Using the supplied longer screws, connect the socket and the extension to the old box. Tighten down so that the top tabs on the extension bottom out on the tiles. 8. Screw the cover plate back on. 9. Turn the circuit breaker back on.
P**M
Perfect!
Easy installation and these do exactly what they are designed to do. Added accent paneling over a few wall areas and we needed to extend some outlets and switches. Nice fit and outlets and switches are now where they need to be and are mounted firmly in place.
G**I
Good product, better price than big box stores.
After installing some wall back-splash, I needed to install something under the receptacle for additional support. The price of these cheap looking little boxes are way over priced at Lowes, HD et al, and I refused to purchase there. I only needed three, but this pack of five is still cheaper than the price for three, at one of the common hardware stores. These are cheap plastic boxes, which are still over priced in my opinion, but I was happy to save, nevertheless. Actually, I am finding that with some preplanning, I can save a lot on electrical supplies, and tools, by ordering online.
J**R
What Are These Designed To Do?
Keep in mind what these extenders are designed to do. The purpose is to fill a gap when the box is not flush with the wall due to adding a back splash, sloppy box install, etc. The manufacturer’s videos and marketing material shows an install in a perfect world which is not usually the case. Some reviewers complained about the BE1 being too thin and flexible to stay in place for a drywall cut that is larger than the box. I agree, but this is due to bad construction or remodel. If this is the case and you still prefer to use the BE1 all you need to do is simply use spacers between the extender and box which will put the pressure on the box, not your wall when screwing the outlet in place. See photo 5 for the type of spacers I used. The outlet is now completely enclosed in the BE1 and there are no gaps which is safer. I used the BE1 to correct a very bad box install on a slightly bent plastic box. The flexibility of the BE1 came in handy. A very rigid extender would not have worked in this case. See photos 1 thru 4. This five pack BE1 I purchased did not come with screws. The extenders came in a zip lock bag. My best guess is the seller buys them in bulk and puts them in the bag. See photo 6. I also bought a pack of the extenders from a local retailer. The extenders came with 2 inch screws in a sealed bag with the manufacturer’s logo, etc. printed on the bag. Before starting your project have 6-32 machine screws of sufficient length handy.
H**K
NO SCREWS
The boxes work fine. However, I've had to buy extender boxes more than once over the years for various home improvement projects and have *never* had them to come without screws so I didn't even think to check that these did not. Caveat emptor. Therefore, take that into account under "value for money" since you're going to have to source screws.
A**8
Simple solution
Found an outlet at church that was installed inside a cabinet, and the outlet wasn't screwed into the box (YIKES!). So this extender was the perfect solution to electrically isolate the outlet from the metal box below. Also installed spacers (sold separately) between the outlet and electrical metal box. Installation Note: This piece is flexible enough where-by you can deform it enough to get the outlet through the opening without needing to disconnect the wiring. The extender box is also sized correctly to fit underneath a standard wall plate (see picture #2). Note: the wood was cut poorly, and oversized (as can be seen in the first picture). I first tried installing this without the extender box, but was not able to get the outlet secured sufficiently (still wiggled just a little when pulling a plug out). So this extender had just enough "ears" to firm up the installation. My take away is that if you were cutting a new hole, you'd want to leave behind more material as you can always cut again.
S**E
Perfect for the job
I bought the Carlon brand extensions originally, but found they didn't fit the metal junction boxes I needed to extend. These work much better if you need to extend a metal junction box. I also found that the Arlington extenders could be trimmed very easily with a pair of snips. I read a review suggesting that these are cheap feeling. I would have to disagree. They are not the hard plastic you'll find with the Carlon extenders, but they aren't flimsy. They are flexible enough to work with and thin enough to trim down easily.
D**H
Great fit.
Great fit for metal boxes.
D**N
These work really well and are CSA certified, which is pretty important.
R**H
I used this after finishing a wall with strapping and laminate flooring so the box was over an inch below the finished surface. This extender worked perfectly and was very easy to install. Since it can accomodate different set backs the extras can be used on future projects. Nice neat result.
R**A
It has all required marking which an Insurance could check.
Ï**W
the product came in an orderly fashion as promised. Not as yet installed, but will do the trick of modifying the electrical boxes as we have laid up new drywall over the existing 125 year old lath and plaster walls. expect that I will order more in the near future to finish off the project.
B**+
These are what you require for those older electrical boxes. The blue ones on the market are too big and won’t fit. I added a smart switch in a garage that had old electrical wiring and box. This worked perfectly. Remember to purchase 2” bolts that are 6/32 in size as you need long bolts to attach it. Bolts do not come with these extenders.
Trustpilot
3 weeks ago
2 days ago