🖨️ Flex Your Prints, Not Your Patience!
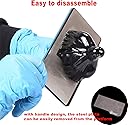
The BIQU Resin Build Plate+Magnetic Sheet is a 202x128mm flexible spring steel plate designed for resin 3D printers like Anycubic Mono X and Photon X. Made from durable US-imported spring steel with a special wire-drawn surface, it offers strong adhesion and easy print removal by bending—eliminating the need for scrapers. Paired with a high-strength soft magnetic sheet, it ensures stable, hassle-free printing and quick plate removal via an ergonomic handle. This combo boosts print efficiency, protects your build platform, and is a must-have upgrade for resin printing pros.


| Customer Reviews | 4.2 out of 5 stars 1,312 Reviews |
R**K
Item is as Described and Works as Intended with the proper prep work!
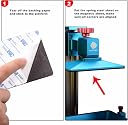
I bought this product, slightly skeptical as I know magnetic force can be somewhat touchy depending on surface area and adhesion can vary based on surface preparation and the quality of product used. This product came in with 3M, chemical-resistant tape and has more than enough surface area to hold the steel plate to the build plate without any issue. Reviewers who have had the plate fall into the vat or come off in any way must have done something wrong as I cannot see any straight-pull force breaking the plate free from the magnet as I sometime struggle to remove it even when I am trying to and from a corner. The Saturn's bed has a blasted finish so the surface is less than ideal for adhesion, but so long as users follow the instruction below I cannot foresee any future issues. Clean the entire build plate and head with iso. alcohol or acetone to remove any resin residue. If your build plate has any SUBSTANTIAL marks from removing prints, no matter if they are gouges or raised material, those have to be removed so break out some 600g paper, lay it flat on a hard surface, and lap your build plate back to flatness. CLEAN AGAIN with iso. or acetone if you lapped anything to remove both the grit, bed material, any anything that could have been on the paper. Heat the build plate and the magnetic sheet with a blow dryer or some other heat source for 5 to 10 mins. so that it is WARM to the touch through and through (not just for a few seconds and then cools back down). Install your build plate on the machine, upside down and tighten it well. Remove the backing paper on the magnetic sheet from just one end of the sheet, keeping it on the rest so you do not physically touch the adhesive. Lightly start the short edge on the plate and, when you t it where you want it press it down, starting from the middle and working outward. Allow the rest of the magnetic sheet to contact the build plate, removing the backer as you go, and pressing down from the middle out to release any air that may become trapped. When the entire mag sheet is laid out, take a microfiber and press/rub all over it for several minutes as both the sheet and the build plate cool. Most adhesive have a set-up period, so waiting to print for a day would be ideal, but even a few hours would be good to allow things to set-up. I began printing entire plates immediately after install and have no issues. I have also tried to work a corner of the magnetic sheet up (just to see if it would give up easily) and could not do so. This system makes printing easier and better. You may still have to scrape the prints off, but at least you are not scaping your build-plate material and removing the plate allows you to keep the head attached to the machine, saving resin, alcohol life, and reducing cleaning time. Addition considerations: The surface of this plate is rather smooth to allow prints to break free. Before I used mine I blasted it with 120g media. The blasting process creates a surface much like your stock build plate and insures that prints will stick every time without fail, but doing so makes it so you will not be able to easily break your parts off the plate. Blasting CAN warp the plate so if you do it, go slow and do both sides evenly so you do not induce too much heat. I did not try the product with the stock surface so cannot attest to print adhesion.
R**Y
A must have accessory.
This thing is a must have. This technology should be standard on all resin printers. It worked flawlessly the first time on my printer. Resin printing is a messy process no matter how careful you are this made removing a print was very easy. Just flex the thin metal sheet and remove the model. Very happy I purchased this item. Easy to install, make sure the platent surface is clean, dry, and free of debris.
J**.
Photon Anycubic X you might want to...
...scuff up the surface a bit more. My experience was I got the little envelope from amazon and opened it up slapped it on the build plate - calibrated... and did a few test prints. It was a bulky item I kept trying... so the plate just kept coming up empty. I was immediately frustrated... but also realized this print item fell off the original build pate too! (also am using ptfe lube on the new fep) So I did the nasty and grabbed some sandpaper and took a few angry swipes at the Biqu metal plate. Just quick swipes to get a bit more Texture. And BOOM This thing works AMAZINGLY on Everything! The days of using a dam razor or chisel are over! No need for a bulky raft! Just slice that thing right on the build plate!! You can pop it off with ease and have no damage to the part and waste less resin. Final note: If you are worried about damaging the new biqu magnet plate you just bought by scuffing it up a bit more as I mentioned above you can flip the metal sheet over and have the original manufacturing texture that came with the metal plate. and that at its default texture works just fine for small parts like minis. This thing is such a simple and great idea. Should be a default on ALL resin printers. Amazing product.
4**3
I did try.
This has nothing to do with the company, or how it's ran. They were very friendly to me when I needed to exchange the build plate for the correct one. For beginners, make sure it is the correct dimensions of the build plate (usually check the website or see if you can find it on the ELEGOO Amazon page. Well, it was an epic fail unfortunately. I had very high hopes! I was very excited because struggling to remove the print from the build plate is literally never fun and more than once my newly printed build had flown off of the build plate and onto the floor below to where it was cursed with the hair of myself and my family of animals. Once again though, I want to verify that this doesn't reflect on how this magnetic sheet works. To give you a quick rundown, to use this item you merely need to clean off the build plate, wait for it to be completely dried, line the giant 3DM sticker/magnet to the build plate, and press it on. Have something pressing down the build plate to the sticker to ensure it is properly on there and won't budge anywhere once you begin printing. Well...this is where it got challenging for me. I got the sticker on, put the build plate back on the printer, and tried to print something. It made such a weird noise and I immediately stopped the printing just for fear of ruining a $200+ 3D printer. I tried again, same thing with the noise. It wouldn't even begin printing and merely just sound like a dying machine. This was something that I brought to the reddit page of ELEGOO to see if anyone else has had this problem. There were some others that knew my problem and had helped me. Now I'm going to give you the same information they gave me. The extra add on to the build plate didn't allow the plate to properly trigger the limit switch. With your regular build plate, the plate triggers the 'limit switch' to let the build plate know that it has reached the bottom of the resin vat and therefore can now begin printing. If you are like me and just let it continue to make the noise while you try to make it print, I hate to tell you, but it'll only ruin your printer and your FEP film and everything else because it's trying to push PAST all of that to trigger the limit switch. I'm a techie more than anything. Computer problems? I can solve it. TV problems? I gotcha. But 3D printer problems are still a whole new world to me and I don't want to break anything. There are videos of changing the height of the limit switch, but for someone like me that is new to the whole 3D printer world, I didn't trust myself to tear apart the 3D printer. Overall, honestly the magnetic plate is a genius idea. If it worked for me, it would of never been taken off of the build plate. For those of you who don't want to take apart your printer and adjust the limit switch for the printer, keep in mind changing the z=0 doesn't change that the build plate still needs to trigger the limit switch to just get to the z=0 part, I highly recommend to just use the support system. Taking supports off of a build plate is easier to get off, and the ELEGOO Mars 2 Pro has a package where you can get those little cutters for the supports if you are a perfectionist.
E**R
A failure - I'm going to try the more expensive one now
I followed the instructions carefully. I was meticulous about cleaning off my build plate. It was scuffed so that the adhesive on the magnet would adhere tightly. I placed it on my surface plate to make sure it was perfectly flat and added several pounds of weight on top. I allowed the adhesive to cure over the span of 5 days. I then ran my first print. I re-homed the height to take into account the extra height of the magnet and plate, added the resin and ran a print. It failed about halfway through - the part came away from the metal plate. So I cleaned everything up and I scuffed up the flexible plate to allow the resin to have more surface to grab onto. I also modified the print to give it a longer lower layer time. And not only did only half the objects hold on for the whole print job, but the magnet had pulled away from the original print surface on one half. Which meant the prints that did adhere were skewed. When I went to pull the flexible plate off, the magnet came off entirely. On the plus side, the prints popped right off of the flexible build plate. I suspect I could use some serious epoxy to keep the magnet attached, but I'm not sure how well things will adhere to the flexible build plate if I were to do that. And it would be difficult to remove at that point. So I'm going to try the more expensive one now.
A**R
Great part, very efficient
An absolute must-have for resin prints, this prevents scraping the plate up and allows quick removal. I will not NOT use plates again
D**Y
You want this
I was a little hesitant on this build plate as it was priced lower. I read some reviews and decided to try it out. I didn't like printing on the stock surface as I could see some scratches forming where prints were pried off. I hadn't had my resin printer for more than a couple months so I was concerned about adding problems, but I wanted a removeable build surface. It showed up on the doorstep well wrapped in bubble wrap. Removing it from the packaging there were no scratches or blemishes, it looked perfect and flat. The magnet felt very strong. I cleaned everything really well and waited a bit to make sure any residue had flashed off. I was a tiny bit disappointed to see that it was slightly smaller than the build plate on the Qidi Shadow 6, but only a little. I centered the magnet on the build plate as carefully as possible so it laid out flat. The magnet is pretty stiff so it wasn't hard to keep it flat. The spring steel plate is thin enough to be flexible but stiff enough to stay very flat. It looked really good and I was not at all concerned with being able to level it. It does add a few mm of z height. My Shadow 6 has a setting for changing the z stop so I set to leveling and setting the new height. All seemed good so I threw in some resin and hit go on a small test print. When the plate hit bottom it did not stop at the right height and I had to emergency stop it. I decided the end stop blade wasn't reaching far enough into the optic switch to trigger it consistently. I had read about a shim that could be printed for printers with no z stop adjustment but after looking at the blade I was able to put a slight bend in it to move it down about the width added by the new plate. After re-setting the z stop I went through a few tweaks to get the build surface sitting as level as possible. I decided to try printing some new cable chain pieces for my fdm printer upgrade. I packed the plate as full as possible and placed the prints directly on the plate with no supports as a test. They printed beautifully and popped right off the plate with just a little flexing. I made about 10 more sets and then ran a 13 hour print that had failed 5 times before. It printed perfectly. Spend some time getting the leveling perfect and you will love this plate. After around 40 prints I have only had one failure and that was an issue in the file setup. Well worth the money.
A**R
Love the plate, hate the adhesive
Using Anycubic Photon Mono (just the mono not the X or SE) Based on other reviews, i soaked my build plate in Iso, level sanded it until it was smooth, Iso cleaned again, attached the magnet, put 2 25lb weights on it for compression, and let it set overnight. Lol the adhesion lasted 2 prints before the magnet came off. So i bought a $15 can of 3M 90 industrial spray adhesive and repeated the process (after removing the sticky film from the magnet with Iso and a metal scraper) and so far so good. Not thrilled with doubling the cost by buying a can of spray adhesive but whatever, i used 6 sprays of a giant can and i know i'll use it for other stuff. The build plate works AMAZINGLY. No more scraping, great model adhesion, and it seems like i'm losing less resin by taking off the entire build plate. Spring steel keeps its shape after bending to release the model.
G**E
Buena compra
Es del tamaño perfecto y facil de instalar, solo hay que clarificar que se necesita observar el tamaño de la placa de construccion, no el area de impresion, sin embargo ese fue error mio, al creer que son el mismo concepto.
Trustpilot
1 month ago
4 days ago