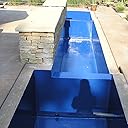
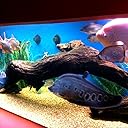
Steel Stock Tank I had a great experience Making a pond with a galvanized steel stock tank and Pond Armor! The paint is a beautiful glossy blue that is silky smooth! The goldfish look fantastic against the blue, and the water looks clean and pretty. I was really nervous I was gonna mess the paint up, even called pond armor to get some tips about if I needed a primer paint or not and they were really nice and helpful. Turns out I didn’t have to have a primer. I bought rollers, but didn’t use them. The paint brushes worked fine, although twice I had a paintbrush hair that came off, I just picked it up with my fingers and smoothed the surface again with the brush. The paint came out looking smooth and glossy like I professionally sprayed it on or something just with the medium cheep brush. On the first coat I forgot to wear gloves which was a mistake!!! Don’t forget them! I really recommend this paint, I think it turned out great and worth the extra expense. It’s much nicer than a bunched up black liner that actually isn’t cheep. I also think I could have just sanded the tank by hand instead of using the electric sander. Here is the steps and supply list I used. Supplies: 1. pond armor 2. Denatured alcohol 3. Paint sticks 4. White vinegar 5. Spray bottle 6. Sponge 7. 60 grit sand paper 8. Mask 9. 2 paint brushes- medium cheepness because you won’t be able to use the brushes again. 10. Cheep plastic tarp for floor 11. Acetone Incase you need to clean anything you get paint on. 12. Gloves 13. Painters tape 14. Crappy clothes you don’t care if you get paint on them. 15. Screwdriver or paint can opener to open cans. 16. Several plastic painters cups or cheep dollar store measuring cups. Steps: Day one 1. Get supplies and plan project, think of a day when you will have time to do both coats and weather is good. Think of how much paint you will need to cover your tank. My tank was a 90 gallon and I was able to get two coats and had some extra I used to paint some cinderblocks. 2. Sand the tank with 60 grit sand paper first with electric sander then by hand. 3. Spray white vinegar on tank, I let it sit for a few minuets. 4. Wash/ rinse tank by spraying it down with a hose and a sponge. Then dry well. Day two 1. Tape off top of tank under rolled steel at the top of tank with painters tape. 2. Measure part A, part B , and alcohol in the cheep plastic paint cups then mix it all up together by using the paint stick. 3. Transfer mixture to new container. 4. Apply first coat with a paint brush. Start with sides at the top of the tank under taped off ledge of tank then do floor, then wait a few hrs. 5. Apply second coat same way, measure, mix, transfer to new container and use a new paint brush. 6. Wait at least 24 hours then fill the tank 7. Admire results with friends and family :)