Description
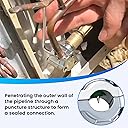
🔧 Pierce with Precision, Install with Confidence!
- ROBUST DURABILITY - Crafted from corrosion-resistant stainless steel to ensure long-lasting performance.
- TRUSTED REPLACEMENT - Directly replaces multiple popular models like AP4502525 and GPV31, ensuring reliable compatibility.
- UNIVERSAL COMPATIBILITY - Seamlessly fits 1/4, 5/16, and 3/8 inch refrigerator tubing for versatile use.
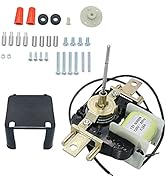
- COMPLETE INSTALLATION KIT - Comes with 2 adapters and a hex key, making setup effortless and precise.
- PRECISION PIERCING MECHANISM - Easily pierce lines with a simple clockwise turn of the valve stem using the included hex wrench.
The AMI PARTS BPV31 Bullet Piercing Valve is a high-quality, corrosion-resistant stainless steel valve designed for universal refrigerator tubing sizes 1/4, 5/16, and 3/8 inch. It includes two adapters and a hex key for easy installation and directly replaces multiple popular valve models, making it a reliable and versatile choice for HVAC professionals and DIY enthusiasts alike.