Desertcart purchases this item on your behalf and handles shipping, customs, and support to USA.
🖌️ Elevate your craft with steady power and pro-grade precision!
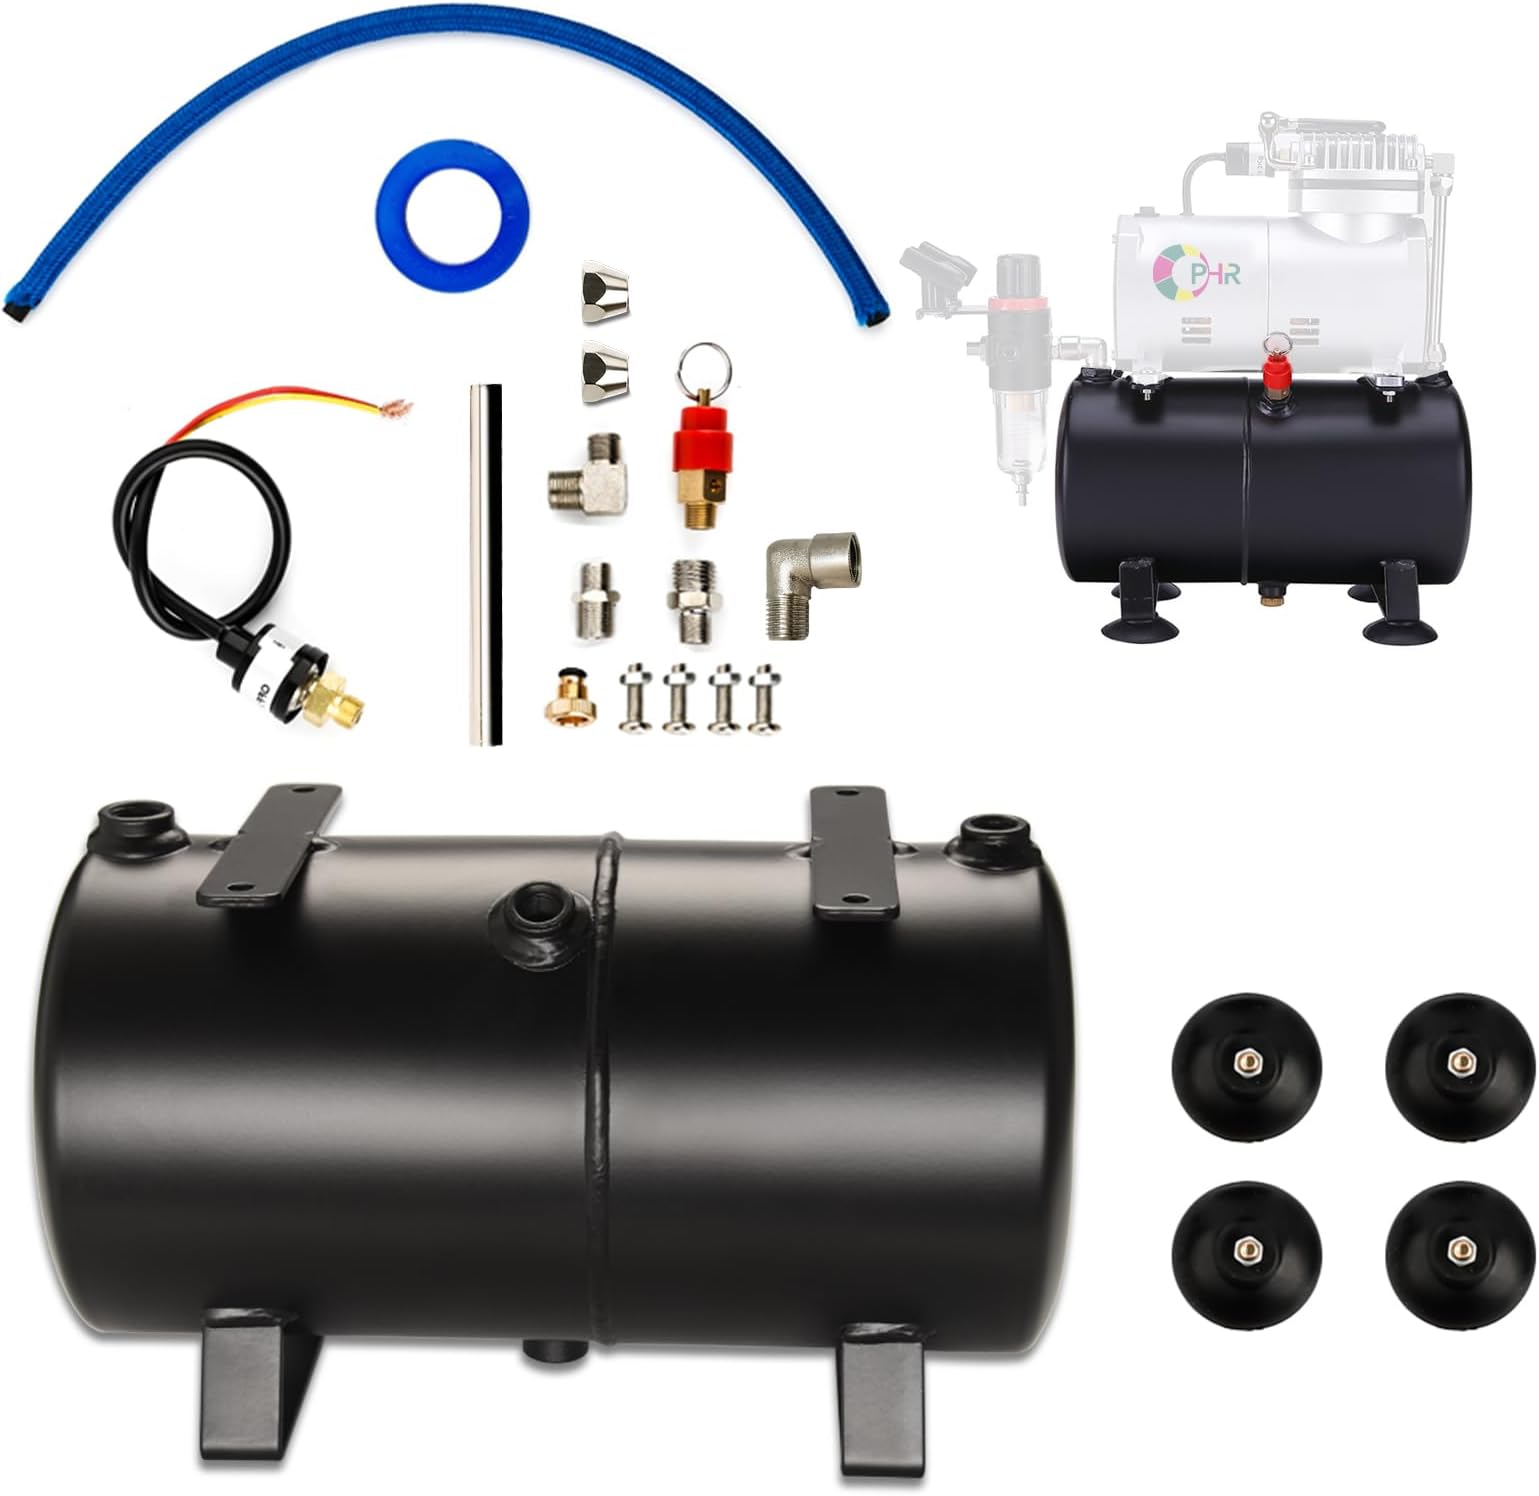
The OPHIR 3L Air Tank Kit is a robust, lightweight air storage solution designed to enhance airbrush compressor performance. Featuring a 3-liter alloy steel tank with superior sealing, an auto start/stop switch for stable pressure control (43-57 psi), and a full set of versatile connectors, this kit is ideal for hobbyists and professionals seeking consistent airflow and durability. Compact and portable at just over 3 pounds, it supports most airbrush compressors with customizable installation options.


| ASIN | B081FS11FK |
| Additional Features | Customizable |
| Best Sellers Rank | #372,417 in Tools & Home Improvement ( See Top 100 in Tools & Home Improvement ) #1,420 in Air-Compressor Accessories |
| Brand | OPHIR |
| Brand Name | OPHIR |
| Capacity | 3 liters |
| Color | Silver Or Metallic Gray |
| Customer Reviews | 3.5 out of 5 stars 178 Reviews |
| Hose Length | 1.5 meters |
| Included Components | Air Hose, Filters |
| Item Dimensions L x W x H | 9.6"L x 5.1"W x 5.7"H |
| Item Highlight | 3L Storage Tank Designed for Air Brush Compressor Setups, Ideal for Hobby Model Painting, Crafts, and DIY Projects |
| Item Weight | 4 pounds |
| Manufacturer | OPHIR |
| Manufacturer Part Number | AC132B |
| Material Type | Alloy Steel |
| Maximum Power | 0.2 hp |
| Maximum Pressure | 57 bar |
| Model Name | OPHIR DIY 3L Air Tank Kit |
| Model Number | AC132C |
| Noise | 30 db |
| Noise Level | 30 db |
| Number of Items | 1 |
| Number of Packs | 1 |
| Power Source | Corded Electric |
| Recommended Uses For Product | Spraying |
| Special Feature | Customizable |
| Style | Fashion |
| Tank Volume | 3 liters |
| UPC | 769638637087 |
| Unit Count | 1 Count |
S**L
Will not fit a Master Airbrush compressor - However
I was hoping that my newly purchased Master Airbrush TC-320 compressor would fit this particular tank but unfortunately it did not. However, with some simple modifications I made it work just fine. I'm posting a few picks to help show what I did to make it work which should help you. The feet of the compressor do line up with the tabs welded onto the tank but the compressor itself is too long to fit between the two bung fittings (welded pipe into the tank) on each end of the tank with their associated pipe fittings attached. The easiest fix is to raise the compressor high enough to clear these fittings. I used 1" square aluminum tubing each cut 1-1/4" long then placed each on top of the tank with the compressor on top to align and mark its eventual position. This left the pipe between the tank and compressor head too short so I ordered 8mm OD aluminum tubing and cut to fit. The bung on the tank was welded crooked so using a piece of wood with a 21/64" hole through it I was able to bend the middle of the tubing to line each end up with the fittings. I did use 1 aftermarket black o-ring at each end of the new tubing which worked fine. I also used both teflon tape and pipe dope on all other fittings. Once completed everything works as expected with no leaks.
Z**E
Almost a great kit... Almost.
The good: this thing looks and works great once set up! It seems very sturdy, and is still compact! The bad: You ARE going to the hardware store. You see, the manufacturer cannot provide fittings for every possible pump and configuration, so... like it or not, you are going to make the trip. Make peace with it. You are also likely going to need high pressure liquid thread lock. I could not get it seeled with just teflon tape, but that could just be me. The ugly: This is what cost the star; there are NO instructions. None. You are on your own. This is particularly concerning as there is an element of electrical wiring involved. If you are like me, and love puzzles and like doing things your own way, this is an inconvenience, not a show stopper. If you are not psychotic... Errr... I mean, if you are not like me, you are likely NOT going to be happy. I feel that this product could be vastly improved with just a couple peices of paper showing exploded assembly drawings of a couple of the most common configurations, indicating an idea of the fittings you may have to buy, etc, and an included parts list so that they can be called out in the drawings. Also a pair of crimp wire nuts were nessesary for my build, so they should have been included as I can't imagine many peoples pump wouldn't need something along those lines. If they had done these two things i would have given this 5 stars. NOW YOU NEED TO READ THIS BIT: Do not change the pressure sensor out with your pump plugged in! You WILL likely electrocute yourself! I expect this is common knowledge, but I remember doing dangerous stuff like that as a kid, and so I feel it needs to be said. If you don't know what you are doing or you are unsure, get help!
C**M
Unless you are a handy person do not purchase this tank
It is obvious to me that the people who make this tank take zero pride in their work. The bracket for the compressor was welded on the tank at a bad angle which made me have to drill new holes to align properly. The air fittings were undersized or the holes were oversized, either way I needed to use a ton of teflon tape in order to stop leaks. The tank was rusty inside... not good for spraying paint! There was a ring of machining swarf on one of the fittings that cut me. Do yourself a favor and find another brand or option.
M**R
It goes between the compressor and the regulator, and it works.
A week or so ago I picked up the better airbrush kit at Harbor Freight. While I eventually got it dialed in to a fairly steady pressure, I realized I needed a set up with a tank. Very seriously considered taking it back, paying the restock fee, and getting something else. Did a quick search and found this. It works a treat! I get consistent pressure at the brush even with long sprays. It's true, there are no instructions, but there is a video out there of someone assembling part of it. I'll give a few pointers here, but these will be specific to the Avanti compressor from Harbor Freight. 1.) Pick up some new O rings, 1/4 in ID 3/8 in OD. The rings that come with the kit aren't great and I over tightened the first time I tried and destroyed two of them. 2.) Pick up a 1/4in by 1.5 in Nipple, I'm adding a link here, but I got mine cheaper at the local hardware store. There are other options, but this is what they had and it works. https://www.amazon.com/EDGE-INDUSTRIAL-Brass-Nipple-Length/dp/B07DCF9J2J/ref=sr_1_4?crid=346J2P7P6OVIU&keywords=1%2F4%2Bby%2B1.5%2Bnipple&qid=1652562653&sprefix=1%2F4%2Bby%2B1.5%2Bnipple%2Caps%2C93&sr=8-4&th=1 3.) The cutoff sensor on the Avanti is the same as the one that comes in the kit (3kg on, 4kg off), so no need to mess with it. 4.) You'll need either thin open end wrenches of appropriate sizes (12 mm and 14 mm) and an adjustable (crescent) wrench, or you can get away with the crescent by itself. To assemble, 0.) Attach the feet to the tank. 1.) Unscrew the regulator from the compressor. This can be tricky, but I found that using an adjustable wrench if I went lefty loosey on the bolt where the airbrush hose connects, the regulator unscrewed from the compressor. OR use a THIN* 14MM open end wrench and unscrew the connector between the compressor and the regulator directly. (THIN means 5MM or less) 2.) Remove the feet from the compressor 3.) Attach one end of the pipe to the square 90 by fitting it inside the opening and pushing two o-rings to the fitting. Loosely screw the connector on. Do not tighten as you'll need to adjust it later. 4.) Attach the other side of the square 90 to the opening where the regulator came out. Snug it down but don't tighten yet, you will need to ensure the flat side of the pipe attachment is on the front and back. The pipe will need to be vertical 5.) On the tank there is a smaller opening and a larger (1/4 in) opening, put the appropriate fitting into the smaller opening where the larger part is facing out 6.) Set the compressor on the tank fitting the pipe into the opening of the fitting you just placed, you may need to adjust the positioning of the pipe vertically to ensure it seats in both the upper and lower openings. Once that is done, pull the compressor off the top of the tank 7.) With the compressor off the tank, loosen the square 90 to a position where it is possible to tighten the compression fitting on the pipe, and ensure it is snug. Make sure the font and back have flat sides on the bolt. Tighten the Square 90 into the compressor completely ensuring the pipe is vertical. You'll see the compression fitting is nearly flush with the compressor, thus the need to have a flat side there and not a corner. Set compressor aside 8.) put the nipple into the other opening on the top of the tank, and put the rounded 90 on the other end of the nipple 9.) If you have not already done so, remove the connector from the regulator that was used to connect to the compressor, and screw the regulator in to the rounded 90 and tighten ensuring the moisture trap is down. 10.) Add the Red fitting to the of centered hole toward the top 11.) Add the drain fitting in the bottom 12.) Set the compressor back on the tank 13.) Use the included screws and nuts to attach the feet of the compressor to the tank (it will be a tight fit due to the nipple being vertical. It is possible to change this arrangement, but I didn't want my regulator sticking out from the compressor and tank.) 14.) Snug the bottom of the pipe to the fitting 15.) Plug the compressor in and fire it up. If you got really lucky you'll have no air leaks. I didn't get lucky and had to do a little rework on a couple places, but it was pretty painless. Soapy water makes it easy to see where the leak is. Note: it's going to take a some time for the compressor to kick off. Just about the time you think you messed up is when it will shut off.
W**M
Older compressors are a hastle for fitment.
Can't complain for the price and what it is. I slapped this tank on an old airbrush compressor from harbor freight I bought something like 5 years ago. I never really used it because it would always run and get really hot, which just isn't good for any machine. That being said, I had to used 2 pieces of 2x2 as risers because the little pump I have is actually just a smidge too long. It was unmountable otherwise because the ends of the motor and crank housing would collide with the top fittings. It wasn't a deal breaker, because I already knew it was going to be a turd to make work. This particular compressor has an offset outlet on the piston head, so the straight pipe wasn't going to work anyway, but with riser situation i.t definitely wasn't going to work. I think I bought 3/8 inch aluminum line for $11 bucks to replace that tube. It works well enough for now. I will probably try and find a length of hose to replace the tubing all together or figure out a better attachment method than this psudo compression fitting. Ultimately, assembly was a pain because the aforementioned fitment issue, but mostly because the threads were loose In the tank that I had to basically install each fitting and plug 3 times to try and get the right amount of tape on them as to not allow leakages. Even with so much care into all the fittings, there is still a small leak I haven't exactly chased down yet but I'd assume it's in the O-rings for that tube. That being said, pair this tank with a $15 regulator and filter combo, and it should turn just about any air bush compressor into a dream. The pressure on/off switch is indeed the same as for my old harbor freight compressor (central pneumatics brand) so buying this will give you a replacement switch to throw in the junk drawer in case you ever need it which is nice. Ultimately, not a super great deal because even though they offer this plastic hose with the kit, mine mine actually came with braided nylon rubber, there is not fittings with this kit to use that hose in an instance like mine. The plastic/rubber hose is basically useless here.
R**B
Works after much fiddling and additional components
This tank appears to just about only choice for one wanting to add a small tank to their airbrush compressor. As noted by others, no instructions provided, nor any parts identification list. Had to purchase better hardware early into assembly with my Paasche compressor. After initial assembly, "everything" leaked, had to disassemble reseal and reassemble - FOUR TIMES! Fittings did not fit the ports correctly and leaked with teflon tape, them pipe sealant, then BOTH! Finally, disassembled again (fifth time) and replaced virtually all the Ophir-provided fittings, chased all the threads with a tap, cleaned and taped all fittings and reassembled carefully. It still required some tweaking, but now holds pressure and is what I needed to compliment my airbrush. For an item costing this much, it should be easier to get to a useable state! This item seems unsuitable for the average hobbyist who lacks experience in mechanical assembly and pneumatic systems and fittings, not to mention the variety of tools and required additional fittings required to complete the project (including the thin wrench required to properly tighten the pressure relief valve, taps to clean up threaded fittings, brass elbows and nipples). I consider myself a reasonably experienced DIY'er but this took three afternoons in addition to trips to Home Depot, Lowes, Ace and ordering components from Amazon to be able to put this tank into service with my airbrush setup. This was way too much additional work for a simple tank to put together with a small compressor.
N**E
Ophir Air Tank Kit is Amazingly Helpful
This kit makes my small airbrush compressor perform so much better. There are no install instructions but it’s pretty much common sense so if you don’t have common sense stop reading right now. Everything will to be secured with need the Teflon tape to prevent air leaks, and trust me it’s not worth the time it takes to skip this step just to have to go back and re do all connections. I skipped and ended up hating my life while I went back to do things correct. All in all this unit is great and now my compressor doesn’t have to run non stop while I airbrush which is going to allow it to last so much longer and not have to strain when I work on larger projects while also allowing my airflow to be consistent and constant. This is a absolute must have if you have a small airbrush compressor without a tank!
P**D
Take your time with the conversion and everything will go great!
I ordered this tank conversion only to receive it with some fittings that were not even cut. Returned it for another and everything appeared ok. Some fittings even with teflon tape were loose, so of to Ace Hardware for Permatex blue thread lock. That worked great, but while connecting up the compressor discharge pipe, the Parts Gremlin, ( If you build models you will know what I mean ) got one of the rubber rings that act as a furrule for the compression fitting. Off to Ace again. They have a good inventory of O rings. I did need to order a fitting to complete the job. Remember, if you need any fittings they are BSP fittings not ASE. Now that the conversion was complete started up and worked perfect!!! No Leaks!!!
M**O
Buenisimo muy buena compra, lo pude adaptar sin problema
Muy bueno, adapte un Truper, genial, y resulta que es más silencioso
S**T
Nearly perfect.
If your compressor looks like mine, this is a great, bolt-on kit that contains ALMOST everything you need to add a tank to your compressor for improved airbrushing. Now, as others have stated, there are no instructions with the kit, but anyone should be able to work it out with a bit of thought. I awarded this 4/5 stars. I did have to scrounge for a 1/4" brass nipple, seen in the last pic between the tank elbow and the regulator- but that's not why I docked a star off the rating. It's quite reasonable to expect to need additional fittings when taking something like this on, and I was pleasantly surprised that I only needed the one fitting. The reason that I scored this at 4 instead of 5, is the quality of the included fittings. First, the chrome pipe that goes from the compressor head to the tank: instead of having proper ferrule-type compression fittings, it uses o-rings. This makes it easy, but failure prone. I expect to have to replace them before very long. I strongly suggest lubricating the o-rings with silicone oil, silicone grease, or proper o-ring lube during installation. Do NOT overtighten the nuts! Snug them up and test the system. Only if they are leaking, should you tighten them a bit more. I also recommend bolting the compressor to the tank before snugging them up at all, but START the fitting on the threads before putting the tank bolts in. The pipe thread fittings the kit are not great, and I suggest using a good quality teflon tape like Masters, instead of the included tape. Good tape is thicker and will give you a better chance of sealing the substandard threads. NPT fittings are supposed to tighten up well before they bottom out. Regarding the included pressure switch- if your compressor looks like mine, the switch is identical and you do not need to install the new one or mess with any wiring. Despite my complaints about the fittings, this is a pretty good kit for the price point, and seems to be performing as intended. Please note that the tank drain also uses an o-ring, so you should lubricate it as well, and don't tighten it past the point where it holds air.
L**T
No le queda
Solo le queda a los compresores que no tienen motor de enfriamiento de la parte de atrás, al mio no le quedo y es difícil ajustarlo
Trustpilot
1 month ago
1 week ago