

Buy anything from 5,000+ international stores. One checkout price. No surprise fees. Join 2M+ shoppers on Desertcart.
Desertcart purchases this item on your behalf and handles shipping, customs, and support to USA.
๐ Elevate your smart home game with the ultimate 3-in-1 Z-Wave relayโbecause one relay just isnโt enough!
The Zooz Z-Wave Long Range MultiRelay ZEN16 800LR is a versatile, ETL-certified smart relay device featuring three independent dry contact relays rated up to 20A. It supports 12-24V AC/DC or USB-C power inputs and leverages advanced Z-Wave Long Range technology with signal repeater for superior wireless coverage. Designed for seamless integration with open Z-Wave hubs like Hubitat and SmartThings (with custom drivers), it enables reliable automation of garage doors, sprinklers, fireplaces, and more, combining DIY-friendly installation with robust security and smart home compatibility.


| ASIN | B0846DZJD8 |
| Best Sellers Rank | #86,352 in Tools & Home Improvement ( See Top 100 in Tools & Home Improvement ) #17 in Home Automation Modules |
| Brand | ZOOZ |
| Brand Name | ZOOZ |
| Coil Resistance | 15 |
| Coil Voltage | 24 Volts |
| Connector Type | Usb C |
| Contact Current Rating | 15 Amps |
| Contact Material | Silver |
| Contact Type | Normally Open |
| Current Rating | 15 Amps, 20 Amps |
| Customer Reviews | 4.6 out of 5 stars 506 Reviews |
| Lower Temperature Rating | 32 Degrees Fahrenheit |
| Manufacturer | ZOOZ |
| Maximum Switching Current | 20 Amps |
| Maximum Switching Voltage | 24 Volts |
| Minimum Switching Voltage | 12 Volts (DC) |
| Model | ZEN16 |
| Mounting Type | Wall Mount |
| Number of Terminals | 3 |
| Operation Mode | Automatic |
| Part Number | DH112226 |
| Smart Home Compatibility | Smart Home Compatible |
| Specification Met | Etl Certified |
| UPC | 853478006162 |
| Warranty Description | Manufacturer warranty for 12 months from date of purchase. |
| Wattage | 480 watts |
M**D
This is my favorite smart device, and Zooz is my favorite smart device manufacturer
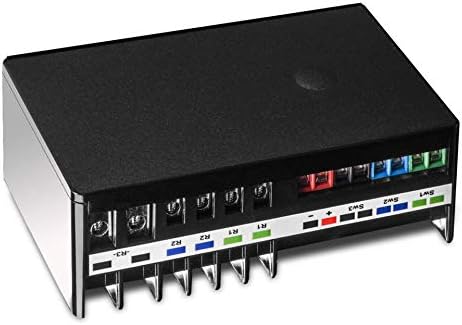
Elephant in the room alert: smart home devices are for hackers. You can spend a ton of money and get some lights to turn some colors and you can be satisfied with that... until a regular human being comes by and flips off a light switch. You can buy from the largest supplier of smart systems - even from the largest supplier of electronics in general - and set up a sensor that turns on a light and you will eventually be stumbling around in the dark. Smart devices are generally can't be used when failure is not an option. I already trusted Zooz when choosing this really, as they make the only line of switches that I know of that work reliably in hardware and software mode (with relay and without relay; for dumb lights and for smart lights). Software switches in my house are necessary in order for literally every single other person who turns lights on and off in my house to live in harmony with me. As an aside from this review... can some people please realize this problem? Do smart device manufacturers not live in smart homes? My hack is somewhat elaborate: first filtering high-solids koi pond water through a filter to a pressure sensing high PSI pump to a set of electronic irrigation valves and finally out of garden sprinklers to water and fertilize my gardens. Though running this type of system through a smart hub has it's advantages - the ability to use weather patterns, soil sensors, and pond water level to decide if watering is needed or possible - it could easily malfunction and drain all the water out of my pond. My fish wouldn't like that. Besides the reliability of this Z wave device - which I did have trouble with at first - there are some failsafes this multi relay provides. Mainly the turn off after x feature. My former hub would lose connection between starting and stopping these relays which would, without this feature, cause my sprinklers to run forever. Also there are enough relays to turn on each of my two sprinkler zones and turn off my pressure-sensing water pump when not sprinkling. If a pipe breaks or a sprinkler clogs, this will keep the pump from running constantly (as this kind of pump runs atomically on a pressure drop on the output). So it works well in my very specific scenario... so what? I have bought two more to play with. Again, smart devices are for hackers, and this box is a hackers dream!. You can pay nearly this much for a single relay, but the Zooz multi relay is full of features that make it more versatile than it needs to be: Each relay has an input for a hardwired switch or button. This is great if you're designing a system that may be used by people unfamiliar with smart systems. There are, again, three independently controllable relays. Zooz's device handler has a huge amount of customization options, also Zooz offers a couple custom applications, at least for Hubitat and Smartthings, that perform common functions. There is, for example, a Zooz application especially for running automatic sprinklers (the controls are a little basic and advanced features can't be used in combination with this application.) Z wave is very fast and reliable on some hubs. My favorite feature: This multirelay can be run on a very wide range of AC AND DC voltages. If you have an AC sprinkler system like I do, your sprinkler transformer can power this unit directly. If you have a low voltage landscape system... AC or DC... you can power this relay with the landscape wire. If you are using this near your doorbell wires and not near an outlet, you can likely power this unit off that. As much as I am gloating about this magical box, it wasn't all roses in the begining. My main issue, which I realized after months of toying with all the Z Wave devices in my house, is that my Smartthing hub's Z wave implementation was very slow and unreliable. After moving everything in my house to Hubitat, everything but this device worked perfectly. This turned out to be an issue with Hubitat's newest hub having a Z Wave software issue. Zooz did note this issue and suggested pairing without authentication as a quick fix, which worked. Hubitat has since fixed this problem, and I couldn't be happier with my setup now. The versatility of being able to meld the various triggers and sensors a smart hub system can connect to to three independent relays ought to trigger some use-case ideas for anyone. I'll be building some halloween props with my spares and some Z Wave PIRs. If only... and by the way why not... they made an waterproof version.
B**O
Great all-purpose relay for SmartThings!
I bought one of these to test out on a couple of different applications and ended up immediately buying a second one. I have a gas fireplace (Heatilator) with a low voltage switch on the wall that turns it on and off. I wanted to be able to turn the switch on and off via SmartThings or Alexa. The switch basically just makes contact between two wires, which is what a relay does. All I had to do was cut the two wires going from the switch to the fireplace ignition controller, insert the wires from the switch end into the Sw1 ports, and the wires to the controller into the Relay1 ports, added the device handler, and added it to my SmartThings hub. A quick google search will lead you a couple of guides which were clear for me aside from how to wire it which is as simple as I described above. Now I can control my fireplace via SmartThings/Alexa AND still use the switch as I always have. My second application was to open/close two garage doors. Both are Liftmaster MyQ and I didn't want to use their proprietary hardware which requires a separate app and a monthly paid subscription for Alexa control. Instead, I took a spare remote door opener and soldered two wires each from one leg of the button inside the remote that I opened up. Again, the button just makes contact between the legs so I made it so the relay will do that upon activation. Again, added the multirelay to the hub, made it a momentary switch, and voila. I have a spare garage door opener sitting in the basement that's wired up to the Zooz multirelay with two simple wires for each button. There's also a SmartApp for SmartThings (again, Google is your friend) to have a "garage door" device where you configure the tilt sensor and the switch and it will show in your SmartThings home screen the status (open/closed/opening/closing) and you can press it to open or close. Both applications were way easier than I could have ever imagined, were budget friendly, and were nice and clean solutions - which is exactly what I was looking for. Big props to Zooz for a great, reliable, and universal ZWave device for us tinkerers! Future plans are to add the blower switch in the fireplace to one of the other two relay slots (since there are 3 per unit!)
H**O
Exceptional customer service
I have quite a lot of Z-wave devices and wanted to add a garage door. I bought the z-wave/garage door device that popped up on Amazon, and that was an unmitigated disaster. So instead, I was redirected to this one which is not really a dedicated garage door opener but a relay that can work as one. It pairs very easily with SmartThings (after installing the required driver, which is easy), and the settings can be adjusted so that it works pretty much as a garage door opener. The wiring will depend on how your actual motor works, and in that respect Nikke and Sara at customer service have been fantastic guiding me. The app won't tell you whether the garage door is open or closed, so use a camera or a door sensor, but it works to activate the door. I've only had it a few days so I don't know how stable it is over the long run, but it definitely works well so far. And there are no words that would praise customer service enough.
C**K
Perfect for garage door opener
Easily mounts near garage door open. Can take power from the opener or from an outlet (standard USB 1-amp will work, not included). Paired immediately and easy to assign relays. Has 3 useable relays. No need to pair to openers - wires into the button contacts. Much more flexible and less expensive than the big Chain brand (that requires their proprietary door opener).
P**C
TL;DR you can use the inputs separate from the relays
Just what the title says. Loses 1 star for being so difficult to figure out. The relay seems to work well. All 3 inputs can be used independently of the relays. If you donโt need no and nc on the same relay or voltage inputs the. this is the better value over the zen17. The zen17 is able to use a small voltage input instead of a simple switch input where the zen 16 cannot. Zen16 - 3 basic inputs, 3 NO relays Zen17 - 2 flexible inputs, 2 NO/NC relays Continue reading for a how to using Home Assistant Though it doesnโt seem to be officially supported by the manufacturer, the inputs can indeed be separated from the relays to use for other switches and sensors. They donโt make it easy to figure out either. I was able to do this in Home Assistant OS 13.2. You may need to transition to Z-Wave JS UI if not already using it. Google โhow to migrate drone zwave js to zwave js uiโ to find the official guide. Devices are added the same way as always. Once you have the zen16 added, go to zwave js ui and select the zen16 multirelay. Under configuration change the inputs (switches) manual control option to [0] disable. You would think you need to choose [2] disable (with switch reports), but you donโt. Itโs not needed and the setting wonโt save that way. Click the right arrow next to the selection to save it. Also change switch type to something appropriate for your use case. The switches still wonโt show up yet. You need to exclude the zen16 without resetting it and re-include it. Do this by going to Settings > Devices & Services > Z-Wave > (Hubs) Configure > Remove Device. Click โStart Exclusionโ and put the zen16 into exclusion mode by quickly clicking its button 3x. It happens fast. Refresh your browser and the device count should drop by 1. I had to unplug it for a moment and plug it back in before re-including it. Add the zen16 back in. Once you have the zen16 included again, you can enable the switches. Go to Settings > Devices & Services > Devices (tab). Select the relay. Under Sensors click the โentities not shownโ to see the switches. One at a time click each โSensor stateโ. The popup will show it as disabled. Click the gear and select enable. Also toggle the enabled switch here and click update. After about 30 seconds you should be able to see the sensors(switches) on your overview and use them in automations etc. In 2 of the pictures I have a jumper across input 2 to show it working as intended.
S**L
Very versatile
I'm using the ZEN16 to control a whole-house water shutoff that formerly was controlled by an Insteon setup. The valve has NO/NC wires, with one turning off the valve and the other turning it on. So. I needed a relay that had NO/NC contacts. The first one I tried (another brand) was DOA, as was its replacement. I then ordered the ZEN16, and at first was concerned that it didn't seem to have NO/NC pairs, but I found that relays 1 and 2 could be configured that way so that if you turned on one, the other would turn off. Works perfectly. I also appreciate being able to program it to revert to the last setting on power fail/restore. There is a small blue LED whose operation is also programmable. By default it indicates the state of the relays, but I set it to be always on when power is supplied. I am not using the switch inputs. Perhaps my only gripe regards the USB-C port for supplying power. This is what I call "fake USB-C" and it won't accept being fed from a real USB-C power supply. Instead, you must use a USB-A to USB-C cable (one is included) and your own USB-A supply. I don't know why companies do this - my understanding is that a simple resistor would allow it to work with a USB-C charger.
A**K
Finally free from MyQ!
I am a DIY Smarthome aficionado and have been dabbling between Hubitat and Home Assistant for years. The biggest PITA in my integrations has always been MyQ to control my garage doors. After Chamberlain decided to purposely break their integration with all 3rd party smarthome apps, I decided that I needed to make a change. After hours of research I decided to try the Zooz16 hack with a garage remote control. And to my amazement, the hack worked amazingly!!! It was easy to take my existing garage remote control and wire it to my Zooz device. If you are not afraid of some light soldering, you can take your remote and custom wire it to the Zooz. But even if you are afraid of soldering, there are websites that sell pre-wired remotes that can be programmed to your MyQ garage door opener. I CAN OFFICIALLY SAY "ASTA LA VISTA MYQ". Your corporate greed forced me to abandon your platform. I have officially deleted my account and once my garage door opener stops working, I will never buy one of your products again. THANK YOU ZOOZ for your amazing product!
V**Y
Using with Home Assistant | momentary button press workaround for garage doors
This review is more relevant to those using the Z-Wave integration with Home Assistant. Short story is I recommend this kit. I'm using 2 of these, one with my garage doors and the other controlling a Motorized Sunsetter Awning which use Somfy tubular motors. I have the Somfy controller relay kit which is really nothing more than the circuit board out of the remote control with 3 dry contacts operating the buttons: open, close and stop. This 3 switch relay kit was perfect because interfacing it with Home Assistant allows me to control the awning based on weather and sun position. I previously had an Insteon relay doing this job, but it only had 2 contacts, so I had no way to stop the awning mid open. Home Assistant will now inch the awning out based on sun position (derived from geo location and celestial clock) and on wind (if possible) and sun (if necessary) which keeps my 12' sliding glass doors in the shade without extending the awning all the way. This save wind wear and tear on the awning while dramatically reducing heat gain from the windows. Also, if wind gusts or rain are predicted, it will retract the awning even if I'm not home. This give peace of mind. Both the garage doors and the awning require a momentary press simulation of the buttons. To do this in HA simply create a script: action: turn the device on, then action: delay 750ms, then action: turn the device off. This simulates pressing and releasing the button for .75 seconds. I have had 100% success with this.
Trustpilot
5 days ago
1 month ago