Desertcart purchases this item on your behalf and handles shipping, customs, and support to USA.
🌿 Elevate your outdoor vibe — shade, style, and shelter in one sleek package!
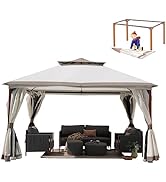
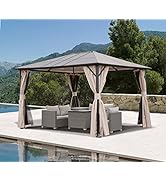
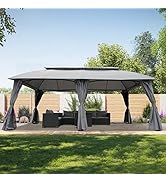
The 10x13 Grand Patio Gazebo combines a sturdy powder-coated steel and aluminum frame with a 200g PA UV-blocking canopy featuring 8 drainage holes for rain runoff. Equipped with zippered, water- and wind-resistant curtains, it offers customizable privacy and airflow. Ideal for patios, decks, and gardens, this weather-resistant gazebo creates a stylish, comfortable outdoor space protected from sun and light rain, backed by a 1-year warranty.


| ASIN | B07R4WY2VN |
| Best Sellers Rank | #64,529 in Patio, Lawn & Garden ( See Top 100 in Patio, Lawn & Garden ) #223 in Gazebos |
| Brand | Grand patio |
| Brand Name | Grand patio |
| Color | Gray |
| Customer Reviews | 4.2 out of 5 stars 1,522 Reviews |
| Floor Area | 130 Square Feet |
| Frame Material | Powder-coated Steel & Aliminum |
| Item Weight | 92.6 Pounds |
| Manufacturer | Grand Patio |
| Manufacturer Part Number | 1 |
| Material | Powder-coated Steel & Aliminum |
| Material Type | Powder-coated Steel & Aliminum |
| Model Number | 3 x 4 m |
| Required Assembly | Yes |
| Shape | Rectangular |
| Style | Garden |
| Style Name | Garden |
| Ultraviolet Light Protection | 99% |
| Water Resistance Level | Water Resistant |
T**M
Five solid stars
This is such a lovely canopy. I'm very pared with how solid and heavy this manufacturing is. This canopy is stro g. It's made of good quality materials. Very well crafted. It appears that this family and framework will withstand a strong storm. It's not flimsy or weak. It's made from heavy metal and strong, think canvas. It's quite well made. Worth every penny. Putting it together was a bit challenging. The booklet said it should take about 90 minutes. It took us 2+ hours and 2 grown men to figure out our. The instructions had no words. Just drawings and arrows. We did eventually get it figured out though.
H**B
Easy to assemble with some help. Tips included.
Allow 8 - 10 hrs. for assembly by one person, with app. 30-60 mins with two helpers. I used two six foot ladders. Tightening of bolts is faster if you cut the L off of the provided Allen wrench and use in a cordless drill with the torque setting at a reasonable setting so as not to overtighten. Have another metric Allen wrench to do the initial alignment. You have to be comfortable with minimal instructions! Front page shows the parts and there sizes, back page a couple of diagrams. You really can't put things together incorrectly, so just breath. This is our second Gazebo. The first was the same size but had pipe legs. It was blown over the fence and destroyed in a wind storm. This one has hollow corrugated legs. To add weight I plugged the bottoms of the legs and fill mostly full with pea gravel per a user recommendation. Once the legs are filled, stand them up and secure such that they won't fall over. Otherwise, you will lose gravel and likely bend the sheet metal. NEXT, you assemble the upper perimeter frame parts. Once assembled, you will need help attaching them. I recommend two helpers, one to hold the opposite post and one to help align the post you are attaching to. Once the perimeter frames are attached, quickly assemble the roof frame as shown. in the diagram. The arms just click into place with buttons. The topmost canvas is VERY hard to get last pocket on. I recommend inserting the arms with buttons past the stop hole on two of them, This will allow you to get the canvas on. You will likely not be able to get the last arm extended without a spreader. I waited to do this until after the roof structure was installed but can be done on the ground. Here is where you can use some more helpers placing the assembled roof frame onto the upper perimeter frame. Once the roof frame was installed I used a ladder and the spreader to pull the last rod out until it clicked in the hole.. I used a 12in Irwin clamp/spreader and a 2X4 block. Where to place this should become apparent. Once you have tightened all of the bolts you will thrilled to find that the main canvas top goes on without a fuss. Use the slot on the outside edge to hook your stretch clamps. Curtains/netting: The four curtains are the same size. Attach the sliders to the curtains before hanging. There are two tracks on the bottom of the perimeter frames, one for the curtains and one for the netting. Use the keyhole to insert the sliders/curtains. the sides are shorter than the curtains and the front curtains don't cover the front and back openings. It is intended that you wrap the side section around to the front (and back), It all goes together nicely and you can then zip it all up. and check the fit. You can now use the included sashes to tie back you curtains as desired. Wind will make these curtains billow into the living area and is real annoying. We found a solution on Youtube. Sew a 1 3/4" seam on the bottom of each curtain. Feed a suitable chain into the seam until it exits the other end. Make sure the chain is smooth and will not chafe inside the seam. We used about 52ft. You can also leave enough chain on each end to wrap around the gazebo legs. I used 1" shrink tubing to prevent scratching the legs. So far the weighted curtsin is not billowing.
A**R
LOOKS REALLY HIGH END!
After months of extensively searching for a gazebo - and reading reviews - I decided to purchase this Grand Patio one. It's been up a few weeks and it's simply GORGEOUS. Everyone who sees it says it just "upped my yard to RICH PEOPLE STATUS"! LOL Love that. It's well made and NOT ROCKET SCIENCE to put together, as my 20 yr old son did it alone - w/ some "lifting help" at points from my husband. Both are tall dudes so no issue. Took about 3 hrs total to put together because they laid all the pieces out first and took inventory...then were being REALLY PATIENT with each piece, and CAREFUL not to scratch anything. When you need extra support and don't have extra "people", they used the help of our 6ft fence to lean portions on while erecting. The top section was a little tricky to put on, but they were VERY careful not to rip it. Gotta tell ya though....I'm SO THANKFUL to the reviewers...SO many great tips...anyone interested in buying this should read and take heed! SO many great tips and advice. The first thing we did was do as another reviewer did - buy a marine "water proofer", put it in a garden sprayer and sprayed the bejesus out of it BEFORE the first rainfall. Let me TELL YOU - water BEADS OFF OF IT! ZERO absorption - you can even sit out there during a rainstorm. Secondly - a reviewer recommended sewing a chain through the bottom so it does not blow in wind. GREAT IDEA - and the next thing we will be doing. We live on Long Island - a block from water - so we get SERIOUS wind, all the time. As of now, we have not anchored it properly, and it has not budged, but we will be doing that this week. For now, we zip tied it to 4 heavy iron chairs - but it's been totally fine. And...as far as the reviewer who added grommets for water draining - GREAT IDEA, but honestly - if you just spray a waterproofer on the canopy, the water will NEVER puddle and stretch out your canopy - it rolls off. It's crazy to watch in a rain storm. Beads of water the size of marbles! It rained literally 4 days after we put our's up - but I did my homework - and it rained FOR FOUR DAYS STRAIGHT - not a divot, not a pull, not a NOTHING in that fabric! Just puddles all over the floor! LOL Link below to the waterproofer we used (but we bought ours in a local West Marine store): https://www.amazon.com/Star-Brite-Waterproofing-Waterproofer-Protection/dp/B0000AY4RE/ref=sr_1_1_sspa?dchild=1&keywords=star+brite&qid=1623109701&sr=8-1-spons&psc=1&spLa=ZW5jcnlwdGVkUXVhbGlmaWVyPUExR0FKV0RTMEU5WEdSJmVuY3J5cHRlZElkPUEwNjQ3Mzg4QTZKVUdETlBYOEZSJmVuY3J5cHRlZEFkSWQ9QTA5MjIyNTEzNlo2OUo0MlExRjk0JndpZGdldE5hbWU9c3BfYXRmJmFjdGlvbj1jbGlja1JlZGlyZWN0JmRvTm90TG9nQ2xpY2s9dHJ1ZQ== As of now, the only NEGATIVE is the corners do not have a tie or clip to hold them down, so they have a tendency to turn up in the wind and puddle some water. I sprayed mine, so no big issue, BUT...this the biggest design flaw I can find. We will try to velcro or command tape those down. Other than that, no complaints. And please forgive the photo - we were just putting our new patio furniture down, so it's a little crazy looking w/ the covers and the comforter on the floor to protect the bottoms of the feet before we put down our rug! LOL More pics to come as we do an update... I chose to give it 4 stars as of now - ONLY because I'd like to see how it fairs in another month or so. So far, it's so beautiful and I'm SO HAPPY WITH IT! We zip tied a few fake palm trees from Marshall's and WOWZA - w/ this next to our pool, the yard feel like a resort! LOL And FYI people, do yourself a favor while it's available - BUY A SECOND CANOPY! It's only $79.00 on Amazon right now. Link below. https://www.amazon.com/gp/product/B088B3ND6G/ref=ppx_yo_dt_b_asin_title_o05_s00?ie=UTF8&psc=1 We live in NY, so OBVIOUSLY we HAVE to remove the fabric top in the late Fall, but felt it was worth the investment to purchase another canopy! You had to SEE the garbage that Lowes was selling for double the price. SO HAPPY! :)
J**C
This is a permanent structure.
We bought this because we thought it would be portable - the description is misleading as it states it great for camping or the beach... well... maybe if you want to put it up and leave it there. It's permanent. At first we weren't sure what to do - should we return it? But we decided to keep it and began the process of assembly. The directions are not great. Fortunately my husband is... but this took the THREE of us three days (keep in mind we have jobs so it was an after work project) to assemble. That said - my husband can build anything well. He did most of this by himself but getting the top part on definitely takes THREE and ladders. It's beautiful and sturdy - we did buy the sand bags for the corners to hold it in place and it has handled some pretty strong winds. It's lovely and we are so glad we decided to keep it. We enjoy this most days. The materials are quality. It is not rain proof though - be aware. It can hold back some light rain but if you get a downpour, you are going to get wet. So - it's not weatherproof and it's not portable - keep that in mind when considering. If you are looking for a beautiful, permanent structure on your patio or in your yard... it's a great choice.
H**W
Exceeded expectations
Exceeded my expectations. It's sturdy, we can use the screen or the curtains, it's the perfect size, I could go on and on. It took a while to put together, but for the price it was worth it!
P**R
Great Design, Materials but Poor Workmanship.
Ok,where to start. My background. Aviation tech for 35+ years, worked everything from mini bikes to 787. I'm not stupid so I think but my better half may differ. So I was looking for a 10 x 13 . Reviewed them all and picked this one. The good or Pros Great Design, straightforward assembly Quality materials Just well thought out including the slide cover and bug screen. Cons Craftsmanship is low. 1) Got one beam damaged but only superficial so it did not affect it. The packaging was not damaged so it was packaged damaged at the factory. 2) Upper top canvas arrived with an area unsewn. We had to restitch it. 3) Main canvas had stitching issues. Not sure how it will hold up. So as others had advised, the top cover laces to the bottom cover straps. The instructions state I don't know an hour or two to put it together with the included tools, nope. Trust me get your power screwdriver or drill set to low, it WILL take you like 3 to 4 hours at best. Maybe if you've done it over and over you can get it done in 2 hours, using power tools, with the included Allen wrench, all day! It's great, however the damaged beam, more so both damaged canvas covers?!?! There's a workmanship quality issue. I will reach out and see if the seller supplied new canvas, till then, I just can't give more than it's stated.
S**D
After having My Gazebo for over a year.
I have been having my Gazebo for almost two years. When I received this Gazebo it arrived pretty quick and I put most of it together by myself. I had help putting on the top. I can’t complain too much about assembly it was pretty easy. Since I have had it for a while I feel like I can write a honest review. The structure of the Gazebo is weak. I have bent pole and lost screws. It has lasted through a couple of wind storms. It’s still standing/ leaning. I came online to see if I can find parts to fix what damaged, but I can’t find any replacement parts/ screws. I want to keep it because I paid money for it and I don’t have money to just throw away. I would like to try and find any information on how to fix the issues plus find a way to make it more stable so when the wind picks up it’s not bending. Forgot to mention the top of the Gazebo did start to get Algae on top so I have to find a way to clean it. I want to get a couple more years out of it so I am going to try my best to fix the problems. My opinion: It’s a great gazebo I have spent many days in it. I just wish it was more sturdy/ stable. I couldn’t nail it in the ground so I think I am going to order some sand bags to add more weight to see if that helps. I have been in it when it was raining, I was able to close the side and very little water got in. I wish the curtains were weighted down to keep them from blowing up when it was windy. I had to be very careful that the curtains didn’t catch fire because I have a propane fire place inside. Over all the Gazebo is okay, but it could be better.
N**R
Gazebo
this is my second gazebo, and is so much better made and easier to put the cover on and off for winter than the one I had, also replacement covers are available for this one. BTW: I use an 8' ladder as a 'dead man' helper so can assemble and install alone. YES get this one.
B**D
Miserable Aufbauanleitung
Der Pavillon ist soweit ok, aber die Aufbauanleitung ist miserabel
D**R
Pavillon ist wirklich sehr schön und stabil
Pavillon hat ein Sturm unverstanden ohne was kaputt gegangen, Sonnenschutz perfekt
R**R
Party gazebo
A little disappointed, the roof is a nightmare to put up. The roof was that tight, the one corner ripped to say I was devastated is an understatement. We’ll have to do a bit of a repair to make good.
N**L
Easy to put up but tool provided could have been better. Used my own ratchet much quicker.
Good quality and well labelled. Easy to put up but tool provided could have been better. Used my own ratchet much quicker.
Trustpilot
1 month ago
1 month ago