


Buy anything from 5,000+ international stores. One checkout price. No surprise fees. Join 2M+ shoppers on Desertcart.
Desertcart purchases this item on your behalf and handles shipping, customs, and support to USA.
โก Power your adventure with style and safety!
The RV Designer AC Self-Contained Dual Outlet S811 delivers reliable 15 Amp, 125 VAC power through dual receptacles designed specifically for RVs and motorhomes. Available in three colors, it blends seamlessly with your interior while offering enhanced safety via dual ground, hot, and neutral slots. Its compact, durable design ensures easy installation and long-lasting performance, backed by a 90-day warranty for peace of mind on every journey.

| ASIN | B008OJ6XA0 |
| Amperage | 15 Amps |
| Best Sellers Rank | #5,571 in Automotive ( See Top 100 in Automotive ) #28 in RV Plugs, Inlets & Receptacles |
| Brand | RV Designer |
| Brand Name | RV Designer |
| Color | White |
| Compatible Devices | Television |
| Connector Type | Plug-In |
| Customer Reviews | 4.5 out of 5 stars 1,856 Reviews |
| Global Trade Identification Number | 00601320118118 |
| Included Components | RV Designer Collection S811 Dual Outlet W/Cover Plate White |
| Item Dimensions L x W | 5.9"L x 3.5"W |
| Item Type Name | RV Designer Collection S811 Dual Outlet W/Cover Plate White |
| Manufacturer | RV DESIGNER COLLECTION |
| Material | Plastic |
| Material Type | Plastic |
| Model | S811 |
| Part Number | S811 |
| Power Plug Type | Type B - 3 pin (North American) |
| Product Dimensions | 5.9"L x 3.5"W |
| Smart Home Compatibility | Not Smart Home Compatible |
| Total Power Outlets | 2 |
| UPC | 700115569125 601320118118 |
| Unit Count | 1.0 Count |
| Voltage | 125 Volts |
| Warranty Description | Manufacturer |
J**F
Perfect replacement!
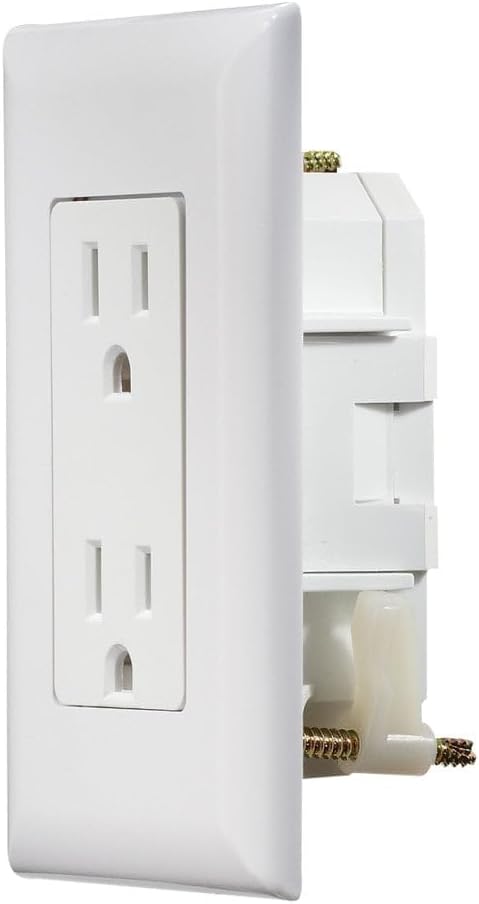
a) Straightforward and easily identifiable packaging. B) Three parts Faceplate ( you need to push it off the outlet plate) , outlet plate , and back plate. c) These are not super easy to install, but none of them are. The hard part is installing the wires into the connectors and closing the back plate. I have included several pictures. D) Here is some installation advice: !!!! Unplug/power your RV and check the outlet is dead!!!! . You do not need to strip the wires , in fact it is safer if you don't. If the previous outlet pierced the insulation on the wires, try to line up the piercings with the new connectors. The connectors will cut the insulation when you add the backplate. . You can pluck the wires out of the old outlet with small pliers or a screwdriver. Try to push the wires into the new outlet by applying pressure with a small flathead screwdriver. Do not try to force them in all the way, you just want them seated so they don't pop out while you are pushing on the backplate. . both outlet plate and back plate are clearly marked where the black, white and ground wires should go. . Push the two plates together ar mush as you can with your hands. Don't get frustrated as you may only be able to get them halfway, As you see in the photos, I placed two pieces of board flat on each side and compressed with a vice until the back plate side tabs snap into place. . Before you place the unit into the wall , I would recommend you unscrew the retaining clips ALMOST all the way out. Then make sure they are folded in and place into the wall. Hand tighten while holding the outlet in. When you tighten the screws the retaining clips will rotate so they are horizontal and hold the outlet in the wall. do not overtighten.... just snug. . Gently push faceplate onto the outlet . These are a bit more expensive than some of the others on Amazon, but I recommend these. I have a Lance travel trailer and these are the exact replacement. They are sturdy and look great!
A**Y
Works great
This was a replacement outlet for my Jayco RV. Fast delivery and worked as expected.
K**R
Great time saver
I needed to add an outlet under our dinette in our RV. Because the dinette sits right over the wheel well, I needed something with minimal depth. This outlet allowed me to avoid mounting a traditional electrical box. It uses screws and tabs to pull tight to the mounting wall. And the interior wiring diagrams right one the outlet made the rigging simple. The whole project took about an hour to complete, but the outlet piece was only 15 minutes of that time.
A**R
Fits as promised
Our original outlet broke and this is the perfect replacement. Easy to install.
S**C
Not as easy as I thought
There was an open ground on our electrical supply and it burnt out two of our outlets in our RV. I went into this assuming it was going to be easy to swap out the old with the new. Just so you know you WILL need a C-clamp and two 2x2 or 2x4's to get the wires attached to the plug. Watch a YouTube video before you attempt to do this and see if it is right for you. I can't fault the outlets for my lack of knowledge. They look great and we haven't had a problem with them at all since installing them in our RV.
M**N
Great for old camper
Replaced all outlets in old camper, worked great
R**M
Looks nice, functions well, but very difficult to install
Once installed, the outlet is great. It might have helped to have some kind of template for cutting the hole. Mine was a new installation as opposed to replacing an older defective one. I suppose if one had the recommended tool for attaching the wires, it would have been quite easy. For the do-it-yourselfer that likes to put time out camping instead of working on the camper, this might not have been successful. I found it ridiculous to purchase a tool to install one outlet. I was able to get the job done by sandwiching the plug between two pieces of wood and compressing the whole thing in a six inch C-clamp which I just happened to have. I tried many other methods of getting the wires crimped into the plug to no avail. In all, it took about two hours to install, part of which was figuring out how big and what shape to cut the hole where I mounted it (thus the comment that it would have been nice to have a template). The rest was getting the romex wire attached to it. Actually mounting it to the wall was easy. Overall, it was worth the effort because now my Coleman 17B has a 120V outlet under the table to use with my computer, bug zapper, or blender on the table.
J**T
OEM direct replacement
For what it's worth - Strange way to connect 120v wiring but this is what the RV factories use.
G**.
Rv outlet
Easy install, perfect fit in the thin walls of your RV. Good quality ๐
B**C
Replacement Outlet
One of my outlets in the RV just stopped working, this replacement worked will and was easy to install
A**R
Bon produit
Facile ร installer
N**N
Good quality.
Works As described.
T**S
Prefect For My RV!
These are perfect replacement receptacles for your RV or for adding an additional plug in those much needed areas. Price is much better than dealer for what looks and feels like the exact same thing. Ordered a couple of these.
Trustpilot
1 month ago
2 weeks ago