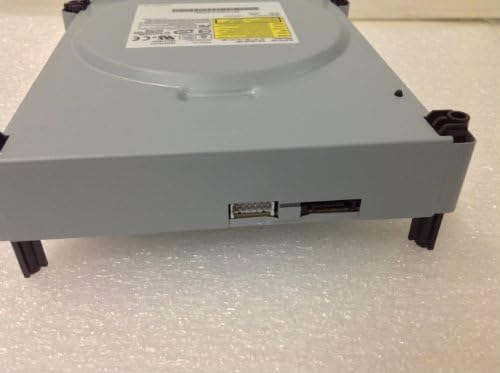
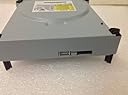
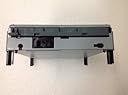
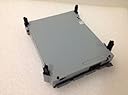
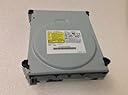
Original DVD Drive Replacement Part Model DG-16D2S for Microsoft Xbox 360 Xbox360 by Honglei
Product ID: 1142427
✅Factory quality tested
📦Compatible with Xbox 360
🔧Refurbished with new parts
Desertcart purchases this item on your behalf and handles shipping, customs, and support to USA.
🎮 Upgrade Your Game, Elevate Your Play!
The Original DVD Drive Replacement Part Model DG-16D2S for Microsoft Xbox 360 by Honglei is a fully refurbished component, equipped with new parts and rigorously tested to ensure it meets factory quality standards. This drive is designed for seamless compatibility with the Xbox 360, making it an eco-friendly and reliable choice for gamers looking to enhance their console's performance.
| Best Sellers Rank | #17,922 in Video Games ( See Top 100 in Video Games ) #242 in Xbox 360 Accessories |
| Customer Reviews | 4.0 out of 5 stars 813 Reviews |
D**G
Do Your Homework: Dg-16d2s Phillips Lite-on Drive for Xbox 360
Let’s get a few things straight. If you don’t do your homework you will either buy the wrong drive andor install it incorrectly. Yeah, this is like school. If you want to succeed you need to do your homework.This is not busy work, this is work required to succeed in fixing your X-Box if you are willing to put insome time and effort. You may even learn something about yourself.It was determined on my son's X-Box that both the drawer and laser were not working correctly. Thedrawer was malfunctioning (stuck in and/or out) and booting up games seemed to take longer, evenwith new game discs. Replacing the X-Box was too expensive and a self-repair was required.Let’s go over what you need to do to correctly identify your X-Box drive and what options there arefor installation.(1.) Determine if Drive Needs Replacement. There are lots of videos or articles that can help identifyand fix problems with your X-Box, i.e., laser replacement. Seek those out and see if a less invasivesolution is a better solution. If those solutions don’t seem to be applicable, or do not work, move on tonumber 2.(2.) Identify Drive Brand and Model: There is a sticker on the drive with the info you need. Openthe X-Box to find the correct drive model. There are about 6 different models in X-Boxes currently.(3.) Search the Web. Use the phrase, “installing Phillips Lite-on X-Box drive” or a similar phrase.At least 3 videos will pop up that will explain how to replace the drive. View each one and see whichwill help you understand the installation process. Bookmark the one that speaks to you; you will needit during installation. There will also be numerous pages that will detail what tools you’ll need.(4.) Review the Process of Installation. Yes, more review homework.(5.) Determine Which Option to Use (so your drive will play games). Go to the WWW and perform asearch to find the most articulate article or video that speaks your language and bookmark or print itfor future use.- A.) Option 1: “flash” the drive’s firmware to transfer the “key” from your Old drive to your New drive.This is what makes your New drive able to play the games.- B.) Option 2: remove and replace your New drive’s circuit board with your Old circuit board that hasthe correct "key" already installed. [ I did this because there is very little soldering required to uninstalland reinstall the circuit board. Make sure you buy the correct solder specific to electronic work. ](6.) Amass All Tools and Instructional Info. Dependent upon your work-space space it is a good ideato have your work in front of the computer screen. It is very helpful as you move through the process.I was able to stop and start the video as needed. Once all your info and tools are together it may takeyou 1 to 2 hours to perform the operation.--- The Review ---Once installed the Phillips Lite-on drive performed flawlessly. No problems, no issues and it is so muchquieter too. I was amazed at how much faster the drive booted up each game. It appears the New driveis not faster but that the Old drive, due to aging, had slowed down and was not as efficient. I don't knowif this was due to the laser or for mechanical reasons, possibly both. 5 Stars for the drive and 5 stars forme because it worked perfectly for the past 2 years and it is reasonably priced.So, if you do some homework, become familiar the work required, and have a couple hours to spare youtoo can replace your drive. If you did not do your homework don’t blame the drive or the vendor.
C**S
Another Xbox 360 salvaged from the trash heap
*Mostly* a drop in replacement for a broken Xbox 360 dvd drive. Picked up a white 360 from a thrift store for $5, being sold as a red ring failure. Turns out, it boots just fine but the DVD drive was a mess. Someone had cracked the tray, and broke the spindle off when they tried to "repair" it as best as I could tell. I tried gluing the tray and spindle, but at that the spindle was off just ever so slightly (one heck of a DVD wobble). At that point when it still wasn't working, I could have replaced the laser lens, and saw if that was the problem, but I had a feeling the wobble might have also interfered and that would have led to a new motor. In the end, the best option was to just replace the whole thing.I said *mostly* a drop in replacement... long story short for someone hearing about this for the first time... dvd drives and xbox 360 motherboards and encoded in the firmware to be paired up, and if the "tags/keys" don't match up, it won't play games. There are two solutions... extract the firmware, and flash it to the new model. The other option is to swap the boards inside the DVD drives. I'm pretty handy with a soldering iron, so that was the simplest and quick options for me. I want to say it was all of 5-6 wires I had to solder? Wasn't bad.Now is this what you need to get yours running again? Maybe not. If all else looks intact, you might be able to save a few $$$ with just getting the lens as it seems they go pretty easily. Only way to really know is to crack in open and visually inspect the parts. Then again, if you want a sure thing so your project doesn't drag out for a few days (open, fix and close in the same day), this is the way to go.A month in, still working fine.
C**R
Buyer Beware - NOT plug-n-play and cannot be 'unlocked' by vendor
I received this today. I have installed in in my xbox and have 2 issues:1) The product arrived damaged. One leg of the drive was snapped. I rigged a support to hold it and installed.2) The original ad stated this was ready to install, with PCB board installed and unlocked. The unit does NOT play games. It reads game discs as regular DVDs. This implies I either need to change out the board (which requires soldering in this model) or flashing the firmware, which I am not set up to do.Something fishy is going on here. I do not know that the seller who fullfilled the order (GameRiza) is at fault. When i click on the item under 'my orders' another unit from a different seller comes up. The description on that ad does not match the description I was viewing when I made my purchase. I did find an ad that matched what I purchased, but there are no ratings for that vendor, which Amazon calls 'Just Listed.' Checking the item from 'my orders' again brings up a THIRD vendor. I believe Amazon to be at fault here for not policing the vendors fulfilling the orders, or placing the deceptive ad which I originally made the purchase from. I did some additional investigation and discovered that it is NOT POSSIBLE to 'unlock' these drives do to a plug-n-play replacement in an Xbox. These drives require flashing the internal card, which is not something the average person can do (requires special cabling/software/skill). Older drives are serviceable such that the card can be swapped from one unit to the next, but this is not one of those drives (unless your circuit board soldering skills are TOP NOTCH)
A**R
Works great
Perfect replacement
Trustpilot
2 months ago
2 weeks ago